Setting Up Two-Factor Authentication
Where to start
There are two parts involved in two-factor setup:
- Part one: Choose how you’ll generate codes
- Part two: Add two-factor to your TMU account
Part one: Choose how you'll generate codes
You have the option of using a mobile device or using a FIDO2 or universal second factor (U2F) security key.
TMU employees may also choose to use a one-time verification (OTV) code generator.
If you’re using a mobile device
You’ll need to install the Google Authenticator app on your device. Do not delete Google Authenticator once installed, as you’ll need it for the entire duration of your time at TMU.
This option does not use text messaging, mobile data or WiFi to operate.
On your Android device, open the Play Store app.

Search for Google Authenticator.
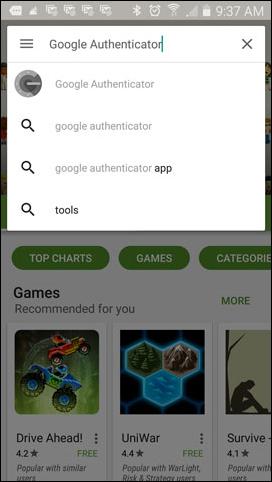
Tap the Google Authenticator option in the search screen and then tap Install.
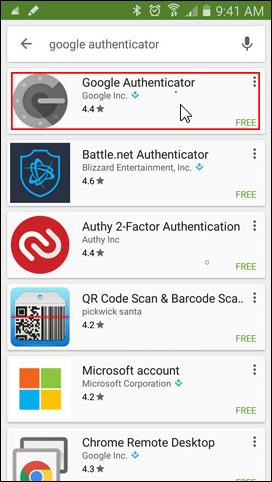
When asked to authorize Google Authenticator to access information on your device, tap Accept if you wish to continue. You’ll be returned to the app screen. Press the back button to return to your home screen.
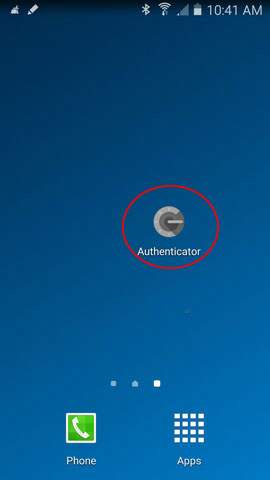
The Authenticator app should now be on your home screen. Tap the icon to run the app.
Once this is complete, you can start Part two: Add two-factor to your TMU account.
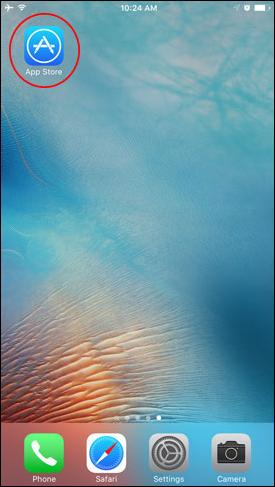
On your iOS device, open the App Store.
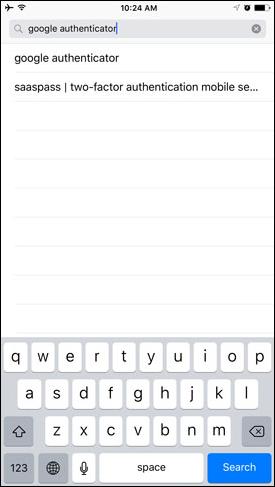
Search for Google Authenticator.
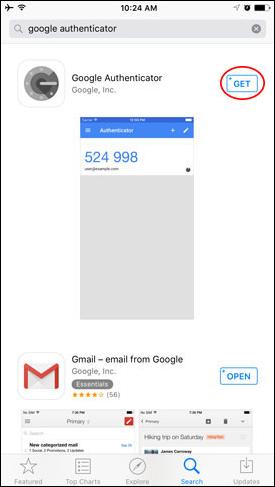
Find the Google Authenticator option in the search screen and then tap GET.
Tap the INSTALL button.
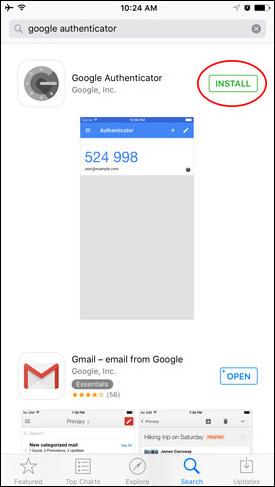
The Google Authenticator app will now install and create an icon on the main screen of your iOS device. Tap the icon to run the app.
Once this is complete, you can start Part two: Add two-factor to your TMU account.
If you're using a FIDO2 or U2F security key
FIDO2 or universal second factor (U2F) security keys are USB devices that can be plugged into your computer to provide authentication for two-factor logins.
The least expensive model is likely the HyperFIDO Mini which normally retails for around $12 and can be purchased online or at the TMU Campus Store. Please note that security keys work with most modern browsers.
TMU employees can check with their faculties or departments for approval purchasing a U2F key.
Once you receive your key, you can start Part two: Add two-factor to your TMU account.
If you’re using an OTV code generator
One-time verification (OTV) code generators are small devices that provide authentication codes for two-factor logins.
Available only to TMU employees, you can check with your faculty or department for approval purchasing an OTV code generator from CCS for $30. They can be requested using the One-Time Verification (OTV) Code Generator Request Form on the CCS website.
Once you receive your key, you can start Part two: Add two-factor to your TMU account.
Part two: Add two-factor to your TMU account
Mobile device setup steps are also available in an easy-to-follow video format.
- Using your computer, log in to the my.torontomu portal with your username and password.
- In the Self Service box, select Personal Account.
- Under the Security section, select Two-Factor Authentication.
- Under the Mobile Devices heading, select Add mobile device.
- Select Android or iOS, depending on the type of device you’re using.
- Since you've already installed Google Authenticator, skip ahead to the section called Next, open and configure Google Authenticator.
- Follow the prompts in the section—note you'll need to complete all the steps, including entering your verification code on the page and clicking the verify and save button at the bottom.
- Once your mobile device is set up, a page about backup codes will appear. Select the Generate new backup codes button.
Backup codes are one-time-use codes you can enter if you’re unable to access your mobile device, or if it’s lost or stolen. We recommend printing or writing down these codes and keeping them in a safe place where you can easily retrieve them when needed.
You’re all set! Now you can log in to your TMU account and provide verification codes whenever asked. Remember—don’t delete Google Authenticator as you’ll need it each time you’re asked for a code.
Need more? Check out tips on:
- How to use two-factor; or
- The optional feature of adding your biometrics for two-factor logins, which may be particularly helpful for those with disabilities affecting dexterity or motor functioning.
- Using your computer, log in to the my.torontomu portal with your username and password.
- In the Self Service box, click Personal Account.
- Under the Security section, click Two-Factor Authentication.
- Under the Security keys and biometrics heading, click Add key or biometrics.
- You'll be taken to a new page and a new window will pop up. In this pop up window, you’ll have the option of customizing a name for the key (a useful feature if you plan to set up more than one key).
- Select the Add key or biometrics button and follow the prompts. Note, if the security key is not blinking, it may be inserted the wrong way. Try turning it over and reinserting.
- When the key is successfully detected and added, click the Close this pop up window button.
Backup codes are one-time-use codes you can enter if you’re unable to access your security key, or if it’s lost or stolen. We recommend printing or writing down these codes and keeping them in a safe place where you can easily retrieve them when needed.
Note if you’re using Firefox, you’ll need to have version 57 or newer and configure the browser to accept U2F keys by following these steps:
- Type about:config into the address bar at the top of the Firefox browser window.
- A search bar will appear. Type in U2F and press enter.
- Double-click on security.webauth.u2f to activate U2F support.
You’re all set! Now you can log in to your TMU account and provide verification codes whenever asked. Need more? Check out tips on:
- How to use two-factor; or
- The optional feature of adding your biometrics for two-factor logins, which may be particularly helpful for those with disabilities affecting dexterity or motor functioning.
OTV setup steps are also available in an easy-to-follow video format.
- Using your computer, log in to the my.torontomu portal with your username and password.
- In the Self Service box, select Personal Account.
- Under the Security section, select Two-Factor Authentication.
- Under Set up two-factor authentication for your account, select the Set up link next to the One-Time Verification Code Generator option.
(If you’ve previously set up a mobile device authenticator, you’ll have to revoke it first before setting up the OTV code generator. Visit the revoking two-factor authentication section of the Two-Factor Authentication page for help on this topic.) - Follow the steps for registering your assigned one-time verification code generator.
- Turn on the code generator and enter the number displayed into the Code field, then select Verify and Save.
- At this point, a link to Show/Generate Backup Codes will appear.
Backup codes are one-time-use codes you can enter if you’re unable to access your OTV generator, or if it’s lost or stolen. We recommend printing or writing down these codes and keeping them in a safe place where you can easily retrieve them when needed.
You’re all set! Now you can log in to your TMU account and provide verification codes whenever asked. Need more? Check out tips on:
- How to use two-factor; or
- The optional feature of adding your biometrics for two-factor logins, which may be particularly helpful for those with disabilities affecting dexterity or motor functioning.