Rubrics: Complete a rubric evaluation
Once you have created a rubric, you will need to attach it to an appropriate assessment.
Rubrics can be attached to the following types of assessments:
- assignment submissions
- grade items
- graded discussions
- Written Response (WR) questions within a quiz
Note: If you are using the Assignments, Quizzes, or Discussions tool(s) for your assessment, we very strongly recommend that you attach the rubric to that assessment, and always grade through that assessment, rather than the grade item. This will ensure that you and your students see grades and feedback in a consistent way.
You cannot make structural changes to a rubric once you start grading, so make sure to review the rubric for accuracy, then make sure that you change the status of your rubric to 'published' before proceeding.
Find Rubrics in the Course Admin. If it isn't there, review how to enable course tools.
Be consistent! Once you decide to use a rubric in a specific tool, be sure to consistently grade all students using the same method. Do not grade some students in the gradebook, and some in a rubric, or you will risk overwriting/losing your work.
You can use a rubric to grade an assignment. Here is a sample of an assignment-based rubric assessment.
Once you decide to use a rubric in the assignment, make sure that you consistently grade all students in the assignment. Do not grade some students in the gradebook, or you will risk overwriting/losing your work.
Note: Your criteria descriptions can contain up to 500 characters, but when you are grading using the rubric, you will initially only see the first 3 lines of text. If your description is longer, you will see a "more" link. Click on it to view the full description.


Find your assignment by going to Assessment > Assignments. You should see the list of current assignments.
Click Edit Assignment in the contextual menu next to the assignment you wish to add a rubric to. You can also follow these steps as you create a new assignment.
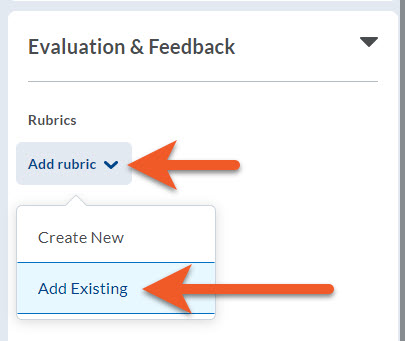
On the right side of the page, click on Evaluation & Feedback to expand the panel, then under Rubrics, click Add Rubric.
Preferred process:
If you wish to grade the assignment using a rubric, it’s best if you go to the Rubric tool, and create the rubric, then return here to connect it.
If you have previously created your rubric in the Rubrics tool in D2L (highly recommended!), and you are ready to connect your rubric to the assignment, click on Add rubric > Add Existing.
Alternate process:
Or, you can click on Add rubric > Create New, and follow these instructions to create your rubric. When you are done, you will return to the assignment settings.

In the popup, you will see a list of rubrics that exist in this course shell. Select the checkbox to the left of the rubric(s) you wish to use.
NOTE: It is possible to have more than one rubric connected to an assignment, for example, if students have a choice between two options for the assignment. However, when grading, you will need to choose which rubric to use to grade each student’s assignment.
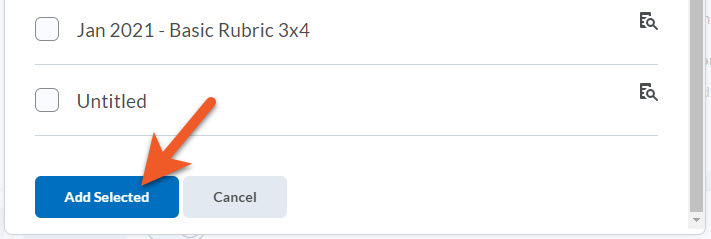
At the bottom of the popup, click on Add Selected, to connect the rubric with your assignment.
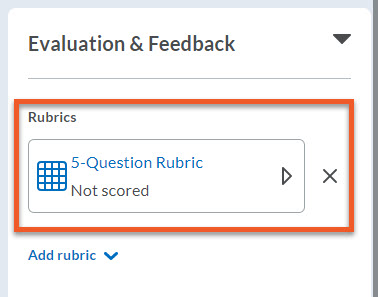
You will now see your rubric in the Evaluation & Feedback panel. If you made a mistake, click on the X to the right, to remove the rubric.
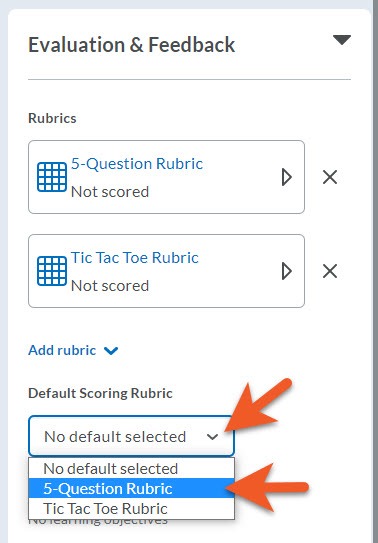
If you have added more than one rubric for this assignment, and you anticipate using one of the rubrics more often than the other(s), click on the Default Scoring Rubric dropdown, to select which rubric should be the default.
Remember to click on Save and Close to save the changes to the assignment.

1. Click on the name of the assignment which you wish to assess.

2. If desired, click on Show Search Options, and use the search or filter functionality to sort submissions by user, group or section.
Scroll down to view a list of submissions from users.
Click on either the file name, or the Go to Evaluation link to the right of the assignment submission you wish to mark.

3. If you don't see the document load right away, click on the name of the student's submission to load the assignment into the main window pane.
Scroll to read and review the assignment.
4. If you have associated a rubric with the assignment, it will be available at the top of the right-hand pane. Click on the name of the rubric you wish to use to evaluate this assignment. The rubric will expand in the pane.

5. a. To mark the assignment, click on the appropriate level for each criteria. Please be sure to click on the level; using it as a slider will not register a graded value.
b. Assigned points will appear directly below each criterion, and will be totalled in the “Overall Grade” box. While you can manually edit this score, please be aware that if you do this, the score for the assessment will not match the rubric. If the rubric is visible to the student, this will raise questions.
c. If you wish to award a score that is not the default for a level, you must first click to choose one of the levels, then click on the numeric score below to edit the score. You can see the available range for a given level immediately below, once you have clicked on it.
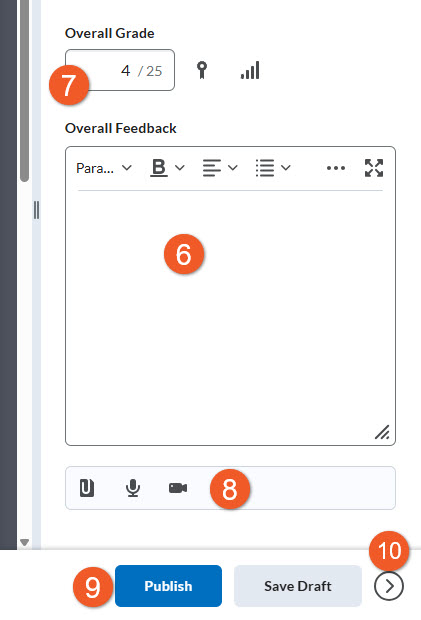
6. You may now provide written comments in the Overall Feedback box, if you wish. D2L recommends including feedback here, rather than in the rubric, as this will be easier for the student to see.
7. In the Score field, you will now see the assigned grade for this assignment, which has transferred from the scored rubric.
While you can manually edit this score, please be aware that if you do this, the score for the assessment will not match the rubric. If the rubric is visible to the student, this will raise questions. For example, if you add bonus marks or deduct points for late submissions, please include an explanation in the Overall Feedback field.
8. Feedback can also be provided as an uploaded file, or as audio or video recorded directly into the platform.
9. When all feedback has been provided, including a score for every criteria in the rubric, click at the bottom of the page to Publish to push grades and feedback to the gradebook or Save Draft to keep working without publishing the grades (will need to be published later)
When publishing, if you have not scored all criteria, it will be noted in a pop-up. If you have scored all levels and receive this message, select Continue Grading and review to ensure that each criterion contains a checkmark, or you can choose to delete your partial grading progress.
10. To proceed to the next student, click on the right-facing arrow, located in the lower-right corner of the page.
Or you may click on Back to Submissions (in the upper-left of the page) to return to the main page to view this assignment's list of submissions.

If you are grading a very long rubric
If you are grading a very long rubric, which has dozens of criteria, it can be quite monotonous and time-consuming to click a score for each and every criteria.
It is possible to score those criteria that have earned a score somewhere between the highest and lowest option, and then set all ungraded items to either the maximum or minimum score.
To do this:
- Click on the "..." or the down arrow beside the name of the rubric (depending on whether you are viewing the condensed rubric, or the expanded version in a popup window).
- Select either "Set Ungraded to [name of top level]" or "Set Ungraded to [name of lowest level]".
NOTE: If you have not graded any criteria yet, this will say “Set all to…”. - All criteria that were previously ungraded for this student will now indicate the score you selected, and the grade for the assessment will be updated.
Warning: if you choose to do this, please use extreme caution and take time to review the grades, as it's very easy to accidentally give the student a much lower or higher score than you intended.
You can use a rubric to grade a discussion topic. Here is an example of how it can be used.


1. Find your discussion topic by going to Communication > Discussions. You should see the list of current discussions.

2. Using the dropdown context menu, click Edit Topic next to the discussion topic you wish to add a rubric to. You can also follow these steps as you create a new discussion topic.

Also, if you haven't already, this is the perfect time to associate (or create) a grade item and include the Score Out Of value. Note that this value should be the same as the total in your rubric and the Maximum Points in your grade item. If these values are not the same, there will be problems with the scores you give students.
3. Click on the Evaluation & Feedback panel on the right side of the screen to expand it.
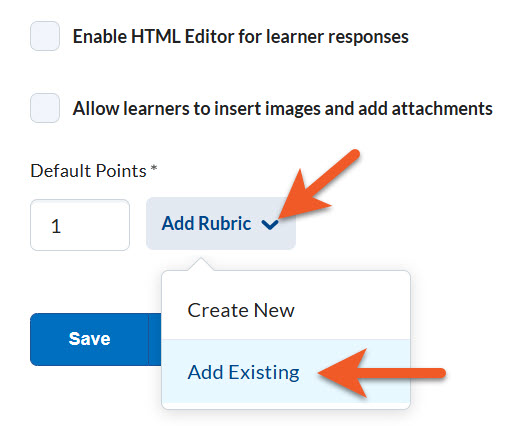
4. Click on Add Rubric. to see the available options.
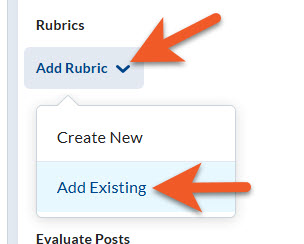
If you have already created the rubric, choose Add Existing.
If you have not created the rubric yet, click on Create New, to open the Rubrics tool and use our instructions to create your rubric. We strongly recommend creating your rubric first.

Click the checkbox next to the desired rubric(s) to select.
Click on Add Selected. This will close the popup window.
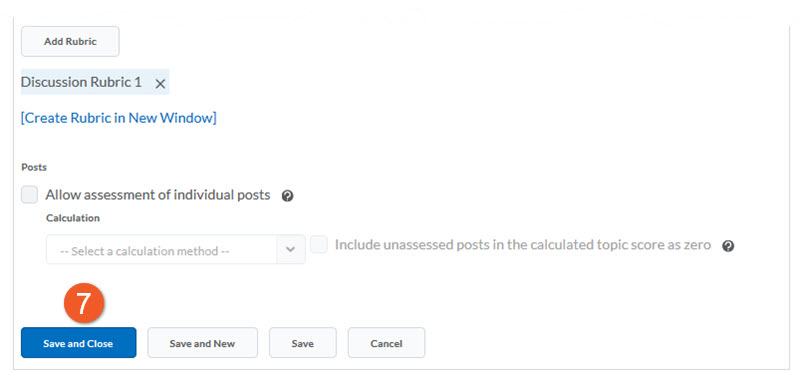
You can now see the attached rubric in the Evaluation & Feedback panel.
Click on Save and Close or Save to save your work.
Next, follow these steps to assess discussion participation with the rubric:
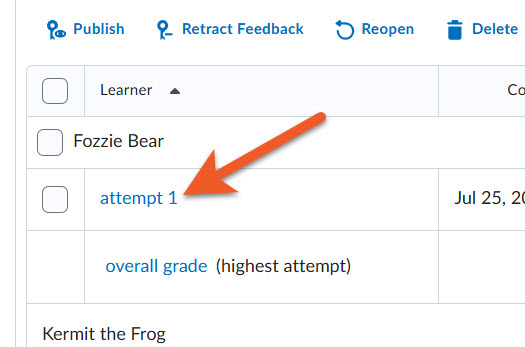
When evaluating student participation in a discussion, click on the contextual menu beside the discussion topic name, and select Assess Topic.

To assess a particular student, click on the link located just below the student's name. This link may say “Topic Score” or the name of the rubric.
You will now see the evaluation page for this student. It looks very similar to the evaluation page for assignments.
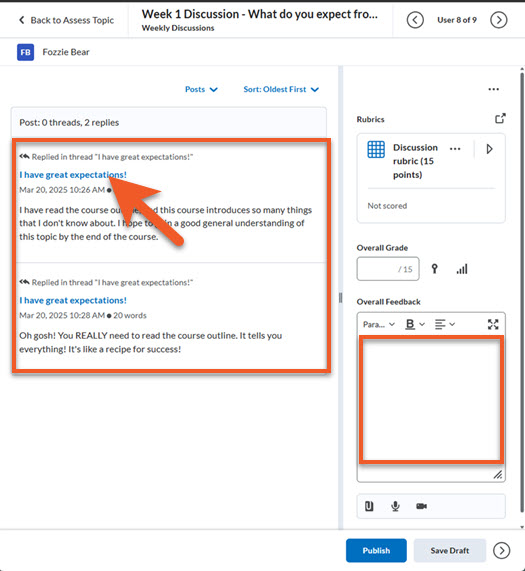
In the left panel, you can read the student's contributions to the discussion. Click on the thread name (blue text) if you wish to read the full thread, for context. It will open in a new tab in your browser.
In the right panel, you can see the rubric, Overall Grade box and Overall Feedback. If you will be grading using the rubric, do not enter anything into the Overall Grade box. This will be automatically updated when you use the rubric.
You can enter comments into the Overall Feedback field either before or after you grade the student.
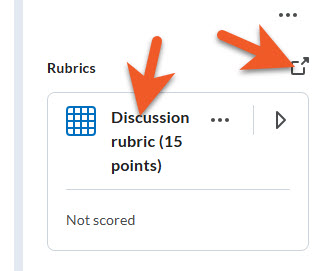
If you have a small or simple rubric, click on the rubric name to expand it in the right panel, and grade by clicking on the levels for each criteria. Otherwise, click on the "popout" icon to open the full rubric in a separate popup window.
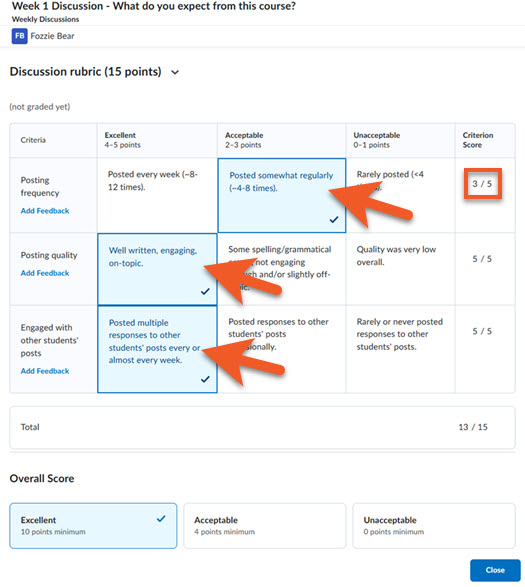
Grade in the rubric (either in the right panel or in the popup window) by clicking on the appropriate level for each criteria. Assigned points will appear below or in the right-hand column.
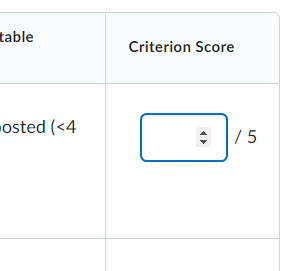
If you wish to award a score that is not the default (but within the range) for a level, click to choose the level, then click on the score in the right-hand column to edit the score by either using the up/down arrows, or typing in the desired score.
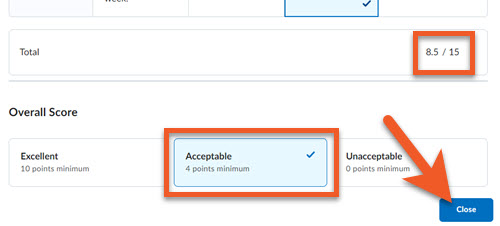
As you grade in the rubric, you will see the "Total" update, located below the main part of the rubric, and you will see the "Overall Score" level updated.
When you're done grading, click on the Close button to close the rubric popup window.
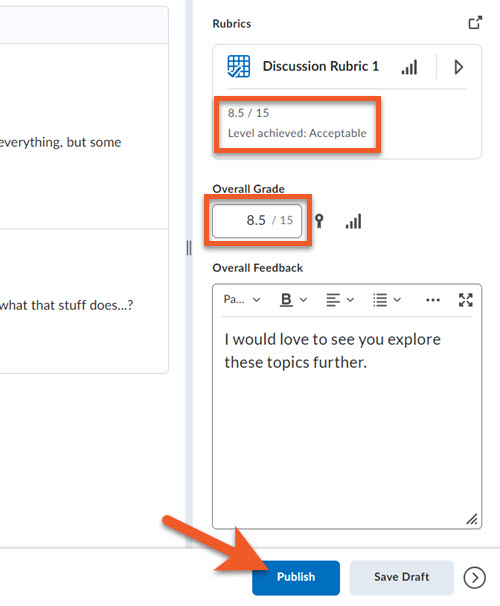
Back on the evaluation page, note that the rubric information has been updated to reflect the student's grade, and the Overall Grade box now contains the student's mark for this assessment.
If you wish, and haven't done so yet, you can type some feedback in the Overall Feedback box.
If you are finished grading this student, you can click on Publish, or if you wish to review again later before releasing grades, you can click on Save Draft, but note that the grade will not appear in the gradebook until you publish it.

1. Go to Grades > Manage Grades.
2. Click on the name of the grade item that you wish to attach to a rubric.

3. Make sure you are in the Properties tab.
4. Under Rubrics, click Add Rubric. If you haven't created a rubric already, you can also click Create Rubric in New Window.

5. To select the rubric(s) you wish to use to assess this item, click the checkbox beside that rubric.
6. Then, click Add Selected.
7. Click Save and Close in the main window to save your changes.

Make sure you are in Grades > Manage Grades.
1. Click Enter Grades in the contextual menu next to the grade item you wish to assess.

2. Choose the student you wish to assess first, and click on the icon in the assessment column to the right of their name.
The rubric will open in a popup window.

3. To mark the item, click on the box for the appropriate points level for each criterion.
4. If you wish to assign a score other than the default (maximum) for a rubric level, click on the score to the far right, and manually type in the assessed score for that item.
5. You may include written feedback for each criterion or general feedback, if desired, by clicking on the ADD FEEDBACK link for that item, and entering your message in the text box.
6. Click Publish to publish the mark to the gradebook and feedback, or Save Draft to keep your changes without publishing (the grade will transfer to the gradebook when you publish later).

7. You can now see the grade and percentage scheme(s) that you have assessed for this grade item. Click Save and Close or Save (at the bottom of the page) to preserve all of your updates.
You will be returned to the main Grades > Enter Grades page.
You can now attach a rubric to a Written Response question, within a quiz.
This makes it easy to provide consistent assessments. However, if you do not provide Submission Views for the student to view the quiz after it has been graded, keep in mind that they will not be able to view the graded rubric, so it will exist only for grading purposes (not feedback). They will only be able to view the rubric while writing the quiz.
Turnitin is only available in the Assignments tool, so if you need to use that service for originality checking, you should create your written response questions as a separate assignment.
Please refer to our instructions for the various tasks involved, prior to attaching the rubric to the question:
Connect an existing rubric to a Written Response (WR) question
Create a Written Response question, either in the Question Library (recommended) or directly in a quiz.
After entering the question text, points and other details, click on Add Rubric > Add Existing.
In the popup window that appears, select the appropriate rubric, and click on Add Selected.
Make sure to Save your question, and any other changes to the quiz.
You can grade a Written Response question within a quiz, using a rubric. This is a few more steps than most other quiz question types, so this is explained below.
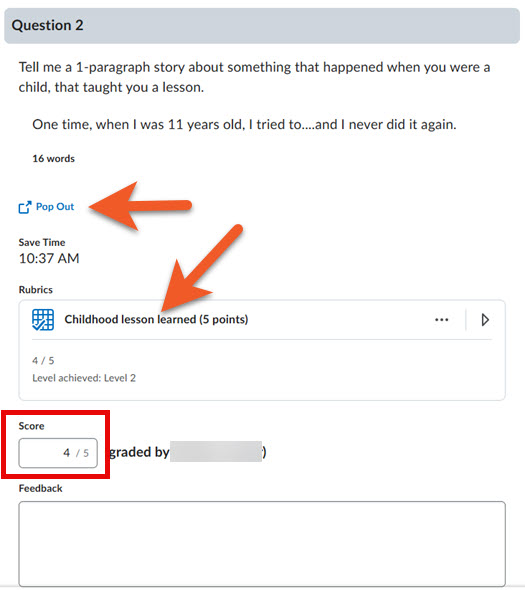
When you are on the evaluation page, scrolling through a student’s quiz attempt, and encounter a Written Response (WR) question that has a rubric connected to it, you will see the question, followed by the student’s response. Below that, you’ll see the tools you need to grade the student’s answer.
Do not enter a score into the Score field. You will use the rubric to assess the student’s work.
Click on the name of the rubric to expand it.
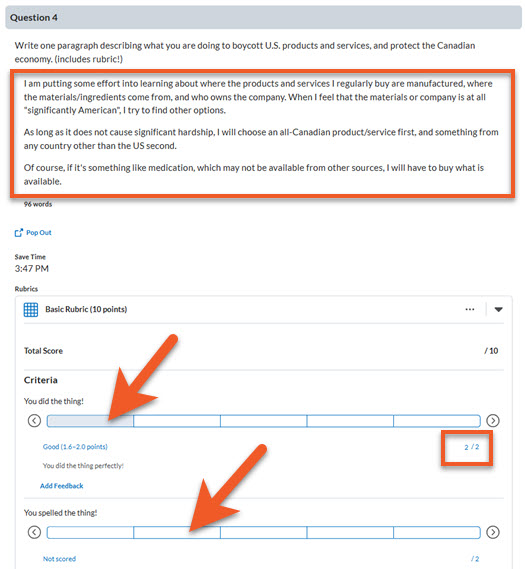
Review the student’s work, then scroll down to click on a level for each criteria in the rubric.
When you click on a level, this gives the student the maximum score for that level in that particular criteria. If you want to adjust the grade slightly within that level, select the level, then click on the score just below the bar, on the far right, and edit as needed.
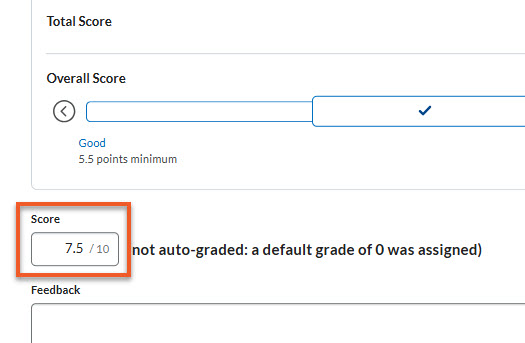
Below the rubric, you will see that the score is automatically updated as you select levels.
Make sure that you grade ALL criteria in the rubric.
NOTE: At this time, Brightspace does not appear to warn you if you miss any criteria.
Only provide written feedback in the Feedback field for this question if you will allow students to view their attempt at a later date. Otherwise, it is better to provide written feedback in either the Attempt Feedback field or in Completion Summary > Overall Feedback, to ensure the student can see your comments.
Proceed with reviewing/grading the rest of the student’s quiz attempt, then select Update in the lower-right of the page to save your work.
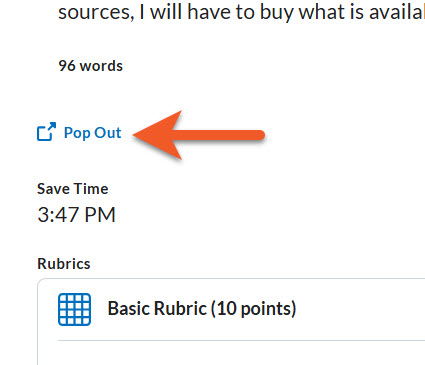
If you prefer to view the student’s work and the rubric side-by-side
If you have asked your students to write a longer essay, you may find it inconvenient to scroll up and down to review their work while grading the rubric.
If you have a larger screen, you can click on Pop Out to open the student’s work in a separate window.
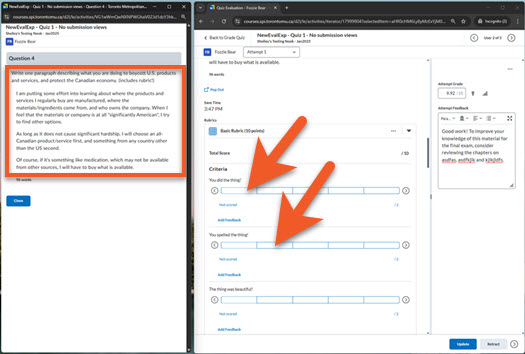
You can then move and resize the browser windows to view these side-by-side, and proceed with grading, as described above.
Close the window that only shows the student’s writing when you are done.
Currently, if you want to see statistics for each criteria in a graded rubric that is attached to a Written Response question in a quiz, it’s a little tricky to find, as this breakdown is not in the regular statistics for the quiz.
To ensure your statistics are accurate, make sure you have graded all students’ quiz attempts. If students are still writing the quiz, or haven’t been graded, your stats will not be accurate.
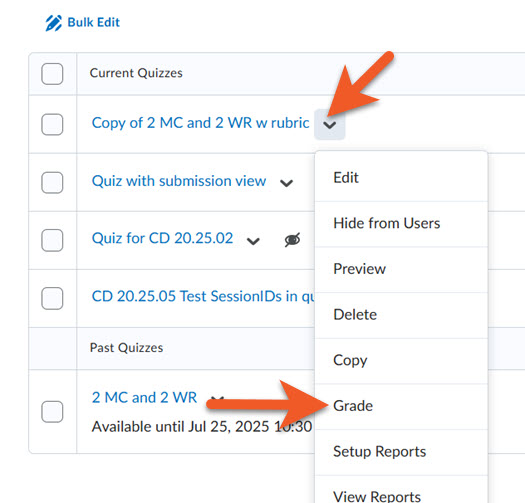
Go to Assessment > Quizzes.
Click on the contextual menu for the quiz in question, and select Grade.
In the list of student attempts, click on an attempt for a student who has a submission and has been completely graded.
Scroll down and find the Written Response question that has a graded rubric attached to it.
To the right of the rubric name, click on the “...” and select Rubric Statistics.
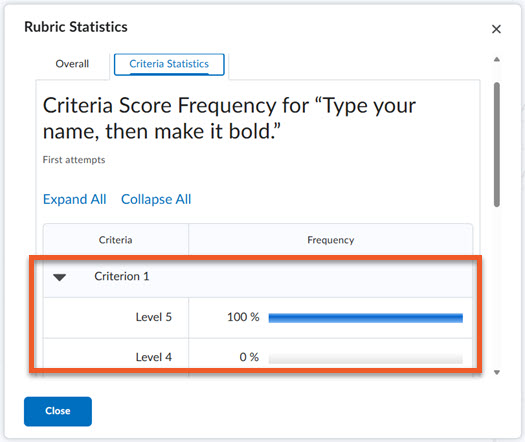
In the popup window that appears, scroll down to see the overall rubric statistics, which indicate how many students earned each overall level in this rubric, or click on the Criteria Statistics tab, to see how many students earned each level for each criteria in this rubric.
Please note that if your quiz allows more than one attempt, these statistics only include first attempts.
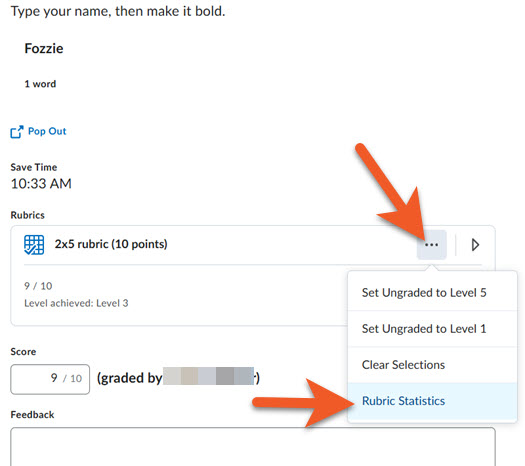
Occasionally, you may start grading using a rubric, and then realize that you’ve made some mistakes and would prefer to clear the selections, and start over.
It is possible to click on each selection again, to deselect it, but if you have a lot of criteria in your rubric, this could be time-consuming.
Simply click on the “...” beside the name of the rubric, and click on Clear Selections. This will reset all criteria for this student to ungraded, so you can start grading them again.
Text-only edits
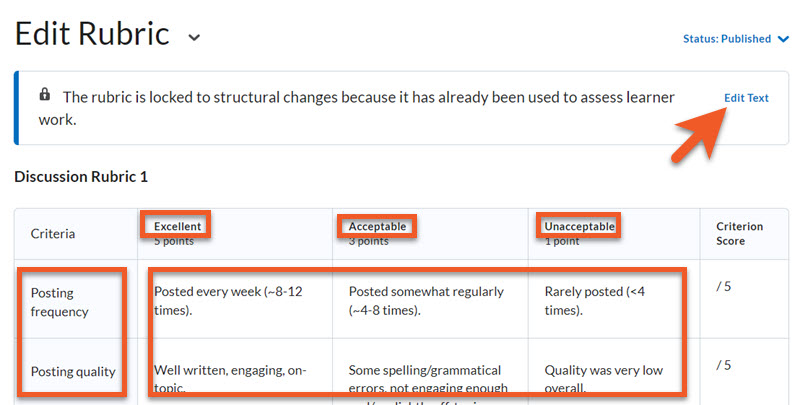
If you only need to make text edits to the criteria, level titles, or feedback after you have started assessing students, this is possible.
Go to Course Admin > Rubrics. Edit the rubric. Click on Edit Text, and make the desired changes, then close.
When you return to the assignment to assess students, you will notice that the edited version of the rubric appears.
It is not possible to edit points values, the number of levels, number of criteria/criteria groups, or any of the Overall Score details after you have started assessing students. If you need to make those types of changes, see the instructions below, for creating a copy of the rubric.

Note that while you are making text edits, you will see an "(Edited)" note appear in the fields you have changed. This is just a visual reminder, while you are working. Once you save/close the edit screen, this will disappear.
Switch to an updated rubric
You cannot make structural changes to a rubric once you start grading, but if you realize that the rubric you started grading with has problems, you can switch to an updated rubric (without losing your work, in case you need to refer to it), here's how to do that:
Go to Course Admin > Rubrics, and find the rubric you've been using.
If you want to update the rubric, to incorporate any changes/improvements, copy the old (incorrect) rubric, and edit the new version. It's a good idea to indicate the new version in the name, so it's clear which rubric you are working with.
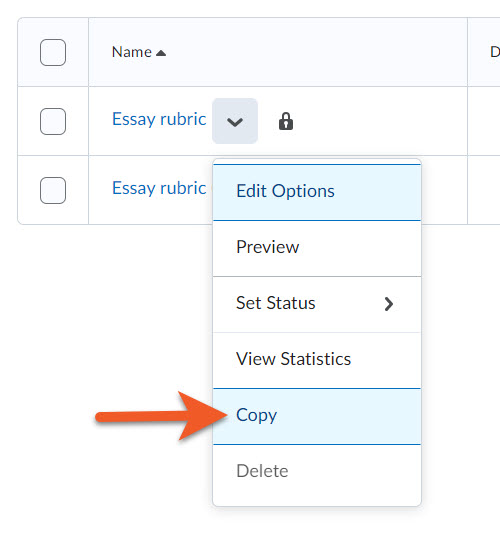
To copy, click on the down arrow to the right of the rubric name, then click on Copy.
Once you've finished fixing the new version of the rubric, make sure you change the status to Published, then close.

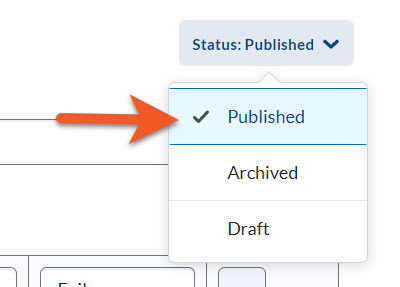
Back on the page that lists all of your rubrics, change the original rubric's status to "Archived" by click on the down arrow to the right of the rubric name, click on Set Status > Archived.
This will ensure that you cannot connect this outdated rubric to assessments in the future. You will still retain a copy of it though, and if needed, you can continue to use it to assess student submissions in the assignment it was already connected to. This also ensures that if you already started grading using the outdated rubric, you will not lose that information, can still refer to the old rubric, and can decide how to proceed.
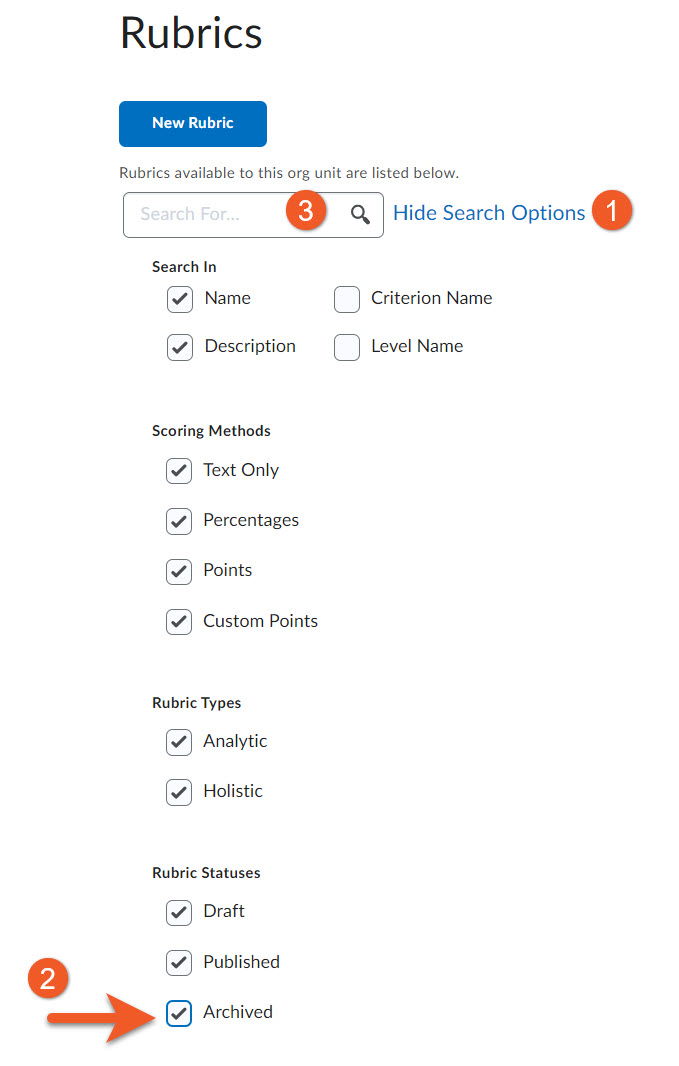
NOTE: All Archived rubrics seem to disappear from the list of rubrics, but if you need to look at any archived rubrics later:
- Click on Show Search Options.
- Select the checkbox beside Archived.
- Click on the magnifying glass icon in the search box, to update the page view. Scroll down below the filtering options, to see your updated list of rubrics.
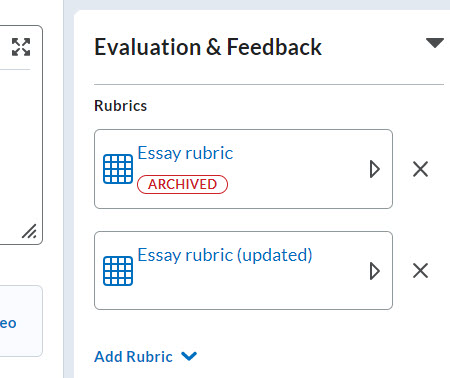
Edit the assignment, and connect the new rubric. You will notice that the assignment now has 2 rubrics associated with it. This is important, so that you retain any grading information from the original rubric and can still refer to it, if needed. Make sure to save!
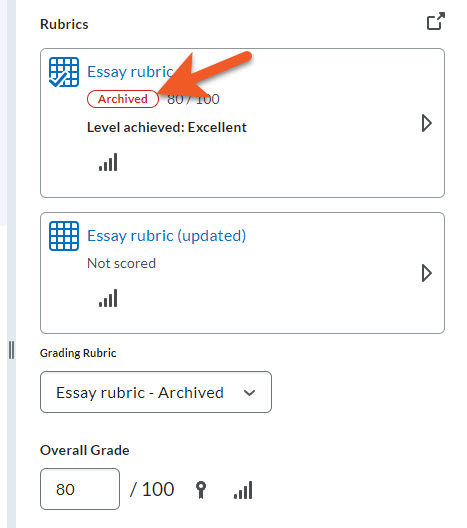
Now, you can decide how to continue grading. As usual, go to the evaluation screen for a student. You will notice that the old rubric has an "Archived" tag. Only you (and other graders) can see this. Your students do not see it. If you are okay with using the original rubric for this student, and have already graded completely, simply leave all settings as they are, and either Save Draft or Publish.
If you have only partially graded the student's submission using the old rubric, and want to finish grading with the same rubric, click on the rubric, and proceed as normal. Click on either Save Draft or Publish when you are done.
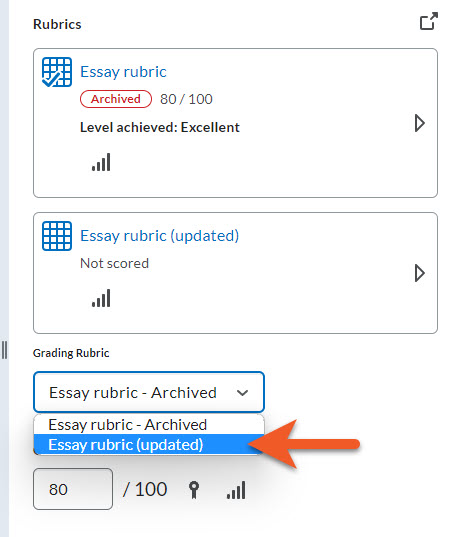
If you wish to grade using the new version of the rubric, first you need to tell D2L which rubric you are using:
- Click on the Grading Rubric dropdown, and select the new rubric. You will notice that the Overall Grade field is updated to zero.
- Click on the new rubric to mark the student's submission.
- If you want to see how you marked using the original rubric, simply click on the old rubric to expand it.
- Remember to click back on the updated rubric to proceed with grading and feedback as normal.
- Either click on Save Draft or Publish when you are done.