Enter grades and feedback (in the grades tool)
Brightspace provides a number of ways to enter grades and feedback, depending how you prefer to work, or how you have collected the data you wish to enter.
If you need to enter grades for assessments delivered via a tool in your Brightspace shell (i.e. Assignments, Quizzes, Discussions), we very strongly recommend that you enter the grades and feedback through their respective tool (instead of in the Grades tool).
Each tool offers its own set of grade and feedback management options that you will find useful.
Warning: If you are inconsistent about which tool you use to enter grades and feedback, you may find that not all feedback is visible to you and the student in the expected ways.
There are a number of different ways to enter grades using D2L Brightspace.
- directly into a grade item in the Grades tool
- into a Rubric associated with a grade item (or another assessment tool)
- into a specific Brightspace assessment (i.e. an Assignment, a Quiz, a graded Discussion)
It's important to make a clear decision about your grading workflow - and stick to it.
In general, we very strongly recommend using the grading features in the assessment tools (Assignments, Quizzes, Discussions) to grade those items, and then simply publish them to the gradebook.
Similarly, if you are using rubrics, it is ideal to complete the grading in those rubrics (either tied to an assessment tool (preferred), or to a grade item directly).
If you are not using either of those other grading features, you can just enter the grades directly into an item in the gradebook.
Be sure to consistently use the selected grading tool, otherwise you risk overwriting grades by mistake!
Also, if you wish to attach feedback files, it is best to do so via the assessment tool, or you (and your students) may not be able to see the feedback consistently.
Linked to an assessment:
If the grade originates in a Brightspace assessment (like quiz, assignment or graded discussion) please grade using that tool. If you are not consistent in how you grade these items, you risk losing or overwriting some of the grades and feedback you've entered.
Linked to a rubric:
If you have a rubric associated with a grade item, but the grade item is not associated with an assessment, make sure you grade using the rubric, and not by entering grades directly in the gradebook. The grade will automatically be transferred from the rubric into the grade item when you publish. If you only partially grade a rubric, there is currently no indication in the gradebook. You will need to click on the rubric for that student to see if the rubric is complete.
We recommend that you do NOT use Spreadsheet View, as the interface tends to make it very easy to make errors. Please use the section or group filter (if needed), then enter grades by item or category.

Navigate to the "Enter Grades" page for the grade item
- In the Grades tool, locate the grade item in question and click the arrow icon next to the title of the grade item. (This can be done in either the Manage Grades or Enter Grades view of the Grades tool).
- From the resulting menu, click Enter Grades.

Here, you can perform the following tasks:
- Enter or modify grades for each student in the Grade column.
- View the weighted grade and grade scheme value, where applicable.
- Enter and view feedback entered for this grade item in the gradebook.
- Access the assessment (such as quiz or assignment) associated with this grade item, if applicable.
Use the checkboxes to select the students for which to apply the following settings:
- Set Grades will set the same grade for all selected students.
- Clear Grades will remove the grades for all selected students.
- Exempt/Unexempt allow you to set/remove grade exemptions for all selected students.
- Email allows you to send the same email to all selected students.
If you need to exempt students from a particular grade item, this can be done quite easily using the gradebook.
Keep the following in mind:
- Exempting a student from the grade means that this grade will not be factored into their final grade calculation.
- There is no possibility to re-weight individual grade items for select students.
- The remaining grade items will reweight automatically, by removing the exempted grade from the weight entirely (see the example).
Original grade weighting:
10% quizzes
60% assignments
30% final exam
= a final grade out of 100
If the 10% quiz grade is exempted:
60% assignments
30% final exam
= a final grade out of 90 (instead of 100)
Navigate to the "Enter Grades" page for the grade item
- In the Grades tool, locate the grade item in question and click the arrow icon next to the title of the grade item. (This can be done in either the Manage Grades or Enter Grades view of the Grades tool).
- From the resulting menu, click Enter Grades.
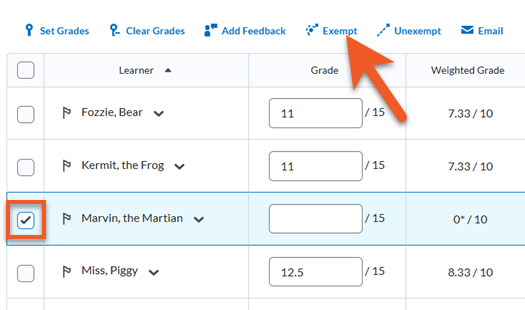
To exempt students from this grade item:
- Use the checkboxes to select the students to exempt
- Click the Exempt button at the top of the page.
Once complete, you will see visual cues to let you know which students have been exempted.
The same steps can be taken to remove exemptions, using the Unexempt button.
Be sure to click Save and Close to save the changes.
We recommend that you do NOT use Spreadsheet View, as the interface tends to make it very easy to make errors. Please use the section or group filter (if needed), then enter grades by item or category.
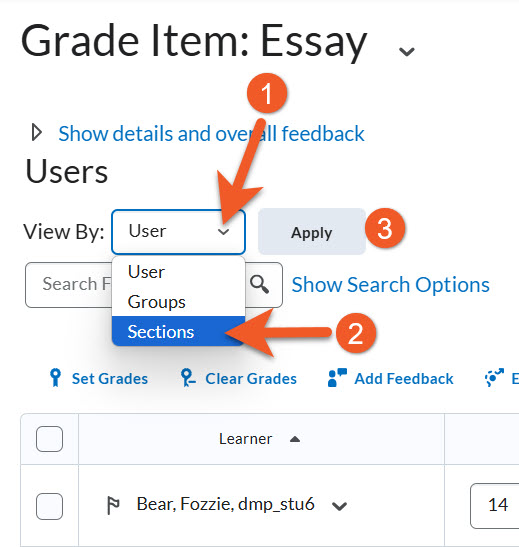
On the Enter Grades page, to view only students from a particular course section or group, click on either Sections or Groups, then select the specific section or group category, then the specific group of students that you wish to view.
Click on Apply.
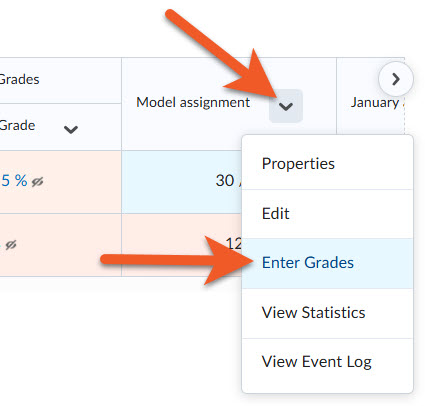
Find the column for the grade item you wish to enter grades into.
Click on the down arrow to the right of the grade item name, and select Enter Grades.
Please note: The Enter Grades page allows you to scroll horizontally and vertically to view more columns and rows. Click on the arrows in the upper right/left to scroll sideways.
If you find that you can’t see an entire column when you use the left/right arrows, scroll down to below the last student’s name, and drag the horizontal scrollbar to adjust.
Use the regular browser scrollbar to move vertically.
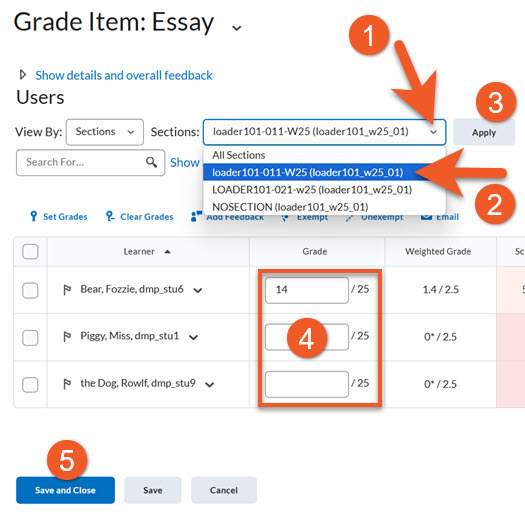
Enter the grades for students in that section. This filter can be applied when marking individual grade items, as well.
Click Save and Close OR Save. Be sure to save frequently!
Keep in mind that D2L Brightspace will often remember the last filter that you used, so if you return to the Enter Grades page (or similar pages within the interface in other tools), you may not see the full list of students.
If you see a number beside the Sections or Groups filter, click on it, then click on Clear All.
We recommend that you do NOT use Spreadsheet View, as the interface tends to make it very easy to make errors. Please use the section or group filters (if needed to narrow the selection), then select the student you wish to enter grades for.
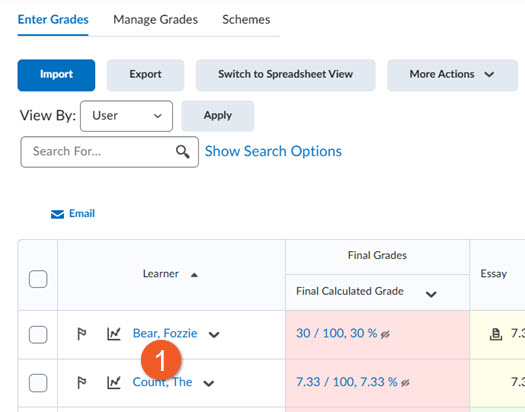
1. On the Enter Grades page, click on the name of a user.
Tip: Use the Section or Group filters, Search For field, or click on Show Search Options for more filtering choices, scroll down, or use the Next Page icon to locate a user.
Please note: The Enter Grades page allows you to scroll horizontally and vertically to view more columns and rows. Click on the arrows in the upper right/left to scroll sideways.
If you find that you can’t see an entire column when you use the left/right arrows, scroll down to below the last student’s name, and drag the horizontal scrollbar to adjust.
Use the regular browser scrollbar to move vertically.
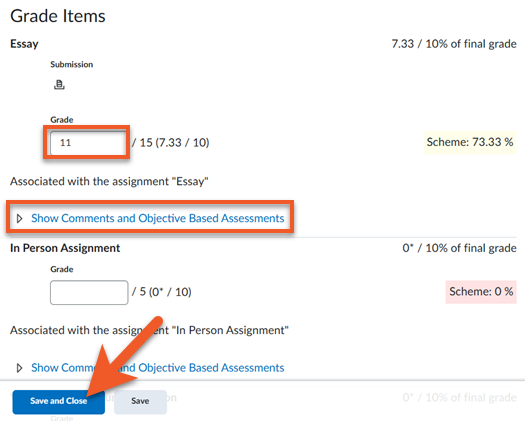
2. On the user's page, scroll down to enter grades for the user for the appropriate Grade Items.
3. Click the Show Comments... link to add feedback for the student or private comments for your records.
4. Click Save and Close or Save to ensure you don't lose your work.
In addition to the three methods described on this page, you can also import/export grades using a .csv file, if you prefer.
This method is useful if you are managing some grades outside of D2L Brightspace and need to bring them into the gradebook at some point.
Brightspace provides several places where you can add feedback, including in the assignments and grades tools.
As is the case when entering grades, if you are marking an online assessment, it is preferable to provide feedback using that tool if possible, rather than through the grades tool, as feedback entered in the grades tool, is only visible to students in that tool, which may not be intuitive for students.
There are times when it is useful to provide feedback in the grades tool. If an assessment has not been submitted online, this can be the only place in your course shell to provide comments to the student. Also, this can work well for items such as participation or other in-class activities, which do not necessarily have an online component.
It is also important to note that if an assessment was initially graded in an assessment tool, such as Assignments, Discussions or Quizzes, published to Grades, and then you need to change the score and/or feedback, it is preferable to also make the change in the same assessment tool.
Private comments
The private comments field can be a good place to keep notes to yourself about a student's performance or special situation, such as exemptions or special accommodations. This can be handy if you wish to leave advice for your teaching/grading team, or your team has questions for you or if something requires follow-up.
Keep in mind that anyone in your course shell who has grading privileges (ie. all users with Instructor, Grader or TA roles) can see these comments.
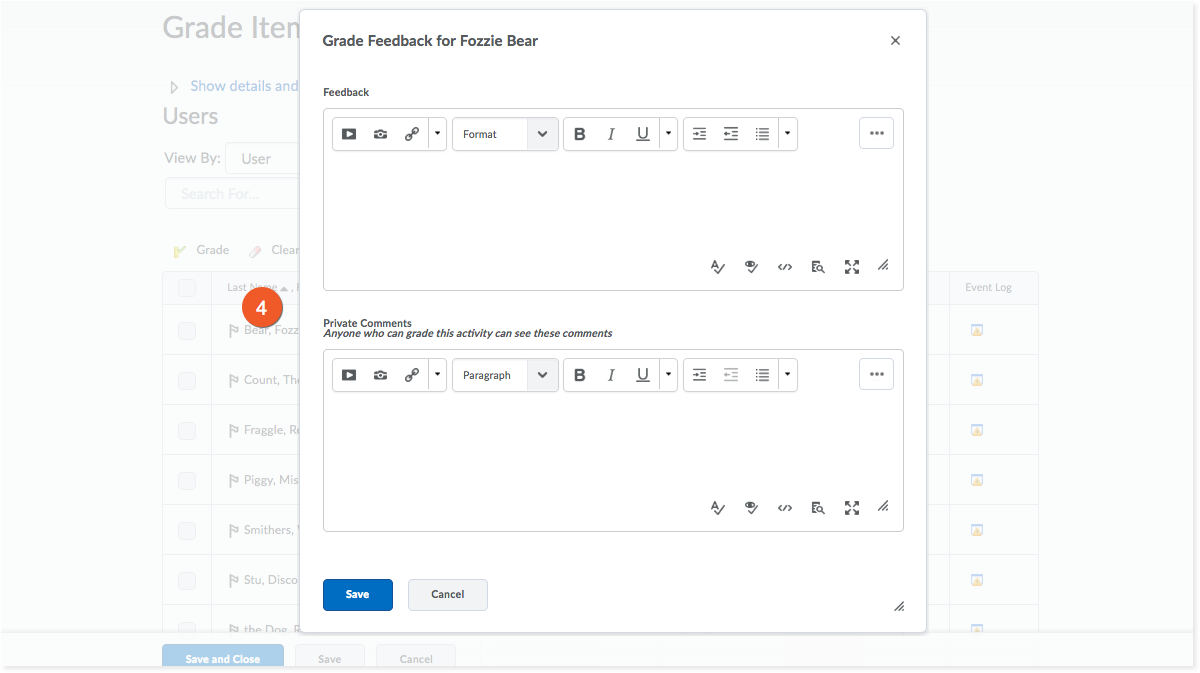
Enter comments for the student in the Feedback field. When the grade item is visible, the student will be able to read these comments.
Enter any notes to yourself or other graders in the Private Comments field. Students cannot see these, but anyone with grading privileges in the course can.
Click Save to save all feedback.
You will be able to see the first few characters of your feedback in the Feedback column, but you need to click on the feedback icon to view any private comments. There is nothing to indicate whether you have added private comments.
You can use bulk feedback to provide the same feedback to many students. We caution against using this functionality if you want or need to provide more personalized details.
TIP: This tool can come in handy as a workaround, if you've made an error, and set up an assignment incorrectly. If you intended to create a group assignment submission folder, but accidentally made an individual submission folder, which students submitted to instead. You can select the members of a group, and provide them with consistent feedback for their group submission.
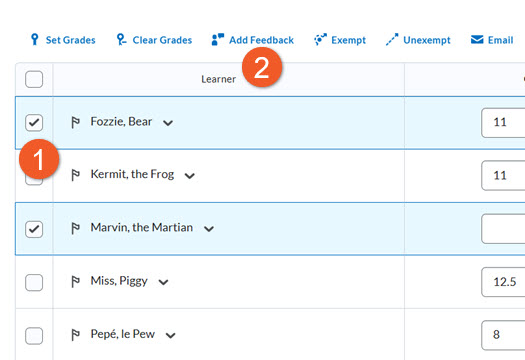
1. To add the same feedback to multiple students, select the checkbox to the left of the student names.
2. Above the list of students, click on Add Feedback.
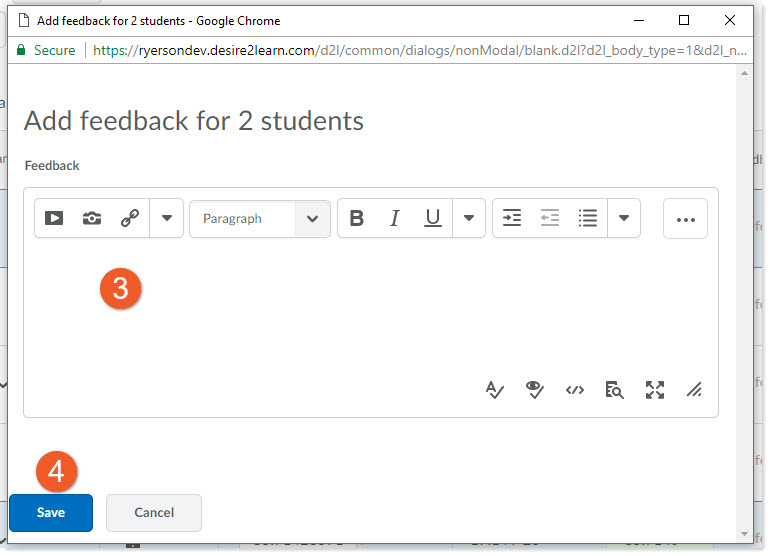
3. Type your feedback into the Feedback box.
4. Click on the blue Save button.
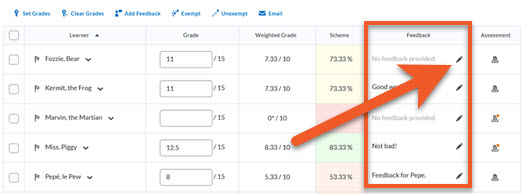
In the Feedback column, you can see the first few characters of the feedback you have added.
If you wish to add private comments, you need to do this one student at a time, by clicking on the edit icon in the Feedback column for that student.