Instructor guide
Congratulations, you have a class blog! Now what?
This guide is focused on the setup of a class blog, with recommendations for settings and approach.
Note: Ensure that you are logged into WordPress before following this guide. Having trouble? View our Login and troubleshooting guide.
On this page:
Add users/students to your blog
- Blog user roles
- Add users
- Add a class of students (for instructors)
- Add students to the blog
- What if I get an error?
- Header editing
- Site title
- Themes
- Widgets
- Plugins
- Background
- Custom menus
- Create a structure using “categories”
- Available space on your blog (file quota)
- What should I upload to the blog?
- Copyright
- Embed different types of media
- Link to a media file
- Select an accessibility-ready theme
- Learn the basics of content accessibility
- Use Sa11y to identify accessibility issues
- Further reading
- Contact
Collecting statistics using Google Analytics
Details
Integrated with D2L Brightspace?: No
Contract Start: 2017
Contract End: TBD
Before exploring this page, please make sure you have a blog. This guide is focused on the creation of a single blog that the entire class contributes to. To follow along, you will need a blog for your class.
Quick things to consider once you have a blog:
- Make sure to review the information about what you need to include in your course outline/syllabus if you are using a blog for your class!
- Be sure to provide your students with the address of your blog, and direct them to login at the admin URL, as explained in our Login guide. They should not log in at blog.torontomu.ca.
- Share the Student guide with your students, to get them started.
As the blog owner, you will be given the top-level, ‘Administrator’, role in your blog. This enables you to make any changes necessary in your blog. You may, however, wish to add other users in the blog. These users can be given access levels as great as ‘Administrator’, or as low as ‘Subscriber’ (who can only read the blog).
Before you begin
You will need to know the users’ university usernames (the part @torontomu.ca in their email address) in order to add them as a user in your blog. These users must already have an account on blog.torontomu.ca before you can add them – see the ‘What if I get an error?’ instructions below to find out what to do.
View the description of access given to each role in the blog (external link, opens in new window) , from the WordPress website. We generally recommend giving students in a class blog the ‘Author’ role.
| Role name | Responsibilities and access |
| Administrator | Somebody who can modify any aspect of the blog, the owner of the blog. CAN see all posts that are “privately” published. |
| Editor | Somebody who can publish ‘posts’, manage all posts (even ones they did not create). These users have a similar access to ‘pages’. CAN see all posts that are “privately” published. |
| Author | Somebody who can publish and manage their own posts, including uploading images. These users have no access to create or manage ‘Pages’. |
| Contributor | Somebody who can write and manage their posts but not publish posts. Also cannot upload files (including images) to the site, not their individual posts. Posts created by a Contributor must be Published by someone with the Administrator role. These users have no access to create or manage ‘Pages’. |
| Subscriber | Somebody who can view private blog posts and pages, comment, etc. These users have no access to the blog-related features in the Dashboard, and cannot create content (beyond commenting). |
Before you begin
You will need to know the users’ university usernames (the part before @torontomu.ca in their email address) in order to add them as a user in your blog. These users must already have an account on blog.torontomu.ca before you can add them – see the ‘What if I get an error?’ instructions below to find out what to do.
Add a single user
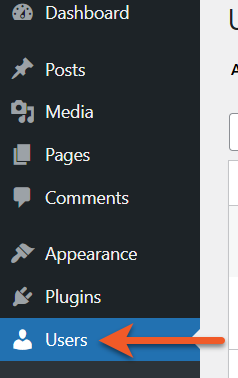
- Log in to the Dashboard of your blog.
- In the sidebar on the left, click on the Users heading.
- Click Add User from the list of options in the resulting submenu.
- Enter the user’s university username in the Username field.
- Select an appropriate role for this user to have in your blog. (See the summary of roles above.)
- Click Add Users.
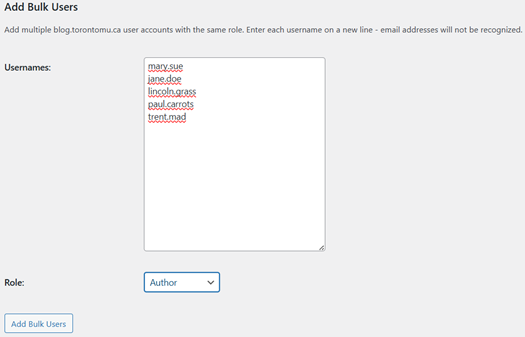
Add multiple users at once
Important: students in a shared class blog should never be given an Administrator role, as this would give them access to the private information of their classmates. We recommend the use of the ‘Author’ role.
- Log into the Dashboard of your blog.
- In the sidebar on the left, click the Users heading
- Click Add User from the list of options in the resulting submenu
- Go to the Add Bulk Users section, in the lower half of the page. You can type (or copy and paste) many usernames to be added at the same time, with the same role. Be sure to enter one username per line, and check that there are no spaces hiding before or after each username.
- Select an appropriate role for all of these users to have in your blog. The summary of roles can be found above.
- Click Add User Bulk.
As long as the username you enter was entered correctly (with no spaces at the end), and represents a user with a currently active my.torontomu.ca account, they should now be added to your blog.
If you are an instructor running a group course blog, where the students all need to be added to the blog, you will need to get all of the students’ usernames.
The best place to get this information is from your D2L Brightspace course shell for that course, as the Grades tool stores the students’ usernames.
- Be sure to select to download the ‘username’ (no other information is required).
- You need the usernames to appear one per line, with no spaces or additional characters.
- Be sure to remove any demo students.
Once you have the usernames, process using the Adding Multiple Users at Once instructions found in the section above this one.
To start, you will need to provide our blog support team with your student section numbers so that we can ensure your students have accounts on this blog network. This is normally done in the blog network. This is normally done in the blog request form, but if any sections are added to your course after the fact, you will need to let us know.
Once your students have accounts, you can add them to your blog.
For most class blogs, we recommend giving the students an “Author” role. This allows them to create and publish their own posts, without being able to edit each other’s posts. They are also prevented from making changes to the structure of the blog.
Users need to have an account on the blog network before you can add them to your blog.
If you get an error when trying to add them, please fill out the ‘Contact Us’ form and let us know the username of the person you wish to add, the role they should have in your blog, and your blog address.
Most course blogs are created so that the students can contribute – but many instructors will create posts and pages as well!
While there are different requirements for the blog assignments in each class, there are a few common elements: publish a post, select a specified category, include an image or video.
Posts are timely entries that generally display in reverse-chronological order in the blog. Most of the content of a blog is generally added as a post, and people who subscribe to your blog will get updates on new posts (but not pages).
Pages are used to display static content about the site, such as details about the concept behind the blog, the authors, etc.
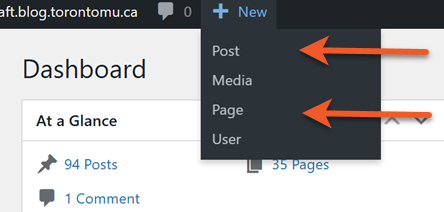
- Look at the top of the page, for the menu bar.
- Click the + New menu item, then select what you want to create (post or page).
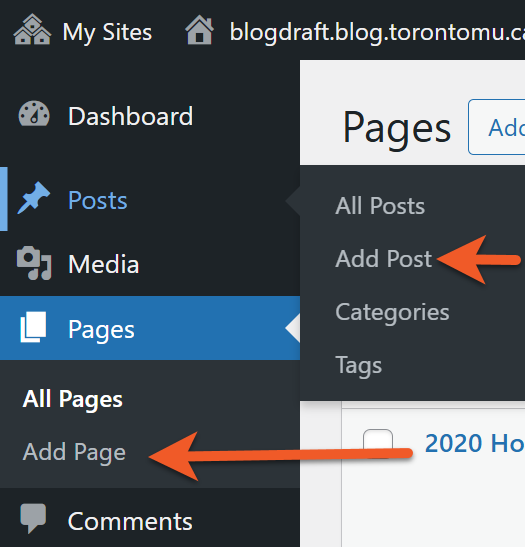
- Go to the Dashboard of your blog.
- In the left-hand menu, click either Posts or Pages.
- Click Add New.
There are many ways to customize your blog to ‘make it your own’. The following list are only a few of the options available. If you are interested in exploring more options, feel free to view these WordPress documentations.
Note: Not everything on WordPress guides are going to be available, depending on the theme. blog.torontomu may not have the theme you need to make certain changes.
Before any blog customization, always make sure you are in the Dashboard for the blog you wish to modify.
- Log in, then look in the upper left-hand corner and confirm that the title of your blog is listed there.
- If you see the name of another of your blogs, click the My Sites link.
- You will see a list of your blogs here. Click Dashboard for the one you wish to work on.
Modify the header image: Logo
Depending on the theme that you choose (see below), you may or may not be able to change the header logo. The following instructions refer to the standard Wordpress method of changing a header’s logo – your chosen theme may do it differently.
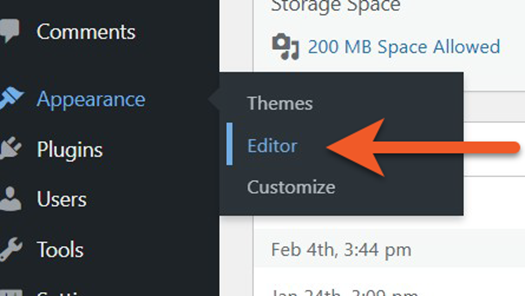
In the Dashboard of your blog, go to Appearance > Editor.
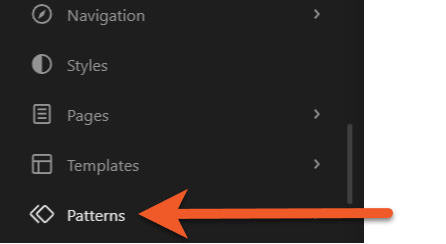
Once you’re in the Design menu, select Patterns.
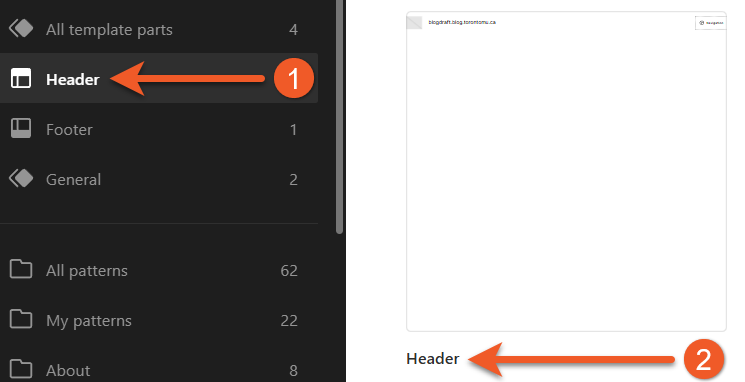
In the Patterns menu, select Header, then select the page that is titled Header.
The page that will show up will look something like the one below. Select the blue upload circle > Choose Logo.
You have two options for selecting a header logo:
- If you have already uploaded an appropriate header image to your Media Library, select Open Media Library and click your desired image. From here, click the Select button. You’ll get a preview of your image as the header afterwards. If you’re happy with how it looks, click Save in the upper right corner. If not, you can either repeat the steps or click Ctrl Z on your keyboard.
- To upload a new image from your computer, click the Upload button. You’ll then get a pop up with all the image files on your computer. However, it is important to note that if your file is not the appropriate size requirements, WordPress will not upload the image. For success, make sure your image is roughly around 525 x 525 or under. Nothing above these numbers will work.
If you are satisfied, click Save in the upper right corner to apply the logo. If not, you can start over by uploading another image. Click Replace on the toolbar OR click Ctrl Z on your keyboard.
Modify the header image: Background
In the Dashboard of your blog, go to Appearance > Editor.
Once you’re in the Design menu, select Patterns.
In the Patterns menu, select Header, then select the page that is titled Header.

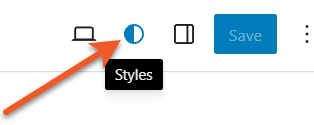
Same as the logo process, a preview of your site header will appear. Instead of clicking the header itself, look to the upper right corner and click Styles (the small half black and half white circle).
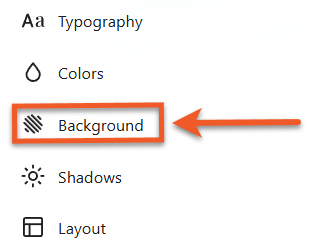
Once Styles is pressed, a menu with various options will appear on the right. Select Background.
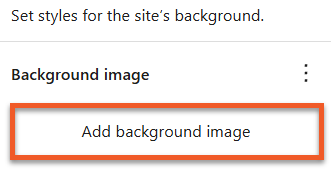
From here, press Add background image.
Depending on the theme that you choose (see the “Themes” section below), you may or may not be able to change the header background image. The following instructions refer to the standard Wordpress method of changing a header’s background.
You have two options for selecting a header background:
- If you have already uploaded an appropriate header image to your Media Library, select “Open Media Library” and click your desired image. From here, click the Select button. You’ll get a preview of your image as the header afterwards. If you’re happy with how it looks, click Save in the upper right corner. If not, you can either repeat the steps or click Ctrl Z on your keyboard.
- To upload a new image from your computer, click the Upload button. You’ll then get a pop up with all the image files on your computer. However, it is important to note that if your file is not the appropriate size requirements, WordPress will not upload the image. For success, make sure your image is roughly around 525 x 525 or under. Nothing above these numbers will work.
If you’re happy with how it looks and no other changes need to be made, click Save in the upper right corner. If not, you can either repeat the steps or click Ctrl Z on your keyboard.
Modifying the Site Title and Tagline
You probably noticed the site title text that appears in the header area of your blog – and maybe you’re rethinking what it should say. There may or may not be a tagline just below the title, depending on the theme that you’ve chosen.
- In the left-hand menu, find the Settings section heading and click on it. This will bring up the General Settings page.
- Here, you can modify the Site Title and/or the Tagline. You may opt to delete the text in the tagline – you don’t need to have a tagline, so that’s OK. It is not recommended to remove the Site Title, however as that information is important as it is used in various locations of your site.
- Click the Save Changes button at the bottom of the page.
Themes dictate the look, the layout and some of the functionality of your blog. The WordPress-developed themes (such as Twenty Twentythree, Twenty Twentyfour, Twenty Twentyfive, etc.) are available on this blog network.
Widgets enable you to add functionality to the sidebars in your blog. Again, this starts with choosing the theme that has the appropriate layout for you (2-column, 3-column, etc.) and then choosing which widgets to add.
Here are some examples of functionality that can be added using widgets:
- Meta - adds links to Login to the blog system, access the administrative areas of a specific blog (IF the user has the appropriate role in the blog) and RSS feeds for the blog’s entries and comments.
- RSS - if you would like to pull entries from someone’s blog, Twitter account, etc. into your sidebar, you can add the RSS feed from their site here.
- Links - add a list of other blogs or websites you would like to reference
- A list of Pages, Recent Posts, or Special Recent Posts in your blog
- Recent comments in your blog
- Text
- Tweet Blender – Show tweets from accounts, hashtags and keywords in the sidebar and/or in an archive page. Plugin must be enabled in order to add the widget to a sidebar.
- A list of Categories and/or Tags used in your blog
- A Tag cloud
- Authors – provides a dynamic list of users who have posted to the blog, additional features such as a link to a list of the authors’ posts, RSS feeds, etc. can also be enabled.
Selecting and activating widgets
- Make sure you are in the Dashboard for the blog you want to add a theme to. (Log in, then look in the upper right-hand corner and confirm that the title of your blog is listed there. If you see the name of another blog, click My Sites. You will see a list of your blogs here – click Dashboard for the one you wish to work on.)
- In the left-hand menu, find the Appearance heading and click on it, then click the Widgets link that appears underneath in the menu. This will load the Widgets page.
- First, look at the column on the right-hand side. This section will list the different areas of your blog that you can add widgets to. You may have sections like “right column” and “left column”, or if you are using a more complex theme, you may have ones listed “top-left”, “middle”, etc. This allows you to add different widgets to specific areas of your blog interface.
- Look through the available widgets. Once you have found one you like, click on the heading (for example, Tag Cloud) and continue to hold the mouse button down while you drag to the area in the right column that you want the widget to appear in. You should be able to see the widget move as you move your mouse. Once you have it over a section that you can add it to, you will see a dashed box, the widget will be dropped here.
- Many widgets have settings that you will modify, such as Title, etc. Once you have modified the settings, click the Save button.
- Click the Close button to stop viewing the settings.
- If you wish to remove a widget, click the Remove button.
Plugins are used to add a higher level of functionality to the entire blog. They range in scope – there are some to enhance the multimedia abilities of your blog, some to check for broken links and some to help track statistics.
Due to the complexity of plugins and the challenges related to security and compatibility, we strongly limit the number of plugins for use on this blog network.
Activate a plugin
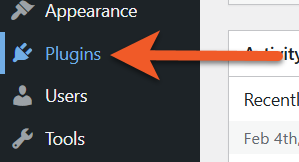
Find the plugin – Click the Plugins link in the left-hand menu to view the list of plugins. Most include a short description of the plugin, as well as a visit plugin site link for more information.
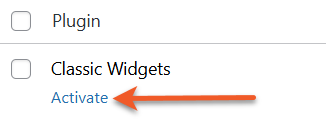
Activate the plugin on your blog – Click the activate link for that specific plugin.
Review any additional settings – Some plugins have additional settings that can be modified. Settings for individual plugins can often be found under the Settings section of the left-hand menu or as its own section of the left-hand menu.
Activate a plugin
BeehivePro – connect a Google Analytics account to your blog, so that you can track visitor activity. (Note that this will not work using your university Google Workspace account – you must have a consumer Google account).
There are now two ways to update the background of your blog. Whichever option you choose depends on what you would like to do to your blog. They also both have similar, yet different steps to one another.
Option one: Changing the background’s colour

1. With your blog open, select Edit Site from the top bar.
2. A Preview will appear, showing you the current layout of your site. If you have not modified it from the theme’s default, this will be blank.
3. To change the site background colour, click the circle in the top right corner.
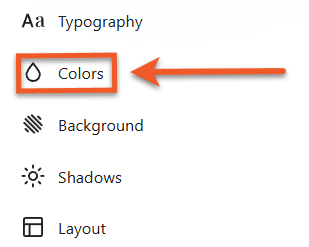
4. Click on Colours.
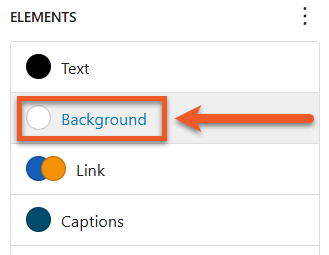
5. There will be a list of Elements that show up. Click the Background button option, which then allow you to choose any colour you would like for the background.
6. When you’re happy with the colour chosen, click Save to apply.
Option two: Changing the background to an image
1. To upload a background image, click Background instead of Colour.
2. You will be presented with two options:
- If you have already uploaded an image you would like to use for the background to your Media Library, select Open Media Library and click your desired image. From here, click the Select button.
- To upload a new image from your computer, click the Upload button. You’ll then get a pop up with all the image files on your computer. For a background image, there are no specific size requirements.
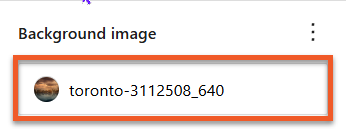
3. Once your image is uploaded, there are many ways you can customize how it looks. Click on the image to open the details panel.
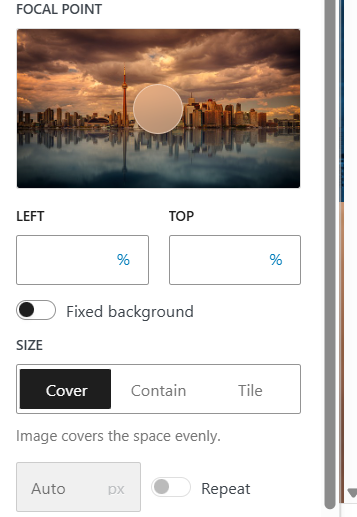
4. Once the panel is open, all your customization options will appear. You can change the size, turn on a fixed background (makes the whole image the background), or select a vocal point.
5. You’ll get a preview of your image as the background after selecting and making changes. If you’re happy with how it looks, click Save in the upper right corner. If not, you can either repeat the steps or click Ctrl Z on your keyboard.
Before the students start to create and publish posts, you will want to consider how the blog should be structured.
How many posts are the students expected to contribute? How will you differentiate between posts 1 and post 5?
The easiest way to achieve this is using “categories”, which allow you to organize blog posts into various topics. These are created by the instructor, and can be selected when creating a blog post.
Categories can be found (and created) in Dashboard, under Posts > Categories. Be sure to keep them simple!
In your assignment instructions, be sure to instruct students to select the appropriate category for their post.
Each blog has a maximum file space of 200MB.
Each file can be no larger than 2MB.
We recommend keeping images to 200KB or smaller, and hosting audio/visual content on a streaming server (like Google Drive or Youtube).
The media section of the blog is really intended to host images that have been properly formatted for the web. Larger files, like audio and video, should not be stored in the blog, as you will quickly run out of space on your blog.
It is possible to upload documents to the blog – but not ideal. Blog posts should really contain the content you are presenting – test, images, media. Linking to static documents, like PDFs, takes your visitor away from your site. These files will also take up precious file space.
Each blog has a limited amount of filespace. The space provided is sufficient for hundreds, if not thousands, or images as long as they are properly optimized for web delivery. Video and audio files are much larger, so you need to take this into consideration when setting up your blog. It is your responsibility to work within the quota, and optimize your files for web delivery.
Did you create all aspects of the file you are posting? If not – meaning, if any part of your file was made by someone else – you need to ensure you have copyright authorization to post the image.
If you are permitted to post the image, you must properly cite it. There are many sources online that can help you properly cite images.
This can be really tricky, but Google image search has now made it a bit easier for you to find images that you are legally allowed to post. Read the details in this article.
Please see this page for more information about copyright at the university.
There is a difference between linking and embedding. Embedding an item will display it right in the blog post. This is possible with images, and certain media files – but not all file types. Linking just provides a link to the file, which visitors can use to download the file or open in another browser window (where applicable).
If you have found a video hosted on another website that you would like to share on your blog, but are unable to embed the video into your blog, the next option is to provide a link to the video.
All you need to do is paste the URL (webs address) into a “paragraph” block. WordPress will automatically understand that this is a link, and will convert it so that it appears as a link should (possibly in a different colour from the rest of the test, and with an underline). Once this has happened, you can change the text that displays so that it includes the title of the video, instead of an unattractive URL.
Note: We recommend leaving the blog visibility set to “Only registered users of this blog can have access”. This ensures your blog is private for the members of the class.
If having a public blog is an important part of the learning experience for the students, please note that it may be more difficult to track the students’ comments as they may fill in their names differently each time they comment.
Before making your class blog public, be sure to discuss it with your students. They may have some concerns that you can consider before opening the blog up to outsiders.
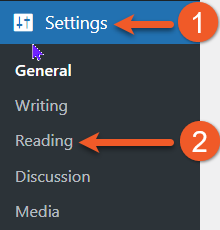
Log into the Dashboard of your blog.
- In the sidebar on the left, click the Settings heading.
- Click Reading from the list of options in the resulting submenu.
- Read through the options listed in the Site Visibility section of the page, and select the level of visibility that works best for your situation.
- Click Save Changes.
1. Allow search engines to index this site (MOST PUBLIC option)
This option is necessary if you want people to be able to find your site by using a search engine. It will also include your posts in the list of recent posts found on the main blog.torontomu.ca website.
2. Discourage search engines from indexing this site
This option is great if you want to restrict people from accessing your site, but you don’t really want it to be found by using a search engine. Keep in mind that this option merely asks search engines not to index your site. We have no way of ensuring search engines do not index your site. We have no way of ensuring they honour this request. If you select this option, your posts will not appear in the list of recent posts found on the main blog.torontomu.ca website, but your posts can still be aggregated.
3. Visitors must have a login – anyone that is a registered user of blog.torontomu.ca can gain access.
This ensures your blog is not visible to the public, but can be viewed by anyone who has a my.torontomu.ca account and is logged in to blog.torontomu.ca. Note that this will only allow users with accounts on blog.torontomu.ca to see your blog, and will not provide wide access to the university community (since most people do not have accounts on blog.torontomu.ca).
4. Only registered users of this blogs can have access – anyone found under Users > AllUsers can have access.
Only people whose accounts have been added to your blog can see your blog. Posts on these sites cannot be aggregated.
5. Only administrators can visit – good for testing purposes before making it live. (MOST PRIVATE option)
Only people whose accounts have been added to your blog with an “Administrator” role and the blog.torontomu.ca Network administrators can see your blog. Posts on these sites cannot be aggregated.
Learn how to maintain an accessible WordPress blog. All websites at TMU are required to be made accessible (opens in new window) — it’s also the right thing to do!
We highly recommend selecting any of the accessibility-ready themes from Twenty Nineteen to Twenty Twenty-Three. These themes are the most up-to-date, accessible, and easy to customize.
Self-describing links
Ensure hyperlinks are self-describing. Avoid links like “click here” or “learn more” because they do not provide ant useful information to someone using a screen reader. These links do not make sense out of context either! For best practice, hyperlinks should be descriptive and link to nouns that are specific in context.
Effective use of headings
Semantic headings do not only act as visual cues, but also as an outline as to how a page is structured and how sections relate to one another. Proper heading structure can be especially useful for people who use screen readers, as they can be used as navigational aids to jump from heading to heading. Add headings using the Heading block type.
- Heading 1 is the most important heading in terms of rank of hierarchy. Within modern WordPRess themes, the title of your post or page is usually a Heading 1 already. Therefore, you should most likely use. Heading 2 when creating new subheadings on the page.
- Make sure all of your headings are structured in a logical order that conveys hierarchy, ensuring that all headings have a proper parent/child relationship.
- Different levels of subheadings, for example a H3 would be nested under a H2. Skipping heading ranks can be confusing and should be avoided.
Ensure text has good contrast
Most of the accessibility-ready themes have good contrast by default. If changing theme defaults, ensure that text has at least a sufficient contrast ratio (external link) of at least 4.5:1 for normal size text, or 3:1 for large text (like headings).
We do not recommend manually styling most of the text in your post, as it may introduce contrast issues if you change your theme colours at a later date. If you change your theme, consider doing a quick audit of your website to make sure no contrast issues were introduced.
Add alternative text to images
Alternative (alt) text is used to convey meaning and provide context in place of an image, graph and other media. Blind and low vision users rely on the alt text attribute to understand the equivalent meaning of images, figures or other graphics in textual form. Alt text should provide a concise description converting essential information about the image.
- Alt text should be concise and meaningful
- Usually, around one hundred characters or less.
- Use punctuation, as it can help make information easier to understand.
- Avoid phrases such as “image of…” or “graphic of…”
- Consider the context of the surrounding information when writing.
View some examples of good alt text. If an image is decorative in nature (doesn’t convey any meaningful context), just leave the Alt Text field blank.
Where to add alt text in WordPress
- Go to the Media Library, select your image to open the Attachment details and enter your alt text in the Alternative Text field.
- When embedding an image within your post, toggle the Settings sidebar. You can add alt text within the Block settings within the Alternative Text field.
Other formatting tips
- Avoid underlining text that is not a link. Underlined text is most commonly used to identify a link to another web page. If you’d like to add emphasis to text, use bold instead.
- Avoid using bold text as a heading. Use the appropriate heading level via the Heading block type instead.
Avoid using ALL CAPS. It gives the impression that you’re yelling, and some assistive technologies may interpret short words as acronyms.
Sa11y is a free content accessibility checker that visually highlights content issues at the source with a simple tooltip on how to fix them. This plugin is available to all TMU blog editors, and can be accessed by logged-in users that have permissions to edit a page. View an overview and demo of Sa11y. (external link)
For more information, please visit This Web Accessibility page or WebAim’s Introduction to Web Accessibility (external link) .
If you have any questions or need accessibility help, please contact us.
Natively, WordPress doesn’t gather statistics on your blog. If you need to be able to track access to your blog, you will need to enable a plugin that collects the statistics on a third-party site.
Beehive Pro is available on this blog network. It allows you to use Google Analytics to collect statistics for your blog.
Please keep in mind that Google Analytics is a public system that houses the statistics for your site on their servers, which may reside in any country. This data is not hosted on the university’s servers, and we cannot provide support for the Google Analytics server, as it is outside of our access.
Important: You will need a consumer Google account in order to access Google Analytics, as the university’s access to Google Workspace does not include Google Analytics.
- If you have a consumer Google account already, login to that account now.
- Go to ww.google.com/analytics/ (external link) to be sure your account has access to this service. One account can host analytics for a number of different websites. If you run a group blog, it might be a good idea to set up an account just for that — you don’t want it tied to any one user’s personal Google account.
The full instructions can be found in the “Quick Setup” section of the Beehive Pro documentation.
Here are our recommendations for quick setup options:
- Log into the dashboard for your blog, and check the Plugins list to make sure the Beehive Pro plugin has been enabled.
- Go to the Beehive Pro menu in your dashboard and select Accounts.
- In the Connect with Google section, click the Connect with Google button and login with your consumer Google account (the one you used to access Google Analytics above).
- Review the access details and if you approve, click Continue.
- You will be presented with a long series of characters. Click the paper icon to copy this into your clipboard.
- Return to the Beehive Pro section of your blog and paste this into the Access Code field in the page.
- Click the Authorize button, at the bottom of the page, to apply the settings.
Now, if you go to Google Analytics, you will see your blog listed in the Website Profiles. It may take some time for it to initiate the collection of statistics — once it has begun, you will see a checkmark in the Status column.
Please refer to the support on the Google Analytics website for more details on the collection of the statistics and reports.
Once an assignment is done and/or the term is over, you will probably want to know a few things about the student contributions.
If you want a full set of web page statistics, you will need to set up Google Analytics (using the Beehive Pro plugin) before your class begins.
Most class blogs, however, don't put much value in that kind of statistic. We often need to know how many posts and comments a student made, and how many comments did each post collect. With a few extra clicks, this information can be gathered using features built into WordPress.
Go to the blog Dashboard > Users.
Find the user in the list.
Click on the number of posts they have made.
You will see a list of all posts made by that student (with the title, category, publish, date).
Please note that this cannot take into account all of the people that may have contributed to a post. It will only show the listed author of the post.
The method will only work if the users are logged in with their TMU accounts when making comments. If commenters are able to enter any name they like, it won’t be easy to aggregate all of their posts under various names.
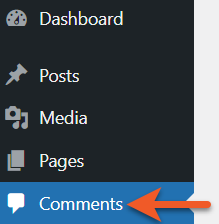
Go to the blog Dashboard > Comments.
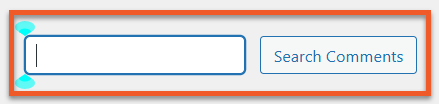
Type the username in the search field at the top and click Search.
You will see a list of all comments made by that student (with the name of the post it is a response to, date/time).
Commenting is not always indicative of a post’s popularity, but it can be an interesting statistic.
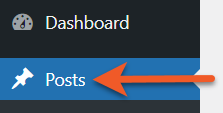
Go to the blog Dashboard > Posts.
Look at the comments column (it has an icon of a comment bubble instead of a text title).
Scroll through the posts, and look for a comment bubble with a number indicating how many comments were made for this post.
You can click on this number to actually review the comments.
What is "Spam"
On your blog, visitors may have the ability to post comments to your posts or pages. Some people create programs that automatically post fake comments to blogs, often in order to promote links to other sites - sometimes malicious sites. Comments that don't come from a real person are known as "spam".
Be forewarned - some spam comments look like real comments! Please read on your responsibilities, and action you can take to prevent comment spam.
My “Spam” Responsibilities
We have a spam prevention plugin enabled on the entire blog network that attempts to block various types of spam. That said, there is really no perfect way to totally get rid of spam, while allowing “real” comments through.
There are three main areas to consider:
- Stop spam comments from being published to your site (preventing your visitors from SEEING the spam).
- Prevent spam from being posted to your site in the first place.
- Clean up spam comments from your comment inbox.
The most important thing is to stop spam from being published – nobody wants their visitors to see the spam on their site. It is the responsibility of EACH blog administrator to prevent and/or remove spam from their site.
Recommended Settings

The following options can be found in the Dashboard > Settings > Discussion section of your blog:
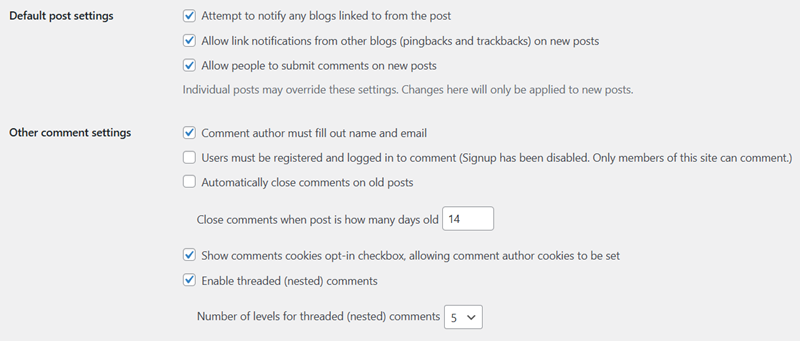
The following options can be found in the Dashboard > Settings > Discussion section of your blog:
Allow link notifications from other blogs (pingbacks and trackbacks)
Pinbacks and trackbacks sound like a really useful thing – they’re supposed to let you know when someone has linked to your blog from their blog. In our experience, they haven’t been all that useful, and it’s a nice open doorway for spam. Turn this off, and limit the ways that you can be spammed.
Comment author must fill out name and email
Automatically close comments on articles ulcer than xx days
The default number of days is 14, but I think I have this set to 30 days on my own blog. It lessens that volume of spam because there are fewer pages on your site that actually CAN be spammed.
In addition, you can turn off commenting on any pages or posts. (Pages are made to encourage discussion – close the ones that aren’t!)
Allow link notifications from other blogs (pingbacks and trackbacks)
Some that sound like nice, flattering comments are actually spam – and if you approve them, you are basically opening the door to spam from the same “person” down the road. One sign that the comment is spam – check the URL that they add with the comment, if it’s something unrelated to your site, it’s likely spam.
Spam comments can be very sneaky, and sound real. If you would prefer to be even MORE strict, then instead check the option “An administrator must always approve the comment”. One of these two options should always be checked.
Hold a comment in the queue if it contains 1 or more links
Spam almost always contains a link in the body of the comment, so this moderation feature is really useful. The default setting on this is to hold a comment if there are 2 or more links – but holding a comment with just 1 link will be more effective.
Carefully consider comments
Some of the spam you get will look like real comments. Spammers are getting tricker, even posting spam comments that appear relevant to your site topic! Here are a couple of things to watch for BEFORE you approve a comment:
Comment Links
Is there a link in the body of the comment – look at the link address (don’t click on it!) and see where it would go. Similarly, look at the website URL that the comment has listed for the user (and the email address). Spam addresses often look suspicious. Be wary of addresses to sites that you don’t recognize, or don’t sound like they are in the same topic as your blog.
Comment Text
Does the comment explicitly refer to something in the post/page it is commenting on, or is the message vague? Some real comments will say things like “this was a great post”, but most commonly people will refer to something that you wrote about.
Be careful – some spammers will even be relevant to your site topic! For example, someone who writes a food blog may get spam that mentions food specifically… but in a vague way.
Turn off comments
What if you don’t want users to comment on your posts or pages? Turn them off!
Turn off commenting on NEW articles (posts and pages)
- Go to Dashboard > Settings > Discussion.
- Uncheck Allow people to post comments on new articles.
- Scroll to the bottom and click the Save Changes button.
Turn off commenting on ALL EXISTING Posts and Pages
- Go to Dashboard > Posts.
- Look for the checkbox at the top of the list of posts, to the left of the ‘Title’ heading. Check it – this will select ALL of the posts on that page.
- Click on the Bulk Actions dropdown menu, select Edit and click the Apply button. This will allow you to change options for all of the selected posts.
- In the Bulk Edit interface, find the Comments dropdown menu, click it, and select Do Not Allow. Click the Update button to process this change.
- Look at the upper right-hand corner of the list. Here, you will see how many pages of posts you have. You will have to repeat the above steps for each page and posts.
Do the same thing for all your pages by going to Dashboard > Pages, and proceed with steps 2-5.
About importing & exporting
While it isn’t possible to create an exact duplicate of another blog, you can export the Posts, Pages and Comments of a WordPress blog and import them into another blog.
When you import the blog content, you will have the opportunity to import the images and attachments, but this may only be possible if the original blog is still active and public (not private).
Things like themes, plugins, header images, custom menus and widgets will not be intact when you import, so you will have to set up each of these things manually in the blog.
Export posts and pages from your WordPress blog
Follow these steps to export your posts, pages, comments from your WordPress blog.
- Log into your blog at WordPress.com
- In the dashboard of the blog you are exporting from, go to Tools > Export (in the sidebar).
- Choose the content you wish to export.
- If you want to export ALL content from your blog, select All content.
- If you want to export select items from your blog, select the appropriate radio button. Each option will have its own set of sub-options. Review these and select the ones you need.
4. Click Download Export File, wait for the file to be generated and download the resulting file to your computer.
Import WordPress blog content into blog.torontomu.ca
Follow these steps if you exported content from another WordPress blog, and would like to import it into your blog on TMU’s blog.torontomu.ca system.
You will need to already have a blog on the blog.torontomu.ca system.
- Log in, and go to the Dashboard of the blog you are importing into (see Dashboard > My Sites for a list of all of your blogs).
- If you had other users posting to your original blog, you should add them to your new blog before you import the content. This is only possible if they already have accounts on the blog.torontomu.ca network – and you will need their usernames in order to add them.
- In the Dashboard, go to Tools > Import and click the WordPress option.
- Browse to locate the WordPress export file on your computer, then click Upload File and Import.
- In the next step, you need to identify the users who should be attributed to the posts from your original blog. If it’s just you, simply click the dropdown menu for map to existing and select your name. If there were multiple authors, you can choose to attribute their posts to you, or select another user that you have added to the blog.
- Be sure to select the checkbox for Download and import file attachments. Remember – the process can only transfer your attachments if the original blog is still active AND public (not private).
- Click Submit. It may take some time for this to complete, depending on the size of your blog.