Student guide
This guide is focused on authoring, publishing posts, and adding multimedia.
If you are expected to create and publish posts, or are given an Author role in a blog, this guide is for you!
Note: Ensure that you are logged into WordPress before following this guide. Having trouble? View our Login and troubleshooting guide.
Details
Integrated with D2L Brightspace?: No
Contract Start: 2017
Contract End: TBD
Most course blogs are created so that the students can contribute – but many instructors will create posts and pages as well!
While there are different requirements for the blog assignments in each class, there are a few common elements: publish a post, select a specified category, include an image or video.
Posts are timely entries that generally display in reverse-chronological order in the blog. Most of the content of a blog is generally added as a post, and people who subscribe to your blog will get updates on new posts (but not pages).
Pages are used to display static content about the site, such as details about the concept behind the blog, the authors, etc.
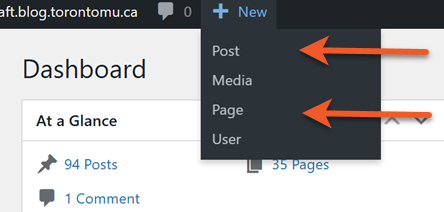
- Look at the top of the page, for the menu bar.
- Click the + New menu item, then select what you want to create (post or page).
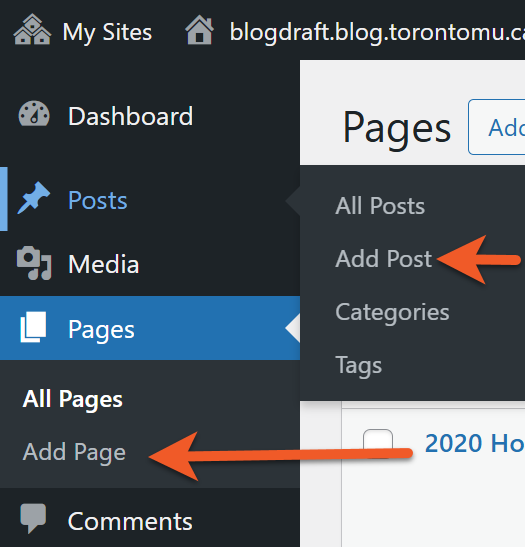
- Go to the Dashboard of your blog.
- In the left-hand menu, click either Posts or Pages.
- Click Add New.
Each blog has a maximum file space of 200MB.
Each file can be no larger than 2MB.
We recommend keeping images to 200KB or smaller, and hosting audio/visual content on a streaming server (like Google Drive or Youtube).
The media section of the blog is really intended to host images that have been properly formatted for the web. Larger files, like audio and video, should not be stored in the blog, as you will quickly run out of space on your blog.
It is possible to upload documents to the blog – but not ideal. Blog posts should really contain the content you are presenting – test, images, media. Linking to static documents, like PDFs, takes your visitor away from your site. These files will also take up precious file space.
Each blog has a limited amount of filespace. The space provided is sufficient for hundreds, if not thousands, or images as long as they are properly optimized for web delivery. Video and audio files are much larger, so you need to take this into consideration when setting up your blog. It is your responsibility to work within the quota, and optimize your files for web delivery.
Did you create all aspects of the file you are posting? If not – meaning, if any part of your file was made by someone else – you need to ensure you have copyright authorization to post the image.
If you are permitted to post the image, you must properly cite it. There are many sources online that can help you properly cite images.
This can be really tricky, but Google image search has now made it a bit easier for you to find images that you are legally allowed to post. Read the details in this article.
Please see this page for more information about copyright at the university.
There is a difference between linking and embedding. Embedding an item will display it right in the blog post. This is possible with images, and certain media files – but not all file types. Linking just provides a link to the file, which visitors can use to download the file or open in another browser window (where applicable).
If you have found a video hosted on another website that you would like to share on your blog, but are unable to embed the video into your blog, the next option is to provide a link to the video.
All you need to do is paste the URL (webs address) into a “paragraph” block. WordPress will automatically understand that this is a link, and will convert it so that it appears as a link should (possibly in a different colour from the rest of the test, and with an underline). Once this has happened, you can change the text that displays so that it includes the title of the video, instead of an unattractive URL.
Self-describing links
Ensure hyperlinks are self-describing. Avoid links like “click here” or “learn more” because they do not provide ant useful information to someone using a screen reader. These links do not make sense out of context either! For best practice, hyperlinks should be descriptive and link to nouns that are specific in context.
Effective use of headings
Semantic headings do not only act as visual cues, but also as an outline as to how a page is structured and how sections relate to one another. Proper heading structure can be especially useful for people who use screen readers, as they can be used as navigational aids to jump from heading to heading. Add headings using the Heading block type.
- Heading 1 is the most important heading in terms of rank of hierarchy. Within modern WordPRess themes, the title of your post or page is usually a Heading 1 already. Therefore, you should most likely use. Heading 2 when creating new subheadings on the page.
- Make sure all of your headings are structured in a logical order that conveys hierarchy, ensuring that all headings have a proper parent/child relationship.
- Different levels of subheadings, for example a H3 would be nested under a H2. Skipping heading ranks can be confusing and should be avoided.
Ensure text has good contrast
Most of the accessibility-ready themes have good contrast by default. If changing theme defaults, ensure that text has at least a sufficient contrast ratio (external link) of at least 4.5:1 for normal size text, or 3:1 for large text (like headings).
We do not recommend manually styling most of the text in your post, as it may introduce contrast issues if you change your theme colours at a later date. If you change your theme, consider doing a quick audit of your website to make sure no contrast issues were introduced.
Add alternative text to images
Alternative (alt) text is used to convey meaning and provide context in place of an image, graph and other media. Blind and low vision users rely on the alt text attribute to understand the equivalent meaning of images, figures or other graphics in textual form. Alt text should provide a concise description converting essential information about the image.
- Alt text should be concise and meaningful
- Usually, around one hundred characters or less.
- Use punctuation, as it can help make information easier to understand.
- Avoid phrases such as “image of…” or “graphic of…”
- Consider the context of the surrounding information when writing.
View some examples of good alt text. If an image is decorative in nature (doesn’t convey any meaningful context), just leave the Alt Text field blank.
Where to add alt text in WordPress
- Go to the Media Library, select your image to open the Attachment details and enter your alt text in the Alternative Text field.
- When embedding an image within your post, toggle the Settings sidebar. You can add alt text within the Block settings within the Alternative Text field.
Other formatting tips
- Avoid underlining text that is not a link. Underlined text is most commonly used to identify a link to another web page. If you’d like to add emphasis to text, use bold instead.
- Avoid using bold text as a heading. Use the appropriate heading level via the Heading block type instead.
Avoid using ALL CAPS. It gives the impression that you’re yelling, and some assistive technologies may interpret short words as acronyms.
| Impacted area | Description | What to do |
| Can’t access the admin area of my blog | After logging in through CAS, the user is directed to a blue page when trying to access an admin page of their blog. This does not appear to affect all users at all times. |
Workaround: 1. Trying using the ‘Back to…’ button to go to the blog homepage and use admin bar (top) to access admin pages. OR 2. Try to log out, then go directly to the admin address of your blog and log in there. Workaround instructions can be found at: Can’t access the admin area of my blog |
| Add block option (“+”) does not display between blocks. | When you hover on the borders in between, above and below blocks, the + icon should appear to add a block in that space. Sometimes the one above the currently selected block does not appear. | Workaround: Try selecting another block, to shift the focus OR save your post as a draft and reload the post editor. |
Still having trouble after reviewing the known issues tables? Contact us if you have technical questions or issues with your blog.
Tips for requesting technical support:
- Select ‘blogging’ as your subject of inquiry.
- Be sure to send us the following details:
- Let us know what username you are using to log in to the blog system (please do not send us your password)
- Let us know the URL of the blog you are accessing / trying to access
- Include any details pertinent to your inquiry.
- If you are experiencing a technical issue reaching a blog site or posting a blog (not login issues, but the browser not allowing you to get to the site), please send the following additional detail:
- Your IP at the time the issue occurred (you can Google “What is my IP?” to find out).
- Which web browser (ie. Google Chrome, Mozilla Firefox, Microsoft Edge, Safari) AND operating system (ie. Windows 11, MacOS 26.3 Tahoe) you were using.
- The time and day you experienced the issue.
- Whether you were on-campus or off-campus at the time the issue occurred.