Akindi On Paper assessments

Akindi is an assessment tool used to deliver on-paper assessments. It supports multiple choice or written response questions
This resource focuses on the instructor use of Akindi Assessments, which are created and graded via your D2L Brightspace course shell.
Support
- Akindi Help Centre (external link)
- Akindi’s Getting Started Guide (external link)
- Contact Akindi Support using the blue live-chat button in the bottom right corner of the screen while using the tool.
- If you have any further questions, email us at courses@torontomu.ca
Several key considerations must be addressed when using educational technology tools in your course. It is your responsibility to ensure that students are fully informed about the tool, its costs, and other details to align with University policy and Provincial acts.
We strongly encourage you to include all of this essential information in your course outline, to ensure students are aware of how it impacts them.
Refer to the TMU course outline template for some ways to incorporate this information into your course outline and to the Senate Course Outline Policies for guidance on what needs to be included in your course outlines.
Sample course outline content: Akindi Assessments
This course utilizes Akindi, an external educational technology tool in addition to D2L Brightspace, to deliver physical assessments. This tool is used to enhance your course learning experience by automatically scoring multiple choice assessments on designated test-response sheets.
- Costs: The tool does not result in additional costs to you.
- Other requirements: Students should complete Akindi assessments with a dark writing utensil, such as a pencil.
- Account creation: No account is created to use this tool; your TMU Brightspace account is used to access Akindi.
- Data privacy and usage: This tool will have access to your name, student number, TMU email address, and academic work using the tool, and it is visible to course instructors, Academic Assistants, and Graders in your course.This information will be retained for 2 years, in case of potential appeals or FIPPA requests.
- Opt-out options: If you have concerns about your ability to use Akindi On-Paper assessments, please raise them to your instructor in advance of the assessment.
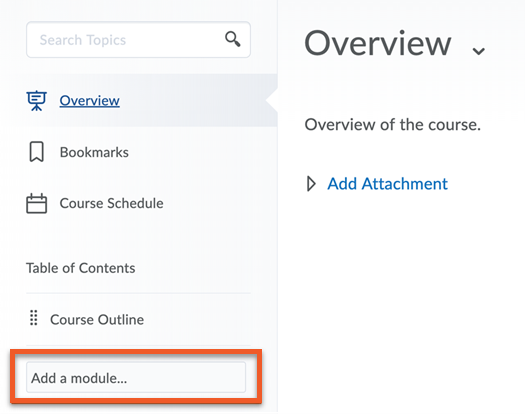
Access the Content tab in your D2L Brightspace course shell. Add a module to the left-hand navigation bar by clicking Add a module… and give it a name.

Inside your new module, click on the Existing Activities drop-down menu and select External Learning Tools.
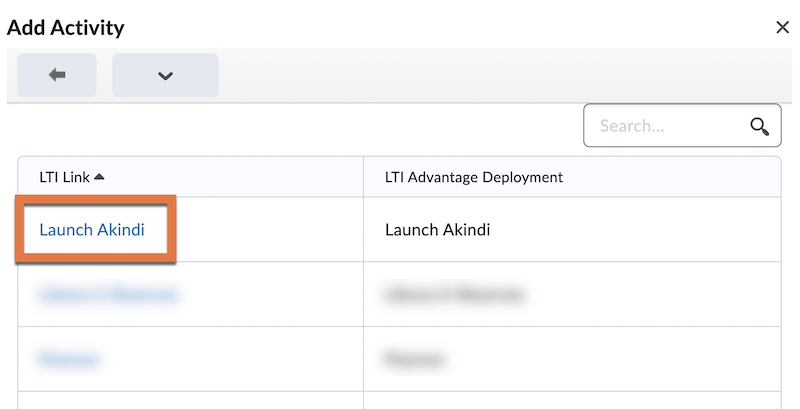
Select Launch Akindi.
This will add a link with the same name to your module; click it to open the tool.
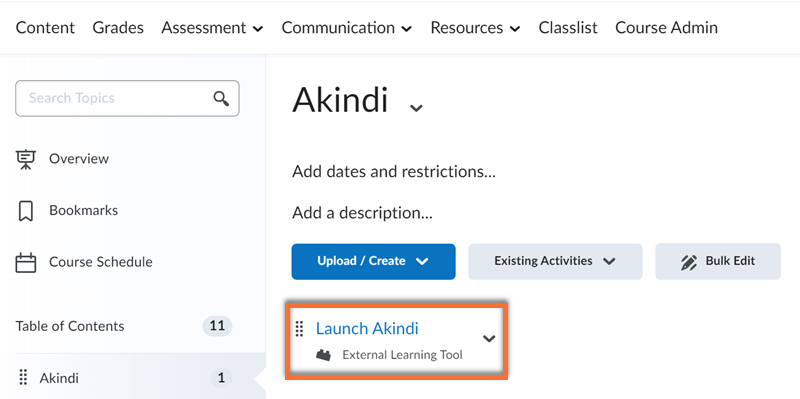
Access the tool by clicking on the Launch Akindi link in your module.
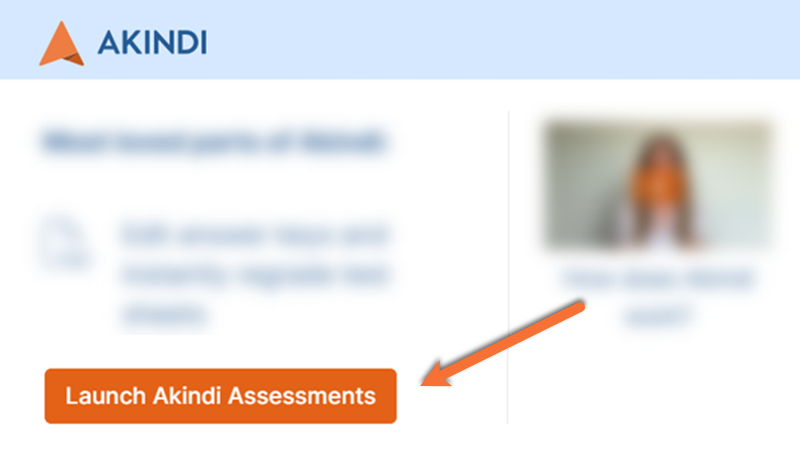
Click on the big orange Launch Akindi button in the bottom left of the new window.
This will open your Akindi Dashboard.
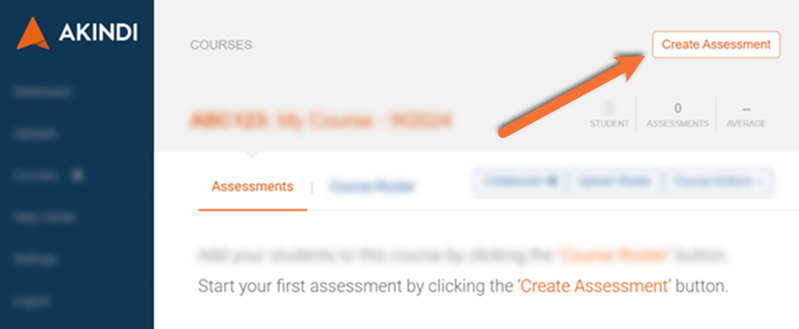
Access the Akindi Dashboard through the link you added to your course.
Click the Create Assessment button in the top right corner.
Confirm your course and name the assessment.
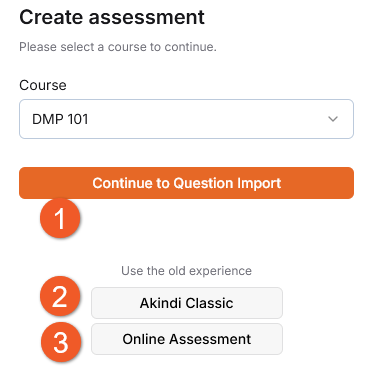
There are multiple ways to create an Akindi assessment:
Start with answer key (formerly Akindi Classic)
Use this option for multiple-choice only assessments, if you have already created your question sheet.
This only creates your answer key and printable bubble-response sheets. You will need to print your question sheets separately.
Continue with the steps in the Start with answer key assessment to proceed.
Start with questions
Use this option to create your entire assessment in Akindi, including generating both the question and response sheets for printing.
This supports assessments with multiple-choice and/or written answer questions.
Continue with the steps in the Start with questions assessment to proceed.
For a comparison between assessment types, visit Akindi’s Getting Started with Paper Assessments guide (external link) .
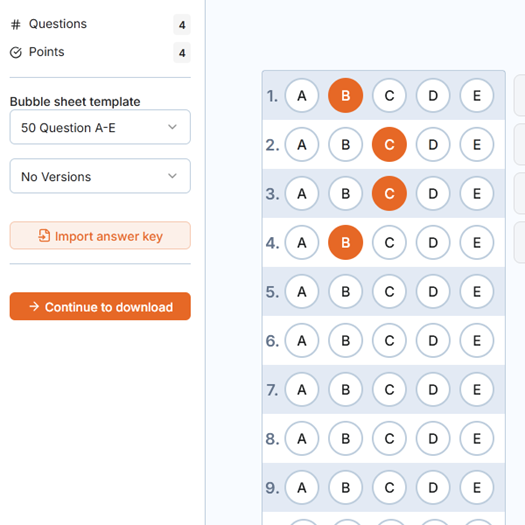
Create the answer key
After selecting “Start with answer key” in the steps for Getting Started (above), select a bubble sheet template to match or exceed the total number of questions in your assessment.
Choose “Enter answer key” then manually select the correct answer(s) for each question by clicking on the corresponding letter(s) for each question.
Note: Although it is possible to import the answer key from a Word document, if you wish to use this feature, the Start with questions workflow is more suitable.
To create multiple versions, select the “No Versions” drop-down and choose the desired number. You will be prompted to input a separate answer key for each version. While writing the assessment, students must specify the version they received by filling in a bubble on their response sheet.
Learn more at Akindi’s Start with Answer Key guide (external link) .
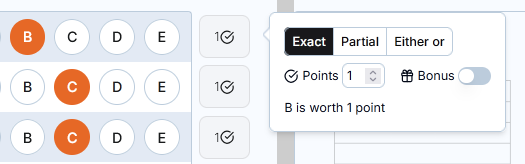
Advanced Marking
After selecting an answer, customize grading with Advanced Marking, using the button beside each question.
Settings include:
- Enabling partial or either-or marking.
- Changing the point value of the question.
- Setting the question as a bonus question.
Learn more at Akindi's Advanced Marking Options guide (external link) .
Once all answers are input, select the orange “Continue to download” button.
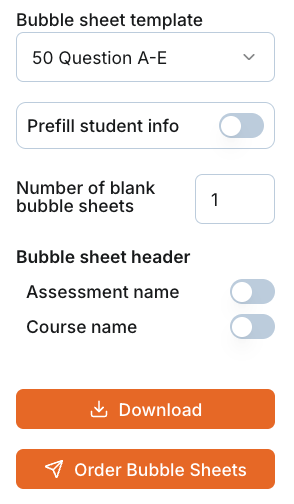
Preview your bubble-response sheet and add additional details using the provided toggles, if desired.
Number of blank bubble sheets: Set the value to align with the total quantity of response sheets you are ordering; it should match or slightly exceed the number of students.
(Optional) Prefill student info: Add each student’s name and student ID number to their response sheet before printing. If selected, each student will need to be provided with their personalized response sheet at the time of the assessment.
Save to device or order prints
Download: Save a folder of your assessments for printing on your own.
Order Test Packets: Request the printing of the bubble-response sheets through the on-campus service.
Note: If your assessment includes pages of questions and bubble-response sheets, the option to order sheets for printing may not be available. Learn more in our Printing and Scanning resource below.
New for Fall 2026: Create your entire assessment in Akindi, including written response questions in addition to multiple choice selections, with options for online grading and feedback.
This workflow is suitable for assessments with both question types; if your assessment only includes multiple choice questions, the “Start with answers” workflow (above) may be more suitable.
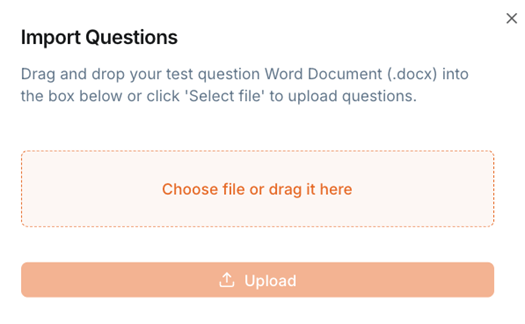
After selecting “Start with questions” in the steps for Getting Started (above), questions can be uploaded or created directly in Akindi.
If you have already prepared your assessment as a Word document (.docx) that aligns with Akindi’s Formatting Word Documents guide (external link) , select the file for upload. Review all questions and answers after upload to ensure they are correctly identified.
If you have not yet created your assessment, close the upload pop-up and type or paste your questions directly into the on-screen editor. Select the correct answer(s) for any multiple choice questions.
Note: Written answer questions must be placed after all multiple choice questions.
Learn more at Akindi’s Start with questions guide (external link) .
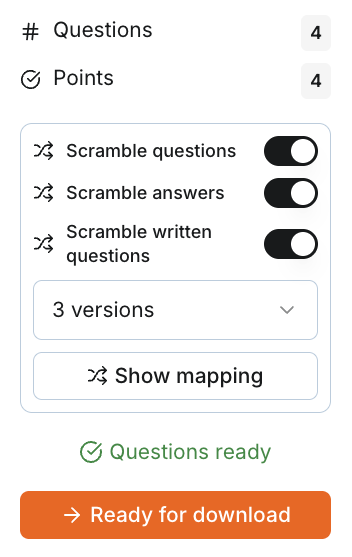
After adding all questions, create multiple versions of the assessment by scrambling the order questions.
Once completed, select Ready for Download to proceed.
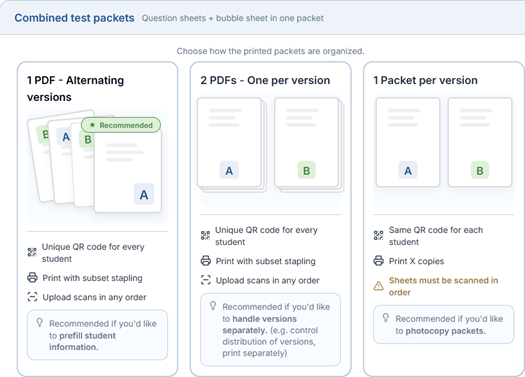
Test packet organization
Choose the method of organizing the booklets that is best suited for your assessment. The options you see will vary based on your assessment design, including the number of versions:
- Unique test packets or All Versions in one PDF: Recommended for most uses at TMU; as each packet is unique (with or without the student names pre-filled), this option ensures all response sheets are allocated to the intended student.
- Versions in separate PDFs: Similar to “Unique test packets” with each version divided into a separate file. Useful if you prefer to manage the distribution of versions in person.
- Blank test packets: Generates only one version of each packet, allowing copies to be made for distribution.
Do not use this option with assessments that include handwritten (non-bubble sheet) answers. The risk of incorrectly allocating responses to the incorrect student is high, and on-campus scanning services cannot facilitate scanning these assessments.
Additional options include the ability to order/download only bubble sheets or question sheets. The assessments created in this workflow are functionally similar to “Blank Test Packets,” and face the same risks and limitations. These assessments should not be used with assessments that include handwritten (non-bubble sheet) answers.
If you plan to scan the assessments with on-campus services, please create your assessments using Unique test packets, All Versions in one PDF, or Versions in separate PDFs. On-campus Duplicating and Printing Services (DPS) is not able to facilitate scans of handwritten answers printed as blank test packets or question sheets only.
If you are not sure about which print-order settings are most appropriate, please contact courses@torontomu.ca prior to submitting a print order.
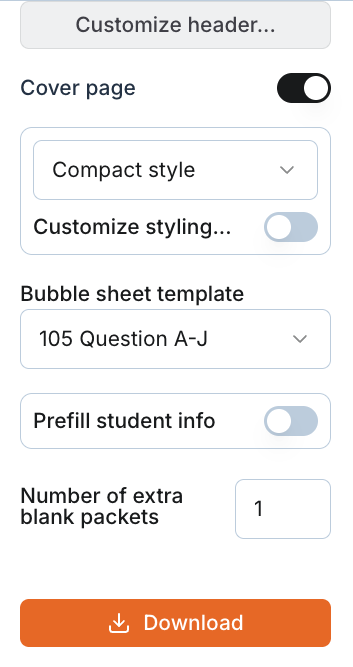
Question sheet settings
Use the on-screen preview to review the printed assessment, and adjust the styling if desired.
Notable options include:
- Prefill student info: Add each student’s name and student ID number to their bubble sheet before it is printed. If selected, each student will need to be provided with their personalized bubble response sheet at the time of the assessment.
- Add cover page: Place a blank sheet before the first question
- Customize styling: Adjust Akindi’s pre-set spacing to suit your needs.
Learn more at Akindi's Customize Test Question Formatting guide (external link) .
Save to device
Download: Save a folder of your assessments for printing, either on your own or for submission to TMU’s Duplicating and Printing Services (DPS) Exam Printing Form.
Learn more in our Printing and Scanning resource below.
Printing of your Akindi assessments can be completed by Duplicating and Printing Services (DPS) on campus, at 105 Bond Street.
Ordering only bubble sheets (assessments without question text)
For “Start with answer key” assessments (which do not include questions), you can order prints of standalone bubble sheets through the in-Akindi ordering system.
On either the main course page in Akindi, or in the final stage of your assessment creation, select Order Sheets to open the Downloads tab of the assessment. Adjust your settings, opting to:
- add or remove student, course, or assessment information
- set the number of sheets ordered
- include a note for DPS staff
Once setup, select the “Order Bubble Sheets” button. After submitting, you will receive an email when the sheets are ready to be picked up from DPS at 105 Bond Street.
If the only option available to you is “Download” (instead of “Order Bubble Sheets”) the assessment is not eligible to be ordered for printing through the Akindi interface at TMU, and you must use the TMU Duplicating & Printing Exam Duplicating process.
Ordering test packets (assessments with question text)
Assessment packets (combined questions and response-sheets) must be downloaded and submitted to the TMU Duplicating & Printing Exam Duplicating process, to ensure all assessment information is captured. If your assessment includes any handwritten responses, do not order the bubble sheets separately.
Only unique (QR coded) packets can be scanned using on-campus services. If your assessment includes handwritten question responses that you are planning to scan for grading, only use Unique test packets or All Versions in one PDF or Versions in separate PDFs.
On-campus Duplicating and Printing Services (DPS) cannot facilitate scans of handwritten answers printed as blank test packets or question sheets only, as they do not create unique sheets for each student, and result in a high risk of handwritten student responses being incorrectly or not-allocated to the student who provided the answers. This booklet type should not be used with handwritten questions.
If your assessment includes both bubble sheet and handwritten answers, do not separate the bubble sheets and question sheets into separate print orders/files, as this functions as a blank test packet.
If you are not sure about which print-order settings are most appropriate, please contact courses@torontomu.ca prior to submitting a print order.
Scanning of your Akindi assessments can be completed by Duplicating and Printing Services (DPS) on campus, at 105 Bond Street.
Deliver completed response sheets to Duplicating and Printing Services (DPS) at 105 Bond Street for scanning. There is no need to sort sheets by section or version.
If your assessment includes both (a) pages with multiple choice questions and (b) response sheets (bubble sheets and handwritten answers), the pages with multiple choice questions must be removed prior to scanning.
Separating the assessment for scanning can be completed by the students as they submit their assessment, or by the teaching team after collecting the completed assessments:
- Split each assessment into two separate piles:
- Multiple choice question pages – not scanned, retained by the instructor.
- Written answer and bubble sheet pages – to be scanned, returned to DPS.
- Ensure staples are removed from the pages that will be scanned.
Booklets that include a staple or the multiple choice question pages will not be eligible to be scanned.
An email will notify you when the results are ready to be viewed in Akindi. When you receive this notice, return to DPS to pick up your scanned sheets.
Note: If a student recorded their responses on a generic sheet provided by The Test Centre, it cannot be scanned by DPS. Please use the independent scanning option for these sheets.
Download files for printing
On the main course page in Akindi, or in the final step of creating your assignment, select the Download option to save the assessment files to your device. The files that are provided can be printed with any standard printer.
Independent scanning
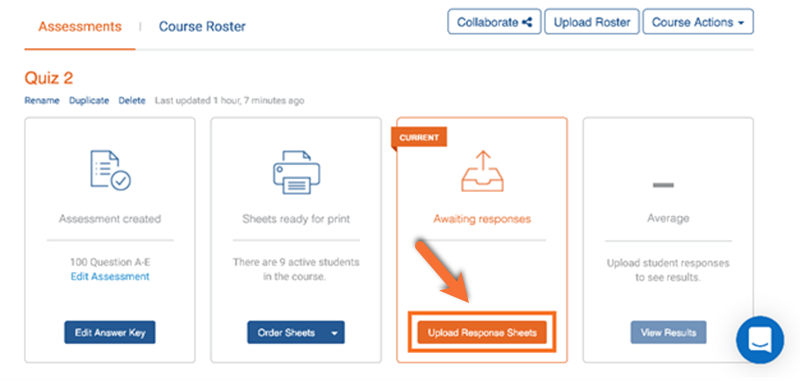
If you have access to a regular scanner, you can scan the response sheets in any order and upload the PDF to your Akindi Dashboard in the Upload Response Sheets option.
Note: As the scanned file includes student personal information (name, student ID, assessment answers), it is not eligible to be emailed. You must use secure methods to move the file from the scanner to your computer (such as a USB or your TMU Google Drive).
If you do not have a secure way to move the file from your scanner to computer, please use the on-campus scanning service.
Assessments completed at The Test Centre
Please provide the Test Centre with a digital copy of blank response sheets for students completing an Akindi Assessment.
Multiple-choice only Akindi assessments
DPS is not able to scan Akindi response sheets provided by the Test Centre, as they are not associated with a specific course and assessment. Once the exam is completed, a course instructor must upload the completed exam sheets into the Akindi Dashboard using the "Independent scanning" steps (above).
Akindi booklet assessments (with questions)
As each booklet (combined questions/response sheets) is uniquely QR coded, each student will need a different booklet/packet. If a duplicate of the same assessment booklet is scanned, student responses may be overwritten.
At this time, individual assessment booklets cannot be downloaded from Akindi; however, you can save the pages for the Test Centre as a standalone PDF for upload to the Test Centre’s portal. Please contact courses@torontomu.ca if you are unsure of the best method to provide the individual assessment from Akindi to The Test Centre.
Time-Based Accommodations
As this assessment is completed on paper, the timing is not managed by the tool, but through the facilitation of the exam.
Scanning make-up tests
If a second answer sheet is uploaded for a student (by the instructor or DPS), it will overwrite the earlier submission and automatically be scored towards the connected grade item.
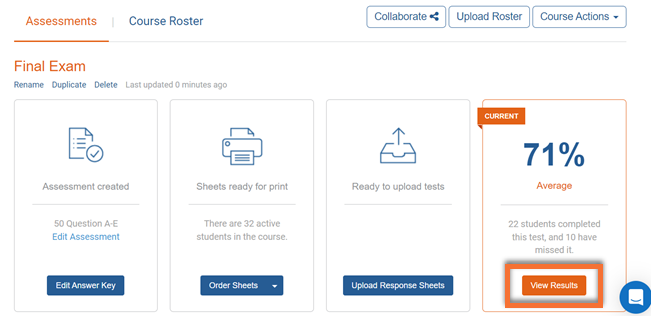
Once the assessment is scanned, you can access grading from the Akindi Dashboard by selecting View Results.
The required steps in the Results view will vary based on the type of assessment that was delivered, and Akindi will guide you through them in order.
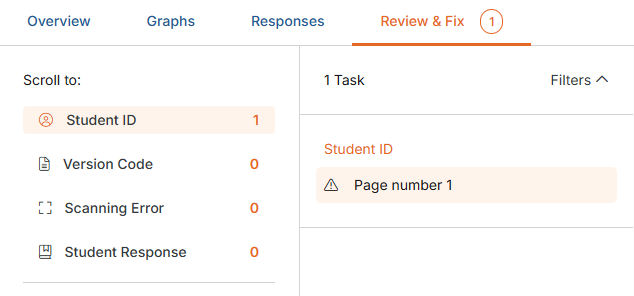
Review & Fix
Before proceeding with grading, address each issue identified in Review & Fix.
This presents a collection of student responses with missing information or errors that require manual review.
Learn more at Akindi’s guide to Review & Fix Exceptions (external link) .
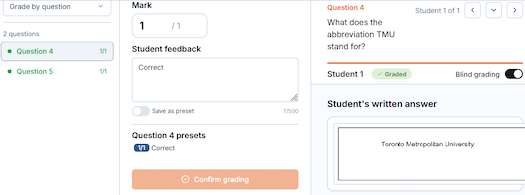
Grading written answer questions
If your assessment included written answer questions, Akindi will add a Grading tab in your assessment. With it, you can view, score, and give feedback to handwritten answers.
Detailed instructions are provided at Akindi's guide to grade written answer questions (external link) .
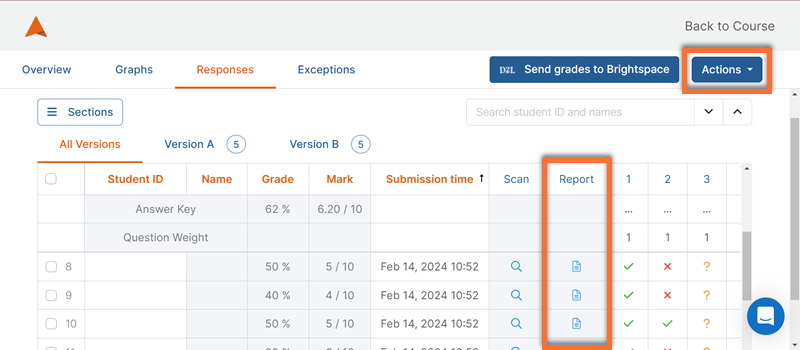
Responses
The Responses tab displays the overall score of each student, including manually graded questions and automatically-scored multiple choice questions.
You can also access a scan of each student’s response with grading annotations, and make changes to the grading.
Detailed instructions are provided at Akindi's guide to the Responses tab (external link) .
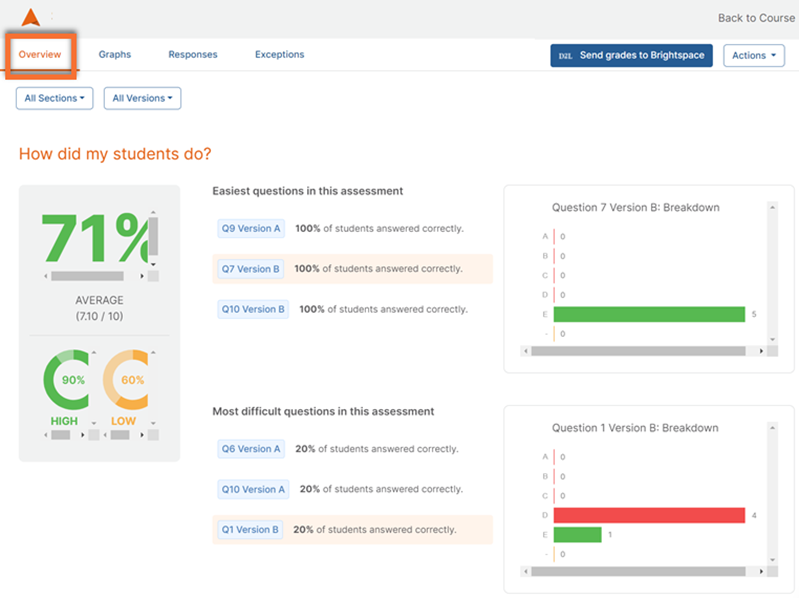
Analytics
A birds-eye view of the assessment, presenting:
- Statistics on how well your students did on the test
- Which questions were easiest and most difficult
- A breakdown of your Akindi discriminatory score, summarizing how well your test was designed based on the results
Learn more at Akindi's guide to Analyzing Assessment Results (external link) .
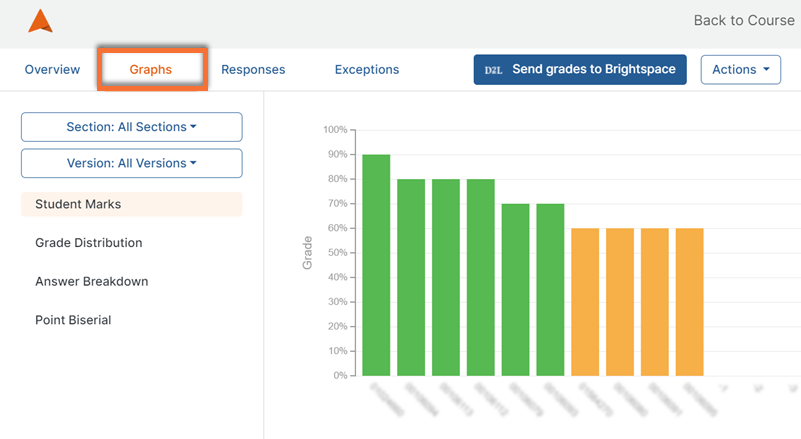
Graphs
View visualizations of your student marks, grade distribution, answer breakdown, and point biserial. Use this to identify questions that may need review.
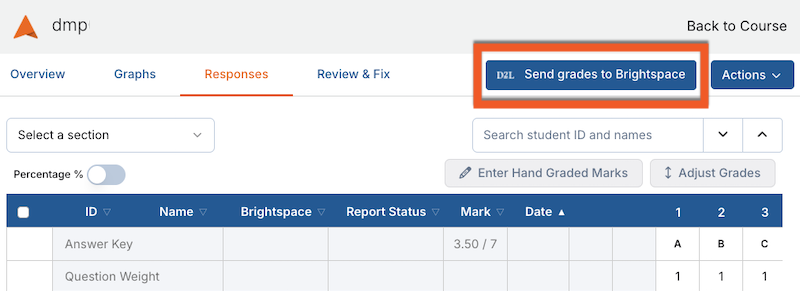
When you are ready to export the grades to your D2L Brightspace course shell, click Send Grades to Brightspace in the top right corner any "Results" page to send grades for all students.
Ensure that you have resolved all issues before beginning this process.
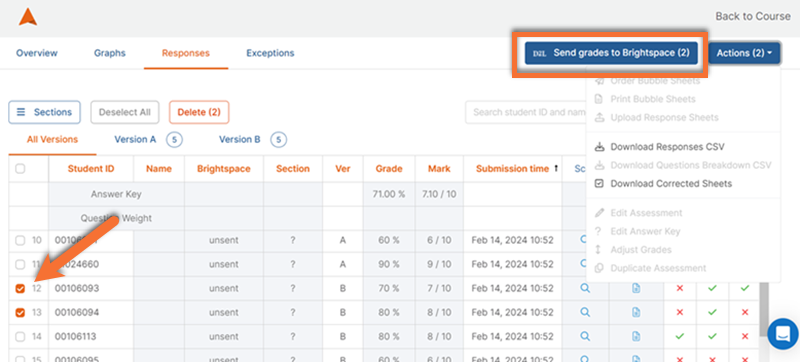
You can also send grades for individual students by navigating to the "Responses" tab and selecting individual students using the left column, before clicking Send Grades to Brightspace.
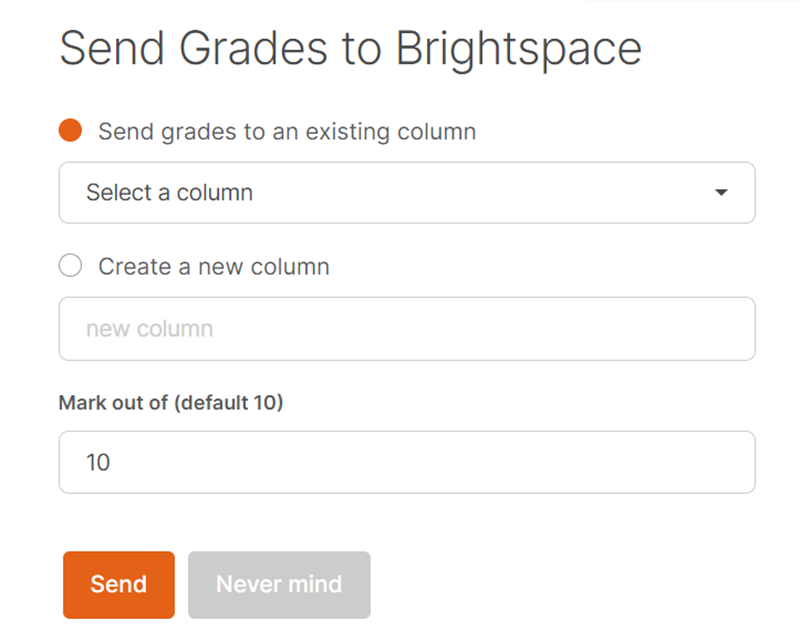
You can choose to:
- Create a new column (which will automatically be visible to students)
- Select an existing column from your Brightspace course
It is recommended to create your intended column in advance, as a "Numeric Grade" in the Brightspace Grades tool, then select it in Akindi.
This allows you to set visibility options and the intended overall course weight of the assessment before syncing the scores from Akindi.
Learn more about Brightspace Grade Items.
Akindi general information
Learn about Akindi, a tool used to deliver on-paper assessments. Akindi is integrated with D2L Brightspace, and is accessed through your course shell.