Embed different types of media

This guide introduces and demonstrates how to show different forms of media on your blog site. This includes videos, audio, images, and more.
Details
Integrated with D2L Brightspace?: No
Contract Start: 2017
Contract End: TBD
Images are a great addition to a blog post, as they can help to illustrate a point, and help to break up the monotony of an all-text entry by adding some personality.
Because a blog is a web-based system, it is extremely important to resize and optimize all images for web delivery before uploading them!
This keeps your blog loading fast, and ensures you don’t eat up your blog quota too quickly.
Each blog has a maximum file space of 200MB.
Each file can be no larger than 2MB.
We recommend keeping images to 200KB or smaller, and hosting audio/visual content on a streaming server (like Google Drive or Youtube).
These steps are useful for anyone who is comfortable using an image editing program, such as Photoshop, Photoshop Express, iPhoto, Gimp, etc. Since each program is different, the instructions below are quite general – referring to the task, instead of the specific name of a tool or button in the program. Please refer to the help documents in your software as needed.
Prepare your image file
- Open your image in your image editing software of choice.
- Look at the dimensions of your image. Your blog post can only display the image at a certain size, so a 1000×1000 image will need to be cropped and/or resized in order to fit.
- Crop: Take a look at the image – is there anything that you can cut off of the image? Cropping tools are great for helping you focus on the most important part of the image.
- Resize: Once the image is cropped as much as it needs to be, it needs to be resized. Your image editing program will have tools that allow you to resize an image to an appropriate size.
- Web-ready format: Save the file to a lower resolution web-ready format. In general, photographs should be exported as .jpg files, while graphics work better when exported as .gif files, but there are also quality settings that you should compare and consider.
- Be realistic. The web is not the place for high-resolution images or video. If you need to include these in your blog post, consider uploading them to Google Drive first, then embedding them in the post.
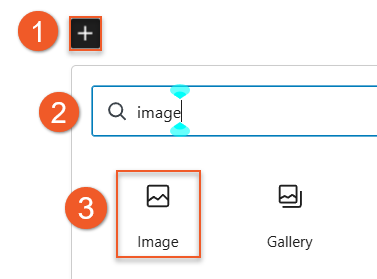
Add the ‘image’ block to the post or page
- Click the plus symbol (+) in the upper-left corner of the editing window.
- From here, you will be presented with a number of options – the simplest thing to do is start typing the word ‘image’ into the search bar. WordPress will show you any blocks that it thinks you may be interested in.
- Locate the ‘image’ block and click on it. This will place the new image block at the bottom of your document.
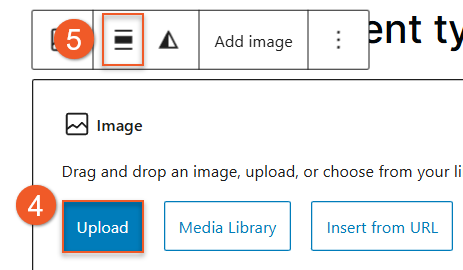
Add your image, then arrange as you like
4. If you have already uploaded the image to the blog, click “Media Library”, and select the image from the collection. If you need to upload the image from your computer, click the “Upload” button and follow the on-screen prompts to upload the image.
5. When the image block is selected, you can choose to align the image centre, left or right. Wide width, Full width, and None are also options you can explore. A duotone filter can also be applied when the triangle icon is pressed.
Important! Add ‘alt’ text
Immediately after uploading an image, look to the right-hand sidebar to add some important details. ‘Alt’ text describes the image for visitors with limited vision – this text is read to them using assistive devices.
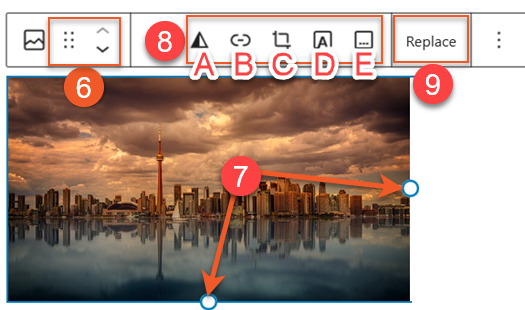
6. When the image block is selected, there are two options for moving the block up or down the page. The six dots are used to drag the image around your post, while the arrows are used to go up and down.
7. If you’d like to adjust the size of the image, select the block. Two small circles will appear on the sides. Click and drag them to adjust the size.
8. There are a handful of options for image customization.
A: A duotone filter can be applied when the triangle icon is pressed.
B: The link icon allows you to add an image link or attach a page link.
C: The square with adjustable corners icon allows you to crop the selected image.
D: The text box icon is for adding text on top of the image.
E: The square with three dots is for adding a caption to your image.
9. If you change your mind about the image you’ve chosen, you can replace it by selecting the “replace” option. You’ll then be able to choose a new image from your Media Library, Upload from your computer, or Reset the image block entirely.
10. Delete any unused images from your blog’s Media manager, to free up the space. Be careful not to upload duplicates of the same image!
Image Size
Your blog’s content area has a limited width, taking into account any sidebars that make up the full width on the right and/or left. That means you are limited to a certain width of image. It is important to make a version of your image that fits within this space before uploading it to the website.
To get the image to the proper width, you may choose to crop (external link, opens in new window) it, removing any unnecessary parts around the perimeter of the image. Otherwise, you can resize/scale (external link, opens in new window) the image.
Since different blog themes may have space for different sizes of image, you may need to try a couple of different sizes in order to find the best one.
Don’t forget to delete any old files from the Media folder. If you neglect to do this, you are using your blog quota for images that aren’t even being used!
Optimize file size and format
Once you have cropped and/or resized your image to the appropriate size, you will need to save or export it in a format that is web-friendly. One of the most important parts of this process is to bring down the quality of the image, and therefore lower the filesize.
Your image file should be no larger than 100KB, preferably no larger than 50KB.
In general, JPG is the format used for photographic images, while GIF or PNG are used for graphics.
Additional resources
There are a number of different ways to include audio in your blog posts.
We do not recommend uploading audio files directly to your blog – WordPress isn’t a media streaming service (which could impact the quality of experience by your visitors) and we are quite restricted for space (so your audio file is likely larger than permitted).
This option leverages the user’s own Google Drive for hosting and streaming audio content. There are a few steps required in order to embed this in a WordPress blog post.
Please note that not all file types can be embedded successfully. MP3 is a supported file type.
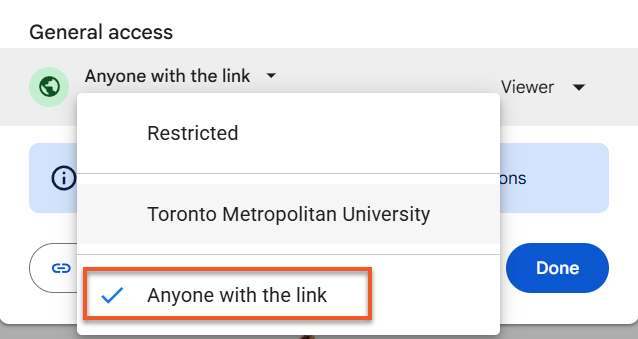
Upload file into Google Drive, then open it in a new window
- Upload the audio file into Google Drive.
- Once it’s uploaded, right-click the file and select Share.
- Change access to "Anyone with the link".
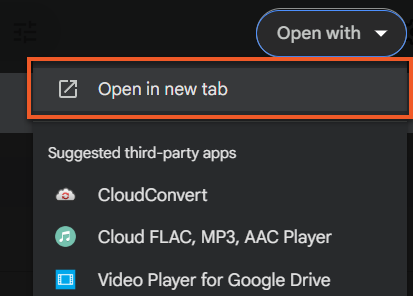
4. Once Share settings are adjusted, double-click on the file to open it. In the top right, select Open with > Open in a new tab.
Retrieving HTML embedded link that will be added to WordPress
To properly embed media, the embed link of the file will be needed. Be sure that you’ve doubled-clicked your media and opened with a new window before completing these next steps.
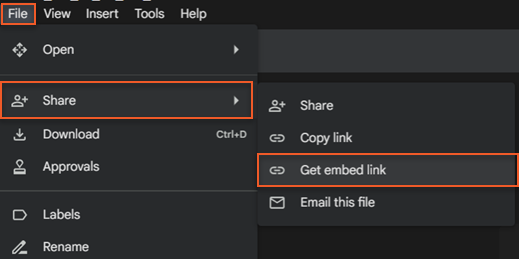
5. In the top left corner, select File > Share > Get embed link. A window with the embed file link will appear.
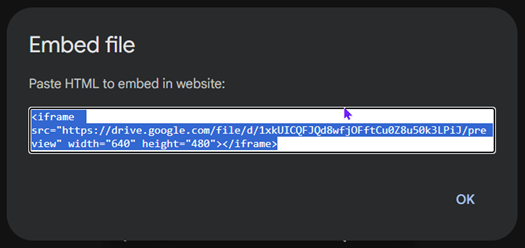
6. Select the whole HTML embed link, then CTRL + C on your keyboard to copy the link.
Add the “Custom HTML” block in WordPress
Finally, you can add the embedded audio to your post or page in WordPress, using the “Custom HTML” block type.
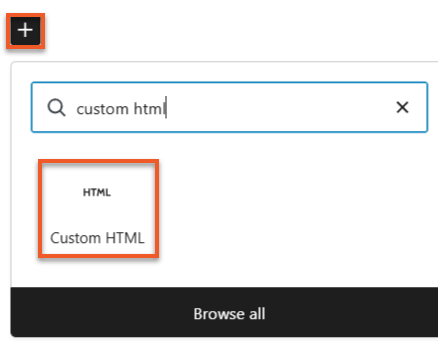
7. In your blog post, add the “Custom HTML” block.
8. Select the text box, then CTRL V on your keyboard. The HTML code will appear in the block.
9. Publish and/or save as needed. Your audio will then be visible on your post.
There are a number of different ways to include video in your blog posts.
We do not recommend uploading video files directly to your blog – WordPress isn’t a media streaming service (which could impact the quality of experience by your visitors) and we are quite restricted for space (so your media file is likely larger than permitted).
Please review the options below, which we recommend.
A note about file formats:
While Google Drive may support any number of video formats, not all of them will work when embedded in WordPress. We recommend videos encoded as MP4.
At this time, video embeds don’t appear to work in Firefox.
Stream Video Platform is a video streaming platform supported to use for all TMU faculty and staff.
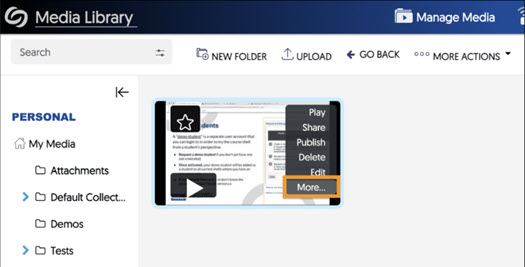
Upload file on Stream
- Login to Stream Video Platform with your torontomu.ca credentials.
- Drag a file or click on Upload, and select the file.
- Once it finishes processing, hover on the thumbnail and click More…
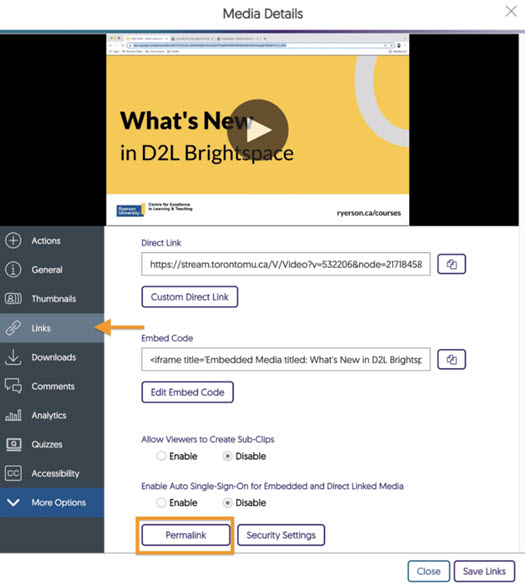
Get the Permalink URL for the file
- Select the Links panel on the left sidebar, then click on the Permalink button.
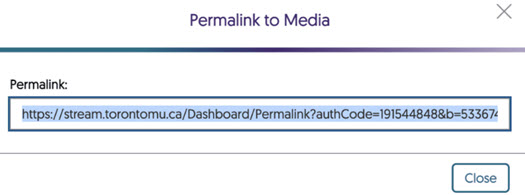
2. Copy the Permalink URL from the dialog box to the clipboard.
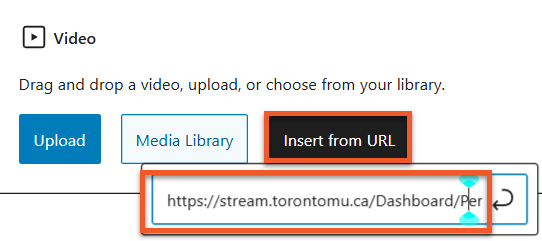
Add the “Video” block in WordPress
- In your post, add the “Video” block.
- Go to Insert from URL and paste in the Permalink URL from Stream.
This option leverages the user’s own Google Drive for hosting and streaming media content. There are a few steps required in order to embed this in a WordPress blog post.
Please note that not all file types will work in all browsers. Please be sure to test out your embed in a few browsers (Google Chrome, Firefox, etc.) to ensure you have used a type that your visitors can view. We recommend the use of MP4.
Upload file into Google Drive, then open it in a new window
- Upload the video file into Google Drive.
- Once it’s uploaded, right-click the file and select Share.
- Change access to "Anyone with the link".
4. Once Share settings are adjusted, double-click on the file to open it. In the top right, select Open with > Open in a new tab.
Retrieving HTML embedded link that will be added to WordPress
To properly embed media, the embed link of the file will be needed. Be sure that you’ve doubled-clicked your media and opened with a new window before completing these next steps.
5. In the top left corner, select File > Share > Get embed link. A window with the embed file link will appear.
6. Select the whole HTML embed link, then CTRL + C on your keyboard to copy the link.
Add the “Custom HTML” block in WordPress
Finally, you can add the embedded video to your post or page in WordPress, using the “Custom HTML” block type.
7. In your blog post, add the “Custom HTML” block.
8. Select the text box, then CTRL V on your keyboard. The HTML code will appear in the block.
9. Publish and/or save as needed. Your video will then be visible on your post.
WordPress can easily embed videos from some popular video streaming services, like Youtube. To try this, make sure you have the URL (web address) for the video you wish to embed, and follow the steps below.
Please note that these third-party tools are not supported at the university, and are suggested on a “use at your own discretion” basis.
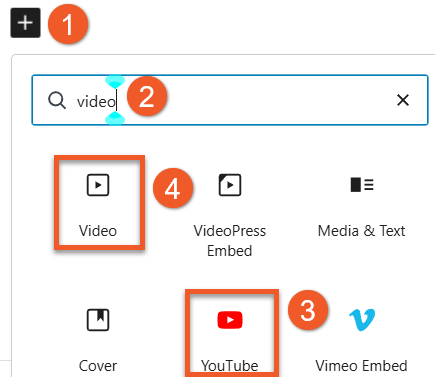
- Click the plus symbol (+) in the upper-left corner of the editing window.
- From here, you will be presented with a number of options – the simplest thing to do is start typing the word ‘video’ into the search field. WordPress will show you any blocks that it thinks you may be interested in.
- Look through the available block options in the Embeds section. If one of these matches the site that you are embedding from (like Youtube), select it and follow the on-screen instructions to paste the video URL (address).
- Otherwise, select the video block. This will allow you to add a URL to a number of embeddable sites.
Note:
If you are trying to embed a video that is hosted on a site that WordPress cannot embed simply using a URL, it is possible you won’t be able to embed it in your blog. For security reasons, it isn’t always possible to use “embed code” offered by some websites.
Did you know?
You can embed many kinds of documents from Google Workspace . This includes videos uploaded to Google Drive, Google slides, and more! This makes it easy to add interesting content to your blog post.
Google content can be divided into two categories: content created using a Google tool (a Google Doc, Google Slides, Google Drawing, Google Sheets) and third-party files uploaded to Google and viewed through a preview (audio and video files, Word documents, PDFs).
At this time, the following cannot be embedded in a WordPress blog post/page: Google Sites.
Embed a media file uploaded to Google (audio, video)
Please review the sections above, for instructions specific to embedding audio and video files that have been uploaded to Google:
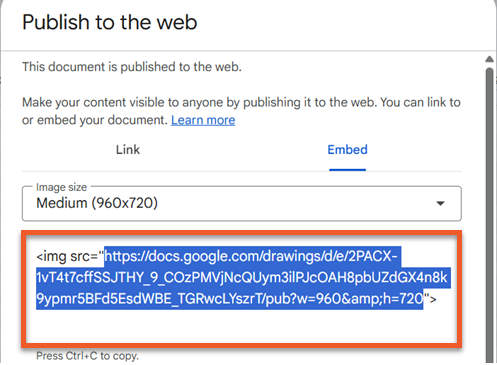
Get the embed code from Google Workspace
- Open the content in Google Drive (Google doc, Google slides, Google Drawings…).
- Make sure your share setting is set to Anyone with the link. Private Google content can’t be embedded as easily.
- In the menu, go to Help. From there, search and select Publish to web.
- Here, you will generate the embed code that will be pasted into your blog post. Be sure to select a size that will fit the space available in the blog post. When in doubt, try a width of 700 or smaller to start.
- Copy the embed code generated.
Extra steps for customizing the Google Doc embed code
The embed code provided for a Google Doc doesn’t work as well without some customizations.
You can add a thin border to distinguish between the Google Doc and your blog post, and you can customize the display size.
All of the additions in the following example are in bold:
<iframe src="https://docs.google.com/document/d/e/2PACX-1vQpBF5Z9a02DALDxXD652Vic622H/pub?embedded=true" frameborder="1" width="100%" height="1500"></iframe>
Add embed code to your blog post/page
Once you have the embed code, you can use it in your WordPress blog post/page.
- Add a Custom HTML block to your post/page.
- Paste the embed code into this block.
- If you want your visitors to be able to view your Google content in fullscreen or download it, you might want to add a link directly to the Google content below the embedded item. (The ability to view content fullscreen will be stripped out of the embed code, for security reasons).