Export and import grades
Overview
Export grades
You can easily save a copy of your students' grades by exporting it from your Brightspace shell's 'Grades' tool.
You may want to use this data to have a record of the grades that you can save outside of Brightspace, or even to do additional calculations that you cannot achieve using the features in Brightspace.
These steps are outlined in "Export grade items from Brightspace", below.
Import grades
Alternatively, you may want to add grades into the Brightspace Grades tool that were collected or calculated outside of Brightspace. There is a recommended way to import these grades into the Grades tool, which we have outlined on this page.
Please be sure to follow the steps below to "Prepare grades for importing into Brightspace" as well as "Import grade items from a spreadsheet".
IMPORTANT: to preserve the privacy of your students, please do not share student data with others and please do not email the exported grades (even to yourself).

1. On the Enter Grades page, click Export.
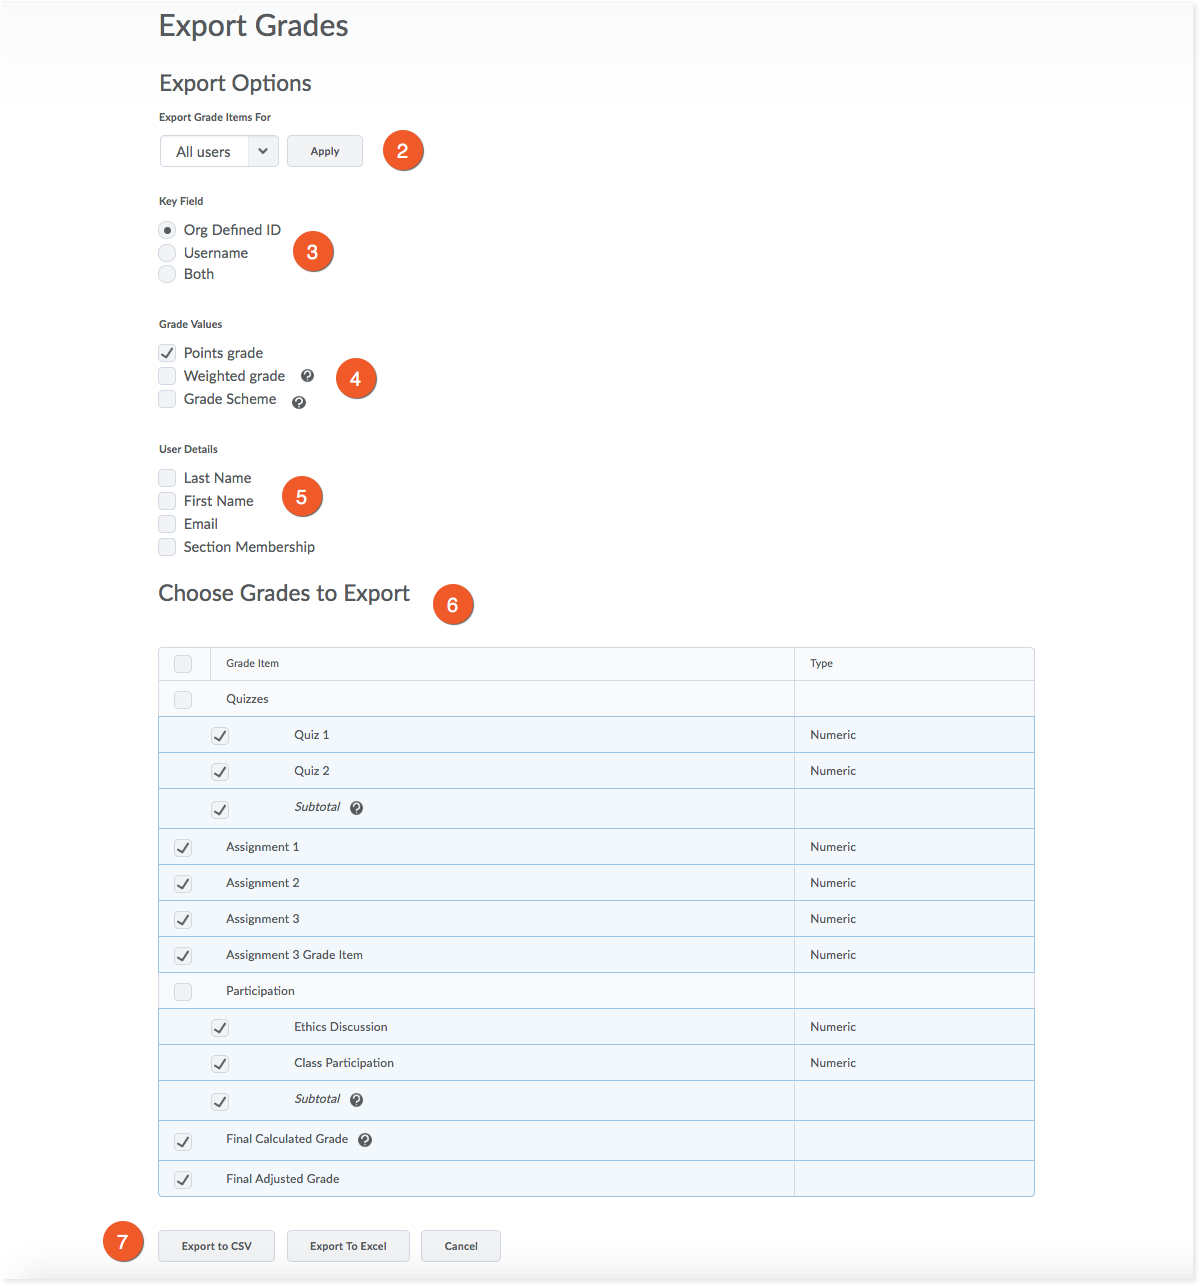
2. By default, you will export all users from your course, but if you want to export a list of only students in a particular section or group, use the Sections or Groups filters to choose.
3. Select the Key Field you want to use to identify users - either the Org Defined ID (Student #) or Username (TMU username). If you're not sure, choose Both.
4. If you want, you can use Sort By to choose how your initial downloaded file will be sorted. Don't worry too much about this, as you can open the exported file in Excel or Google Sheets, and re-sort as desired.
5. Select the Grade Values you want to export. If you will be updating the downloaded spreadsheet, then re-importing to Brightspace, it's easiest to only choose "Points grade".
6. Select Last Name, First Name, and Email, if you wish. You may find this useful if you are exporting for purposes where you require the student's email address.
7. If you have multiple course sections in your Brightspace shell, or wish to use group enrollment information outside of Brightspace, you may wish to select the Section Membership and/or Group Membership options.
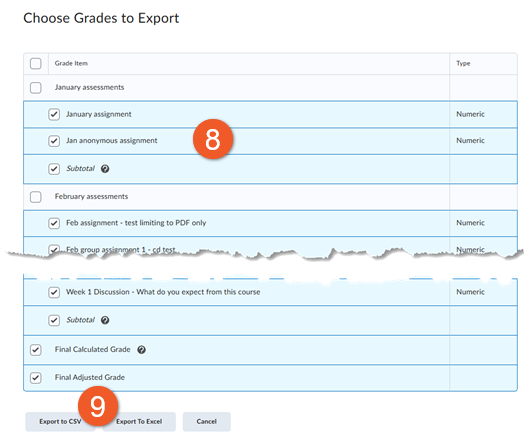
8. In the Choose Grades to Export section, click on the checkboxes for the grade items you want to export.
9. You have two export options:
If you are exporting a file to enter grades and re-import, choose Export to CSV. You can still open this file type in Excel to enter grades. The file type must remain a .csv file in order to successfully import back into D2L.
If you choose Export to Excel, please note you cannot use this Excel spreadsheet to re-import back into the D2L Grades tool. We do not recommend using this method if your goal is to work on your grades in a spreadsheet and re-import them. This option is good for saving an archive of your grades to Excel.
If you aren't sure how you will use your exported file in the future, the Export to CSV option is the best choice, as you will have the most flexibility.
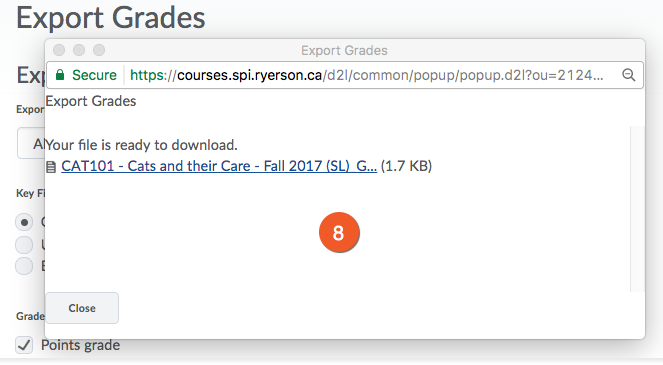
10. A pop-up window will appear. Click on the Download button.
Depending on your browser and operating system, the file may automatically download to the folder where all of your downloads are, or you may be prompted to choose a folder.
You can enter and calculate your grades in a third-party application, like Excel or Google Sheets, and then import them into the D2L Brightspace Grades tool.
Below, we have outlined the process that seems to work best for our instructors.
A. Create the grade item(s)
Even before you start grading in Excel or Google Sheets (or whichever application you prefer), it is best to create the columns in your course shell in D2L Brightspace.
We also recommend hiding the grade item (column) from all students at this stage, so you can later control when students are able to see their grades (and, subsequently, receive email Notifications).
- Create Numeric Grade Items for each column you will need to grade.
- Hide the grade item, if you don't want the students to be notified as soon as the grades are uploaded.
B. Export the grade items from Brightspace
After creating the grade column(s) in your Brightspace shell, you will need to export the grades to a spreadsheet format that you can work on outside of Brightspace.
Follow the steps outlined in the Export grade items section of this page.
C. Enter the grades into the exported spreadsheet
Once you have exported a spreadsheet file containing the column information from your Brightspace shell, you will need to enter the grades.
*Be sure to match the grades to the students! Double-check the grades before you upload them to your Brightspace shell.
If you are copying and pasting grades from another spreadsheet, make sure the other spreadsheet has the students listed in the same order as the spreadsheet you got from Brightspace. It's worth taking the time to double-check your list before you begin.

- Once you open the exported CSV file in Excel or another spreadsheet program, you can begin entering grades for each student. For grade data to be imported correctly later, you must enter the points value under the grade item column. For example, if the max points for an assignment is 10, you will enter the number of points the student achieved out of 10.
- You can view the number of max points in the title of each column (e.g. <MaxPoints:10>)
- Save the file in "Comma-separated value (.csv)" format. Please check with your spreadsheet application for instructions on how to do this.
Create a grade item/column *during* the import stage (not recommended)
The recommended workflow (as outlined above) is to create all grade items in your Brightspace shell before the import process. We don't recommend the creation of new grade items/columns using the spreadsheet, during the import to Brightspace.
Why?
- A new grade column created during the import process will be visible to students immediately after the import. This may generate an immediate email notification to the students to let them know that a new grade has been posted.
- The heading for a new grade item must follow a very specific naming convention in the spreadsheet. It is very common for people to have mistakes in this heading, therefore creating errors during the import... and generally creating more work for themselves in the long-run.
If you choose to not to follow the recommended workflow, and would prefer to create the new column during the import process, you need to ensure the name of the column follows the necessary naming convention:
Grade Item Name Points Grade <Numeric MaxPoints:10 Weight:10>
You can change "GradeItemName" to the name of your grade item, but you MUST include "Points Grade" after the name or you'll receive an error notification upon importing the file. The MaxPoints and Weight can be adjusted appropriately.
Before you begin, make sure you have followed the steps outlined above, and have saved your spreadsheet as a "Comma-separated value (.csv)" file.
If you miss any of these steps, your import file will not work.
Once you've entered grades and saved your CSV file, you can begin the importing process.

1. In your D2L shell, go to the Grades > Enter Grades, and click on Import.

2. Click Browse.
On your computer, locate the file you want to import and click Open.
3. ONLY if you created new grade items in the CSV file, select Create new grade item when an unrecognized item is referenced.
Note: We recommend that instead of doing this, follow the process above in the "Prepare grades for importing into Brightspace" section, and create the grade item in the gradebook first, then export the gradebook, so that the CSV will contain more information about that grade column, reducing the chances of experiencing an issue.
4. Click Continue.

5. If you created new grade items:
- Select the Create New Grade Item check box beside each of the items you want to create.
- Select a grade item Type.
- Click Continue.
- Fill in the grade items’ properties.
- Click Continue.
Note: If you create a new grade item in the CSV file, that grade item will be active by default in D2L. You will not have the chance to hide them from students before they get a notification about a new grade posted. If you do not want grades going live right away, making them visible to students, it’s recommended that you create the Grade Item first in the Grades tool before importing so you can control the settings (see section above, for the full process).

6. View error and warning messages associated with the import, and click Continue.
Note: Fields with errors are not imported.

7. Preview your import and click Import.