Email and notifications
There are a variety of ways to reach your students using email.
- Email the entire class using the Classlist tool.
- Email individual students or select groups of individuals from various tools, including the Classlist and the Grades tool.
- Automatically notify students of updates in the class using Notifications (if students have turned on Notifications).
- When creating an Announcement, also email the same content to your students.
- Send automated emails based on criteria that you set.
Please note: You can only use any of the email functionality in Brightspace if your course shell is active (visible to students). To comply with TMU's policies, you can only make your shell active during the term you are teaching this particular group of students. See our instructions to make your course shell active.
Find the Classlist in the top menu. If it isn't there, review how to enable course tools.
Point your students to our Student guide to Brightspace email.

Please note that email functionality within D2L Brightspace is not directly connected to your TMU Gmail inbox. To ensure you maintain an accurate record of any messages you have sent to your students, please make sure to check this setting, to ensure that you receive a copy of your messages.
We recommend creating folders in Gmail for each class you teach each term, so you can easily find your messages in the future.
In the upper-right, click on your name in the top navigational minibar. Select Account Settings from the menu.

Click on the Email tab at the top of the Account Settings page.
Select the Send a copy of each outgoing message to… checkbox to make sure any email you send is automatically sent to your email address.
Click on Save and Close to save your changes
IMPORTANT: If you forward your copy of the email receipt
If you are set up to receive a copy of your outgoing email, you will receive a special version of the email if you have a role like Instructor or TA in the shell from which the email is sent.
This email will contain a "receipt" - a list of the email addresses for everyone you sent to, as a sort of confirmation. This is private information that should not be shared with others, so you must take special care if you plan to forward this email elsewhere.
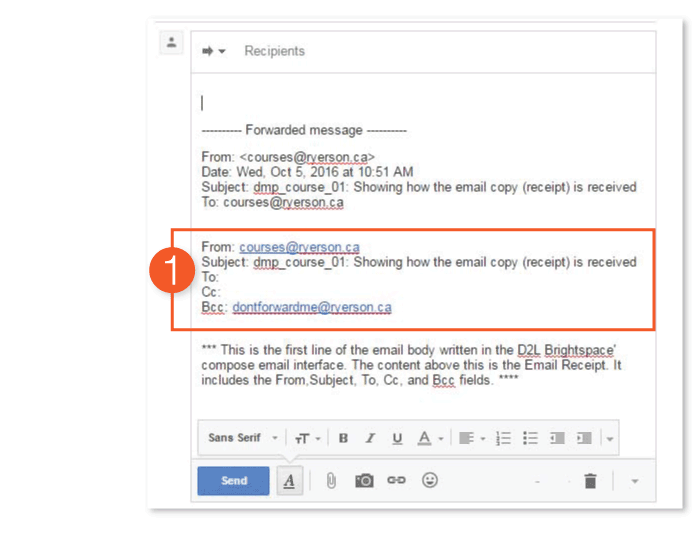
If you choose to forward this email, please do the following:
- Note the location of the confidential email addresses, in the body of the email you have received.
- Make sure you delete this portion of the email, to avoid a privacy breach.

Select the appropriate course from your MyCourses page. In the course shell, click on Classlist in the top navigation.
Click on the Email Classlist button.

If you want to simply send an email to all of the users in your class, click on the Compose Email button at the bottom of the list of users.
Otherwise, you can choose to email users with a specific role (like Instructor or Student) by clicking the appropriate tab (above the list of users) first.

In the popup window that appears, you will see all of the options for your email message.
The To: and Cc: fields will be empty. This is fine, ‘though you can add additional email addresses, if appropriate. Please keep TMU’s privacy policy in mind.
Email recipients from the classlist are summarized in the Bcc field, without listing their email addresses.
The subject line starts with the name of your course shell. Please leave this in place, as it makes it easy for recipients to sort their emails. You can add to the subject line, with information that indicates what this message is regarding.
Write your email, as usual, then click the Send button at the top or bottom of the page to send the email. The email will appear in the users' Toronto Metropolitan University email inbox or their default email inbox if they don't have a university account.
In the body of the message, you can use the text editor to do some basic formatting (font size, colour, bold, indent, bullet lists, tables, links, etc), and you can even insert an image into the body of the message, if necessary. Try to avoid including large images or attachments. It’s better to link to a document in a shared drive (ensure you’ve shared with these users!), if you need to share non-text content.
If you are emailing a large number of students (ie. more than 100), after you click on the Send button, you may see a message that your message is queued to be sent as a background task. This is to help manage performance on the server. It should only take a few minutes for all of the emails to be sent.
Note: As an instructor, you will not be able to email your students while your course is inactive (see: Making your Course Shell Available). You can still view your classlist during this period.
Note: Students are unable to send instructors an email through the Brightspace system. For this reason, we recommend informing students how to contact you, the instructor, in Announcements and your Course Outline.
Select the appropriate course from your MyCourses page. In the course shell, click on Classlist in the top navigation.
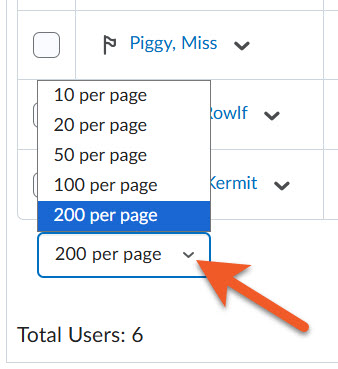
You will only be able to select from students that appear on the current page, so if your classlist is large enough to span multiple pages, you may be able to adjust the number of users per page, to make this easier.
At the bottom of the page, you can adjust the number of students that appear per page. We recommend setting this to a high number, so that, if possible, you can always see all students on one page.
If the students you wish to email still span multiple pages, you will need to repeat the following steps for each page.
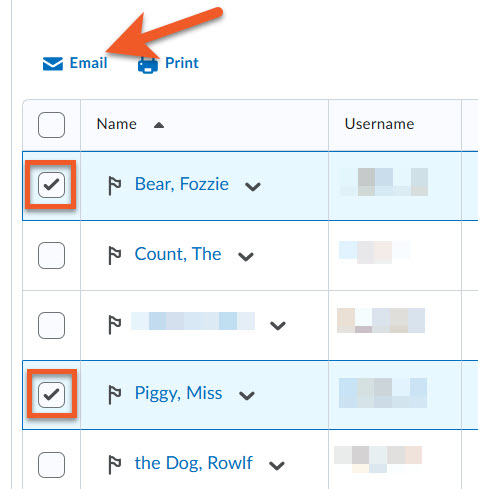
Select the checkbox next to the student(s) you want to email.
Click on the Email link at the top of the list of students.
In the popup window that appears, you will see all of the options for your email message.
The To: and Cc: fields will be empty. This is fine, ‘though you can add additional email addresses, if appropriate. Please keep TMU’s privacy policy in mind.
Email recipients from the classlist are summarized in the Bcc field, without listing their email addresses.
The subject line starts with the name of your course shell. Please leave this in place, as it makes it easy for recipients to sort their emails. You can add to the subject line, with information that indicates what this message is regarding.
Write your email, as usual, then click the Send button at the top or bottom of the page to send the email. The email will appear in the users' Toronto Metropolitan University email inbox or their default email inbox if they don't have a university account.
In the body of the message, you can use the text editor to do some basic formatting (font size, colour, bold, indent, bullet lists, tables, links, etc), and you can even insert an image into the body of the message, if necessary. Try to avoid including large images or attachments. It’s better to link to a document in a shared drive (ensure you’ve shared with these users!), if you need to share non-text content.
If you are emailing a large number of students (ie. more than 100), after you click on the Send button, you may see a message that your message is queued to be sent as a background task. This is to help manage performance on the server. It should only take a few minutes for all of the emails to be sent.
Note: As an instructor, you will not be able to email your students while your course is inactive (see: Making your Course Shell Available). You can still view your classlist during this period.
Note: Students are unable to send instructors an email through the Brightspace system. For this reason, we recommend informing students how to contact you, the instructor, in Announcements and your Course Outline.
When students first open your course shell, the first thing they see is the Announcements. This is a great place to add time-sensitive information that is specific to this group of students, such as classroom changes, details about a pending deadline, etc.
In the Announcement setup, you can also select an option to send an email copy of the announcement to all of your students. The email is sent a few minutes after the announcement is published, so it's a great way to push information to your students in a timely manner.
Visit our Post announcements to your class instructions.
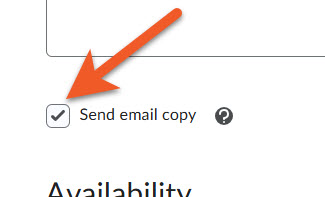
If the checkbox for Send email copy is selected, when the announcement is published, a copy will be emailed to all entitled users including those who have opted out of announcement notifications.
- The email will be “from” from the email address of the person who publishes the announcement, and you should receive a copy of the message in your inbox.
- This option will be automatically deselected when an announcement is copied or edited, and must be selected again before republishing.
- Please be aware that if users are already receiving an automated notification email about announcements, this may result in duplicate or similar emails.
- Note that any inline images will be included in the email, but inline audio/video will not, as this is not possible in email in general.

From a particular assignment, you have a couple of email options.
In your course shell, go to Assessment > Assignments.
Click on the name of the assignment, to see the list of student submissions to that assignment.
You can:
- Email students who have not submitted their assignment yet.
OR - Select and email a particular student about their assignment submission

In Grades > Enter Grades, you can select one or more students, using the checkbox to the left of their name, and then click on the Email link above the student list to send them an email.

In your course shell, in the top navigation, click on Communication > Groups. Then, select the appropriate group category from the View Categories dropdown list.
Select one or more groups, using the checkbox to the left of the group name, and then click on the Email link above the student list to send the members of the group(s) an email.
The Intelligent Agents tool allows Instructors to set up automatic notifications to be sent to themselves, advisors, and students when specified course performance criteria are met.
It can be used to both recognize student achievement (e.g., a high score on a quiz) and warn of potential problems (e.g., lack of online activity or poor performance on an exam).
Find out more about creating Intelligent Agents.
Notifications is a tool that allows every user (students and instructors) to receive an email alert when there are new items or certain kinds of changes in their course.
You can set up a notification to alert you about new content items, news/announcements, and even posted grades!
Each person must enable their own notifications
Each user is responsible for setting up email notifications for their courses - it is not something Instructors will be able to do for them.
This is why it's important for instructors to encourage their students to set up their notifications at the start of the term.
Students will still be able to receive emails sent from instructors regardless of their notification settings.
Please note: While SMS messaging was previously available, as of July 2024, SMS (text message) notifications are no longer available.
Read more about this change.
Related topics
Announcements and notifications