Groups
Find Groups in the top menu, under Communication.
The Brightspace Groups tool enables students to work on and submit collaborative group projects, or break into smaller discussions.
You may organize students into groups of a particular size automatically, manually, or allow students to choose their group for a given activity.
Brightspace Groups may be used to facilitate:
- collaborative group projects (groups in conjunction with private discussions, group assignments)
- selective release of course materials and activities (groups in conjunction with release conditions)
- student sign up for presentation topics or times (via a self-enroll group)
Point your students to our Student guide to participating in Brightspace groups.

Before you begin:
Consider how you want the students to be assigned to their groups:
- Automatic enrollment - Brightspace adds the members to the groups
- Manual enrollment - someone with an Instructor or TA role in the course shell adds the members to the groups
- Self-enrollment - the students self-select their groups
*Note that the Instructor can always manually assign or re-assign group members, regardless of the initial method of selecting membership.

- Inside your course shell, select Course Admin from the top navigation.
- Under Learner Management, click Groups.

3. Select New Category.
About Group Categories:
In D2L Brightspace, a Group Category is just a set of groups. For instance, you might use a category to create a set of groups for a group project, and a second category to create a set of groups for in-class discussions. Each student could be enrolled in a group in each category.

4. Fill in the Category Name of the groups and a Description, if desired.
For example, the category name could be “Group Presentation”, and you could summarize what the presentation assignment is in the description.

5. Enrollment type
Decide how the groups will be created, and whether students will be automatically enrolled into the groups.
Choose wisely! This cannot be changed once the groups are created!
No Auto Enrollment (instructor enrolls group members)
Instructors must manually enroll the students into their groups once the groups have been created. See below for more information.
- # of Groups - No auto enrollments You will identify the number of groups to be created.
Auto enrollment (Brightspace enrolls group members)
Groups will be created by either group size or number of groups. Students will be randomly, automatically, assigned to each group. Instructors will always have the ability to enroll or unenroll students in any group.
- Groups of # - You will identify the size of the group (capacity), Brightspace will determine the number of groups.
- # of Groups - You will identify the number of groups, Brightspace will determine the size of the group.
Self Enrollment options
Students will self-enroll into their preferred groups. They will be able to see the other members of their group once they have enrolled (but not before). Instructors will always have the ability to enroll or unenroll students in any group.
- Groups of # - self enrollment You will identify the size of the group (capacity), Brightspace will determine the number of groups.
- # of Groups - self enrollment You will identify the number of groups, Brightspace will determine the size of the group.
- # Groups, capacity of # - self enrollment You will identify both the number of groups, or the size of the group (capacity)
Single-user, member-specific groups
Brightspace will create a group for each student. These can be great for facilitating individual reflection activities.

6. Enter the number of groups to be created (or, if you selected Groups of #, enter the size of each group).
7. Select Restrict Enrollments To if you wish to create sub-groups within a particular pre-defined group of users, such as students from a particular course section, or a group that you have created previously.
If your course shell has more than one course section, and you wish to ensure groups are made up only of students from the same section, the 'Restrict Enrollments To" feature may work for you.
Please note that you will need to create a separate group category with this type of restriction for each section. Any groups created within that category will be made up only of students from that one section.
Also, keep in mind that if you create multiple group categories for one assignment, Brightspace only allows 1 group category per assignment, so you will need to create multiple instances of that assignment (and the grade item that goes with it), and add restrictions, so that only the relevant students can see that assignment. Contact our team if you have questions about this, as it can be a little bit complicated.

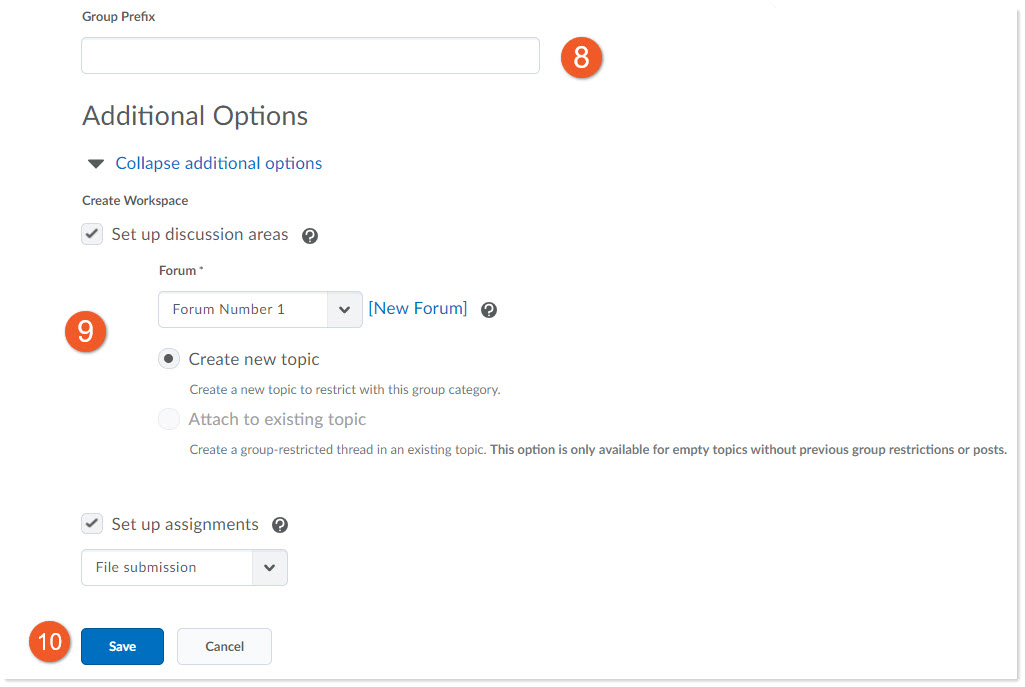
8. If you want each group within your group category to have a name that starts with the same prefix, you enter this in the Group Prefix field. For example, Presentation Group 1, etc, rather than the default, which is Group 1, Group 2, etc.
Additional Options:
9. Select Set up discussion areas to create topics or forums that are limited to each group.
Select Set up assignment submission folders to create assignment submission folders that one member of each group can submit to for the group (and all members receive the same grade and feedback). However, we actually recommend setting up the assignment separately, then selecting the group category, as you will have easier access to all of the assignment settings.
If you select these items, the next couple of screens will require you to fill in some details about the discussion areas and group submission folders, so that they can be created and linked to the groups. Most fields can be edited again later, in case you don't have all the information you need, or change your mind about some details.
10. Click Save.
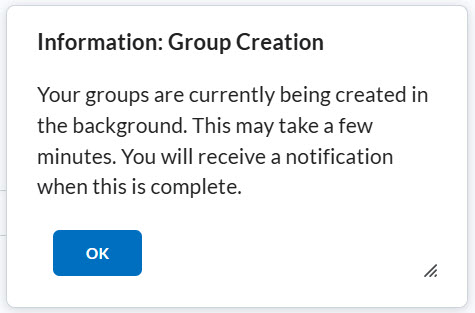
You will see a popup message, warning that your groups are being created. If you have a relatively typical number of students/groups (under 100), click on “OK”, then click on Communication > Groups in the top navigation, to reload the page, and you should see your groups.
If you have a very large enrollment in your shell, it may take a minute or two, and you will see a notification (the bell icon in the top navigation) when the groups are finished being created.

Once the groups have been created, the instructor always has access to review the membership of the groups... and make changes where needed.
To access the membership for all groups in a group category:
- Click the arrow icon next to the name of the group category.
- Click the "Enroll Users" button.

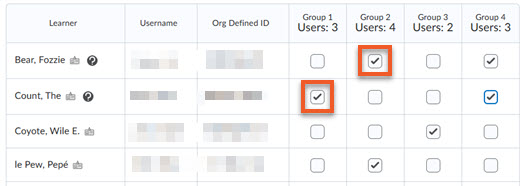
When you access the group enrollment for an entire category, you will be presented with each of the groups along the top, and the list of students along the left.
Simply check and uncheck the appropriate boxes to add or remove students from groups.
Keep in mind that Brightspace will not prevent you from adding the same student to more than one group in a category!!
- To add a student to a group, check the box for that student in the appropriate group column.
- To remove a student from a group, uncheck the box for that student in the appropriate group column.
If you have a very long list of students, you can use the filters (the search field, and "Show Search Options" link) to limit the list of students.
For example, you can show only the students who haven't yet been added to a group (specific instructions on this topic can be found later in this page).
You can also click on the column header, "Learner" to see options to sort by last name, first name, A-Z or Z-A.
Click the Save button to save your changes.
You may have students join the class after your groups have already been created. There is one setting that will help to ensure that new students are added to a group automatically.
Ideally, this should be enabled when you create the groups... but it can be set after the groups have already been created.
There are a few limitations:
- This option is only available for groups where students were automatically enrolled initially ("Groups of #" or "# of Groups").
- This option will only add newly enrolled students to a group. It will not automatically check the existing classlist to see if there are students without a group.
For any cases where this option will not work, please see the instructions below on how to locate students without groups (and add them to groups).
- Go into the Groups tool, and select the appropriate group category from the "View categories" dropdown menu. This will ensure you are looking at the Working Groups category and groups.
- Click the arrow icon next to the appropriate category (above the list of groups), then click "Edit Category".
- In the "Group options" section, check "Auto-enroll new users". This setting will ensure that new students to the course are automatically added to a group in this category.
- Click "Save".

Sometimes, the instructor needs to add another group to an existing group category (for example, due to late enrollments).
To add a group to an existing group category:
- Click the arrow icon next to the name of the group category.
- Click the "Add Group" button.
- Follow the on-screen instructions to generate a new group within the category.
- Add members to the group, if necessary.

If you find that you have more groups than you need in an existing group category, most of the time, it is not a problem to simply leave them there. If you have late enrollments, or need to move students around, you can add them to the empty group.
If you need to remove a group to an existing group category:
- Select the checkbox to the left of the name of the group you wish to delete.
- Click on Delete (located above the list of groups).
- In the popup message, click on Delete Groups to confirm that you wish to permanently delete the group.
Note: In the popup message, you may notice a warning that “Groups and their associated activities are deleted in the background. This may take a few minutes to complete.” If you are deleting a few groups (<100), this will typically only take a few seconds. You may need to refresh the page to see the changes.
Restore a group you accidentally deleted
If you made a mistake, and deleted groups that you shouldn't have, it is possible to restore the groups, their enrollments, and any student work that is related to that group (ie. group assignments, group discussions).
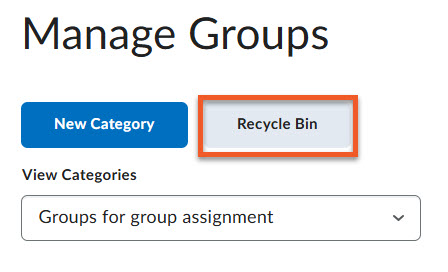
To restore deleted individual groups, go to Communication > Groups.
Click on Recycle Bin.
Note: If you have deleted the groups very recently, please note that it may take several minutes for them to appear in the Recycle bin.
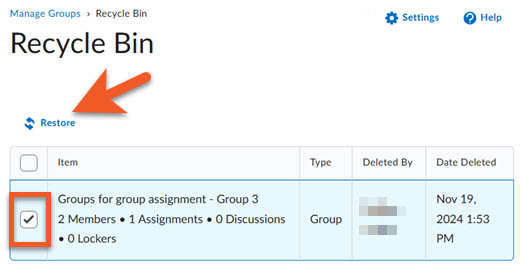
Select the checkbox in front of the deleted group(s) that you wish to restore. Below the name/description of each group, you can see any associated activities that will also be restored.
It is recommended that you make a note of which group(s) you are restoring, as there will be a slight complication with enrollments, which is explained below.
Click on Restore.
Warning: Some students may now be enrolled in more than one group
If you delete, then restore a group that had students enrolled in it, those students will now be enrolled in 2 or more groups.
This is because when the group was deleted, the students were redistributed into remaining groups.
When you restore group(s), the students reappear in those groups. However, they also remain in the group that they were temporarily moved into. This is because the student may have completed work while in that temporary group.
Please check assignment submissions and group discussions to ensure that those students did not submit any work while they were temporarily in a different group. If everything looks okay, you can use "Enroll users" to unenroll the student from their temporary group. It's absolutely vital that you do this BEFORE grading any group work, or the student may end up with an incorrect grade.
In the example on the left, "Group 3" was deleted, and then restored. Therefore, you can delete these students from the group that is not "Group 3".

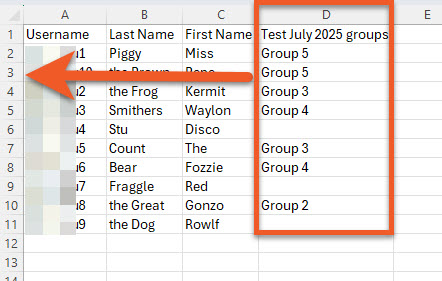
Please note: If any of your students are not assigned to a group, they will not appear in this report. If you require a full list of your students, including those not currently in a group, you may wish to go to Grades > Enter Grades > Export, instead. You can include Groups in the report. You can find full instructions on our Export and import grades page.
In your D2L Brightspace course shell, click on Communication > Groups in the top navigation.
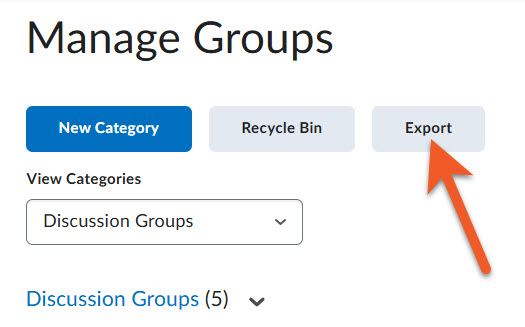
On the Manage Groups page, click on Export.
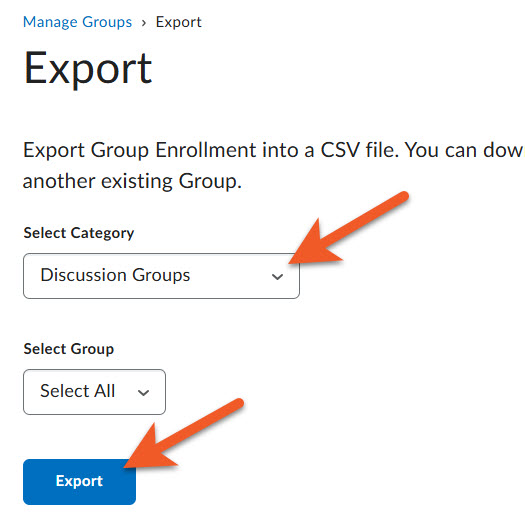
Select the Group Category that you wish to export the list of students for from the Select Category dropdown. Keep in mind that a Group Category is a set of groups, such as all the groups used for class discussions or a group project.
If you only wish to export the list of students from one group within a category, you can then select that group from the Select Group dropdown, but in most instances, you will want to see members of all groups in a given category, so leave this set as "Select All".
Click on the Export button.

Wait for D2L to generate the file. For most courses, this will only take a few seconds, but if you have a large number of groups in the category, it may take a minute or longer.
When you see the "Complete" message, click on Download, to download the CSV file to your computer. If you are not prompted for the location, you will be able to find the file where you find all of your downloaded files.
You can open the CSV file with Microsoft Excel, Google Sheets (after uploading to your Google Drive), or most spreadsheet software.
If you have a fairly typical class size, of perhaps 100 or fewer students, this process may not be ideal for you. You will find the instructions above, in the “Assign users to groups” section, which explains how to use the “Enroll users” function in the Groups tool, to be easier/faster than creating an import file.
If you have a larger class, and have created a group category with auto-enrollments or self-enrollments, most or all of your students should already be in groups, and you will also probably find it more efficient to make changes using the built-in “Enroll users” functionality.
Using a CSV file to import your students into groups is only efficient if you have a very large class with a very large number of enrollment changes to make, have been keeping track of those in a spreadsheet, AND you are comfortable working with spreadsheets. This process requires you to be very precise.
D2L requires you to use a CSV (comma delimited) file that is in a very particular format, so that it can import your list of students and their group enrollments.
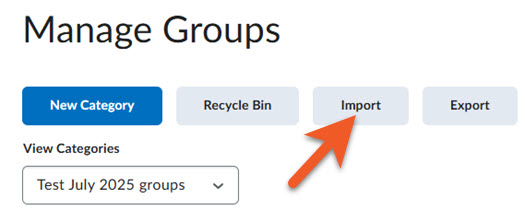
In your course shell, go to Communication > Groups, then click on Import.

Click on Download template CSV to download the template file to your computer.
Navigate to where you saved the file and open it in your spreadsheet software.
Ultimately, the file that you import into D2L will need to follow this format, with only these 3 columns, but you’ll find it easier to follow if you have more information to look at while you’re working through the process. You will source the information you need from other places, and paste it into one spreadsheet. The steps below walk you through the process in a way that should be easy to follow.
Note: In these instructions, we are using Microsoft Excel, but you might use different spreadsheet software. If you don’t have appropriate software installed on your computer, you can upload the file to your Google Drive, and edit it with Google Sheets, then download the CSV file. Some details of the process may look slightly different than pictured below, if you use Google Sheets or other software, but the steps should be mostly the same.

2. Export from Grades, so you have a complete list of student usernames
To ensure you have a full list of student usernames for your class, as well as any existing group enrollments (if there are any), you’ll need to export a file from D2L. The information you’ll need is found in an export from the gradebook.
In your course shell, go to Grades > Enter Grades, and click on Export.
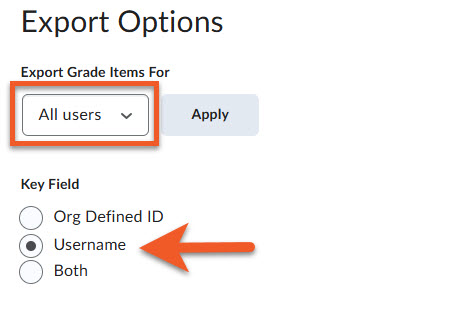
On the Export Options page, make sure that the “Export Grade Items For” dropdown has All users selected.
For Key Field, make sure that you select Username.
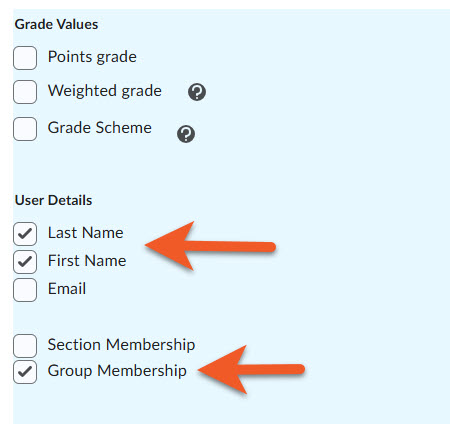
You will not need any grades for this export, so deselect all items under Grade Values.
In the User Details section, select Last Name and First Name. While you can’t include this information in your final import file, you will find this makes it easier to find students when you are updating their information in the spreadsheet, especially if you have collected their group information separately.
Select Group Membership, so that if the student is already enrolled in a group, you will be able to see this information.
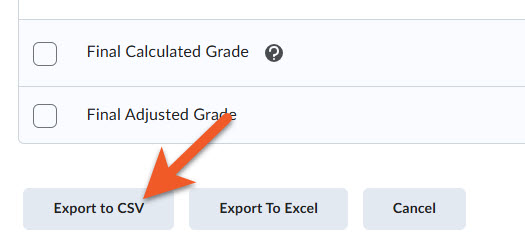
Deselect all grade items. You will not need any of that information in the group enrollment process.
Click on Export to CSV.
In the popup window that appears, wait for the file to be processed, then click on Download, and pay attention to where you save the file on your computer.
3. Prepare the spreadsheet for your import
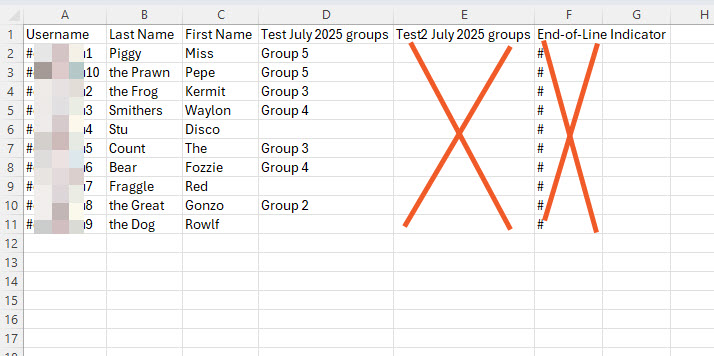
Use your spreadsheet software to open the CSV file that you just downloaded from Grades.
It will look something like this, with all students’ usernames and names listed, as well as a column for each group category in this shell, and if students are enrolled in a group in that category, you will see the group name(s).
Identify which column belongs to the group category that you will be importing to. You will need to keep that column.
Delete the columns for any other group categories, and delete the column titled “End-of-Line Indicator”.
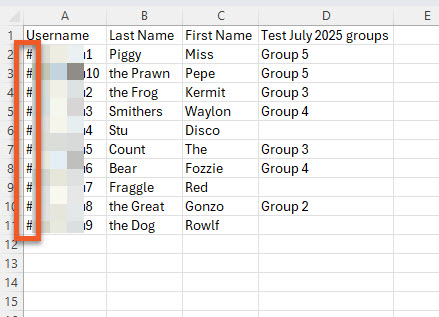
Note that in the “Username” column, all student usernames start with a hashmark (#). The Groups Import process will reject your file if it has these hashmarks.
Use Find & Select to replace “#” with “” (nothing).
If you’re using software other than Excel, this might be “Search & Replace” or something similar.
Now, let’s make this spreadsheet look a little more like the required import template:
- First, move the group column from its current position, to be the first column.
- Then, add a new column to the left of column A. This will be the Action column.
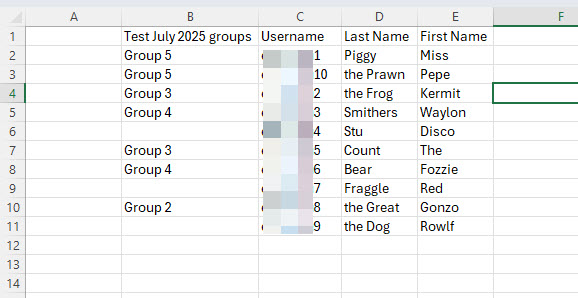
Your spreadsheet should now look something like this example.
We have left the student Last Name and First Name columns in, so it’s easier for you to identify your students, for instance, if you are copying student group information from another document, but these will be removed later. You can use these columns to sort your spreadsheet to be in the same order as content you are copying from another document.
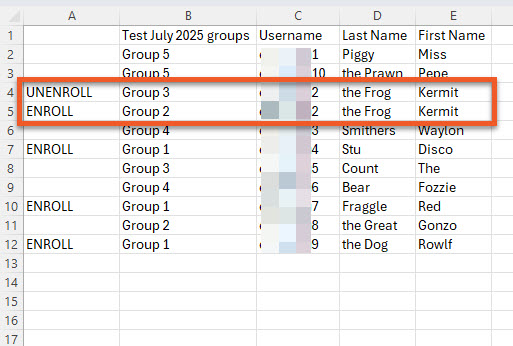
It’s now time to start populating the Action (Column A) and Group Name (Column B) columns for all students.
In the Action column (Column A), you will enter either:
- ENROLL - to add a student to a group
- UNENROLL - to remove a student from a group
- Leave the cell blank (or delete the row) - to maintain the current situation. If in doubt, it’s better to include “ENROLL” or “UNENROLL”. If it’s redundant, D2L will just ignore it.
In the Group Name column (Column B), you will type the group name.
If a student is already enrolled in a group, and you wish to remove them from one group and add them to another, you will need to have 2 rows for that student. The first row should remove them from the existing group, and the second row should add them to their new group. If you neglect to remove them from the first group, the student will be in 2 groups. D2L will not inform you of this, because there could be situations where this is a desired behaviour.
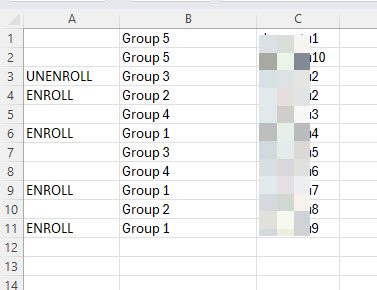
In this example, Kermit the Frog is moving from Group 3 to Group 2, and Disco Stu, Red Fraggle, and Rowlf the Dog are being added to Group 1. The rest of the students will remain in the group they were already enrolled in.
Keep in mind that the group names must appear identical to what you see in your shell, in Communication > Groups. Do not guess what the names are. The uppercase/lowercase must match exactly, and you cannot have any extra characters, including spaces, at the beginning or end, or your import file will be rejected. If you used the default settings when setting up the groups, they will be Group 1, Group 2, etc.
If you are starting with a spreadsheet where no students have been assigned to groups yet, and your group names are something other than the default, you should ensure you are copying the exact group names from D2L. To do this:
- In your course shell, go to Communication > Groups.
- In the View Categories dropdown, select the Group Category that you want to enroll students into.
- You will see the Group names listed below, in the table. Copy each name, and when you paste into your spreadsheet, make sure to “paste as plain text” or “match destination formatting”, to make sure you don’t copy any hyperlinks or other unnecessary style information (which would break the import process).
When you are done updating the spreadsheet, delete the Last Name and First Name columns.
Also, delete the header row.
The D2L Groups Import tool will reject your import file if it contains these.
Your spreadsheet should now look something like this.
Save the spreadsheet as a CSV (comma delimited) file, and remember where you saved it. We recommend adding the word “import”, the name of the group category, and today’s date to the file name, so that if you need to find the file again in the future, that will make it easier.
4. Import the spreadsheet into D2L Brightspace
In your course shell, go to Communication > Groups.
Click on Import.

Click on the Select Category dropdown and choose the Group Category that you wish to import enrollments to.
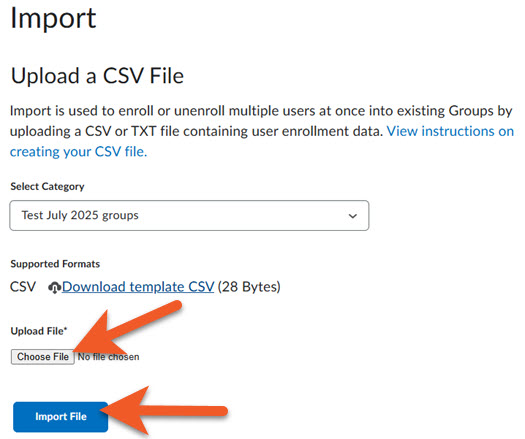
Click on Choose File, then navigate your computer to find the import file that you just created.
Click on Import File.
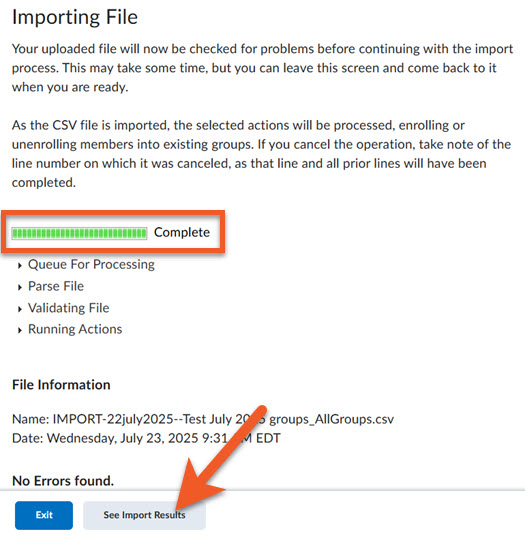
Depending on the size of your import file, it may take a couple of minutes for the import to be processed.
If there are any problems with your import file, you will see error messages that indicate what the problem is. You will need to open your import file, fix the problems, save, and try the import process again. Errors you might see include:
- Do not include Header Row action in the CSV file.
- Value does not match an existing Username.
- No matching group found.
- Action is invalid.
If everything is okay, you’ll see a green “Complete” bar. Click on See Import Results to view the details of your import. Review the results, then click on Done, to return to the Manage Groups page. There, you can choose your group category, then click on the contextual menu and Enroll Users, if you wish to review which groups students are now enrolled in.
If you discover any problems, you can either manually fix them in Enroll Users, or you can create another import file, and follow this process again.
There are a couple of communication possibilities that come with Brightspace Groups.
Group Email
To start, the group members can email everyone in the group by clicking the "Email" icon listed with their group. To protect the students' privacy, they do not see each others' email addresses in the recipients' list.
If a group member sends an email, however, their email address will appear in the resulting email, as the sender of the email.
Unfortunately, there is no way to email individual group members. The group may decide to share their email addresses with each other, for the purpose of emailing or using Google Chat to discuss their project work - but this isn't something that should be required for the class.
Group Discussions
You can use the Groups tool to create private areas in the Discussions tool for group members to communicate.
Private group Discussion boards can be set up either during the creation of the groups or after the fact. Private discussions can only be seen by the members of the group (and the course teaching team, of course).
- When creating or editing the group category, check the "Set up discussion areas" box.
- You may select an existing discussion forum, but I would recommend creating a new forum for the group discussions.
- Click "save" to proceed to the next screen.
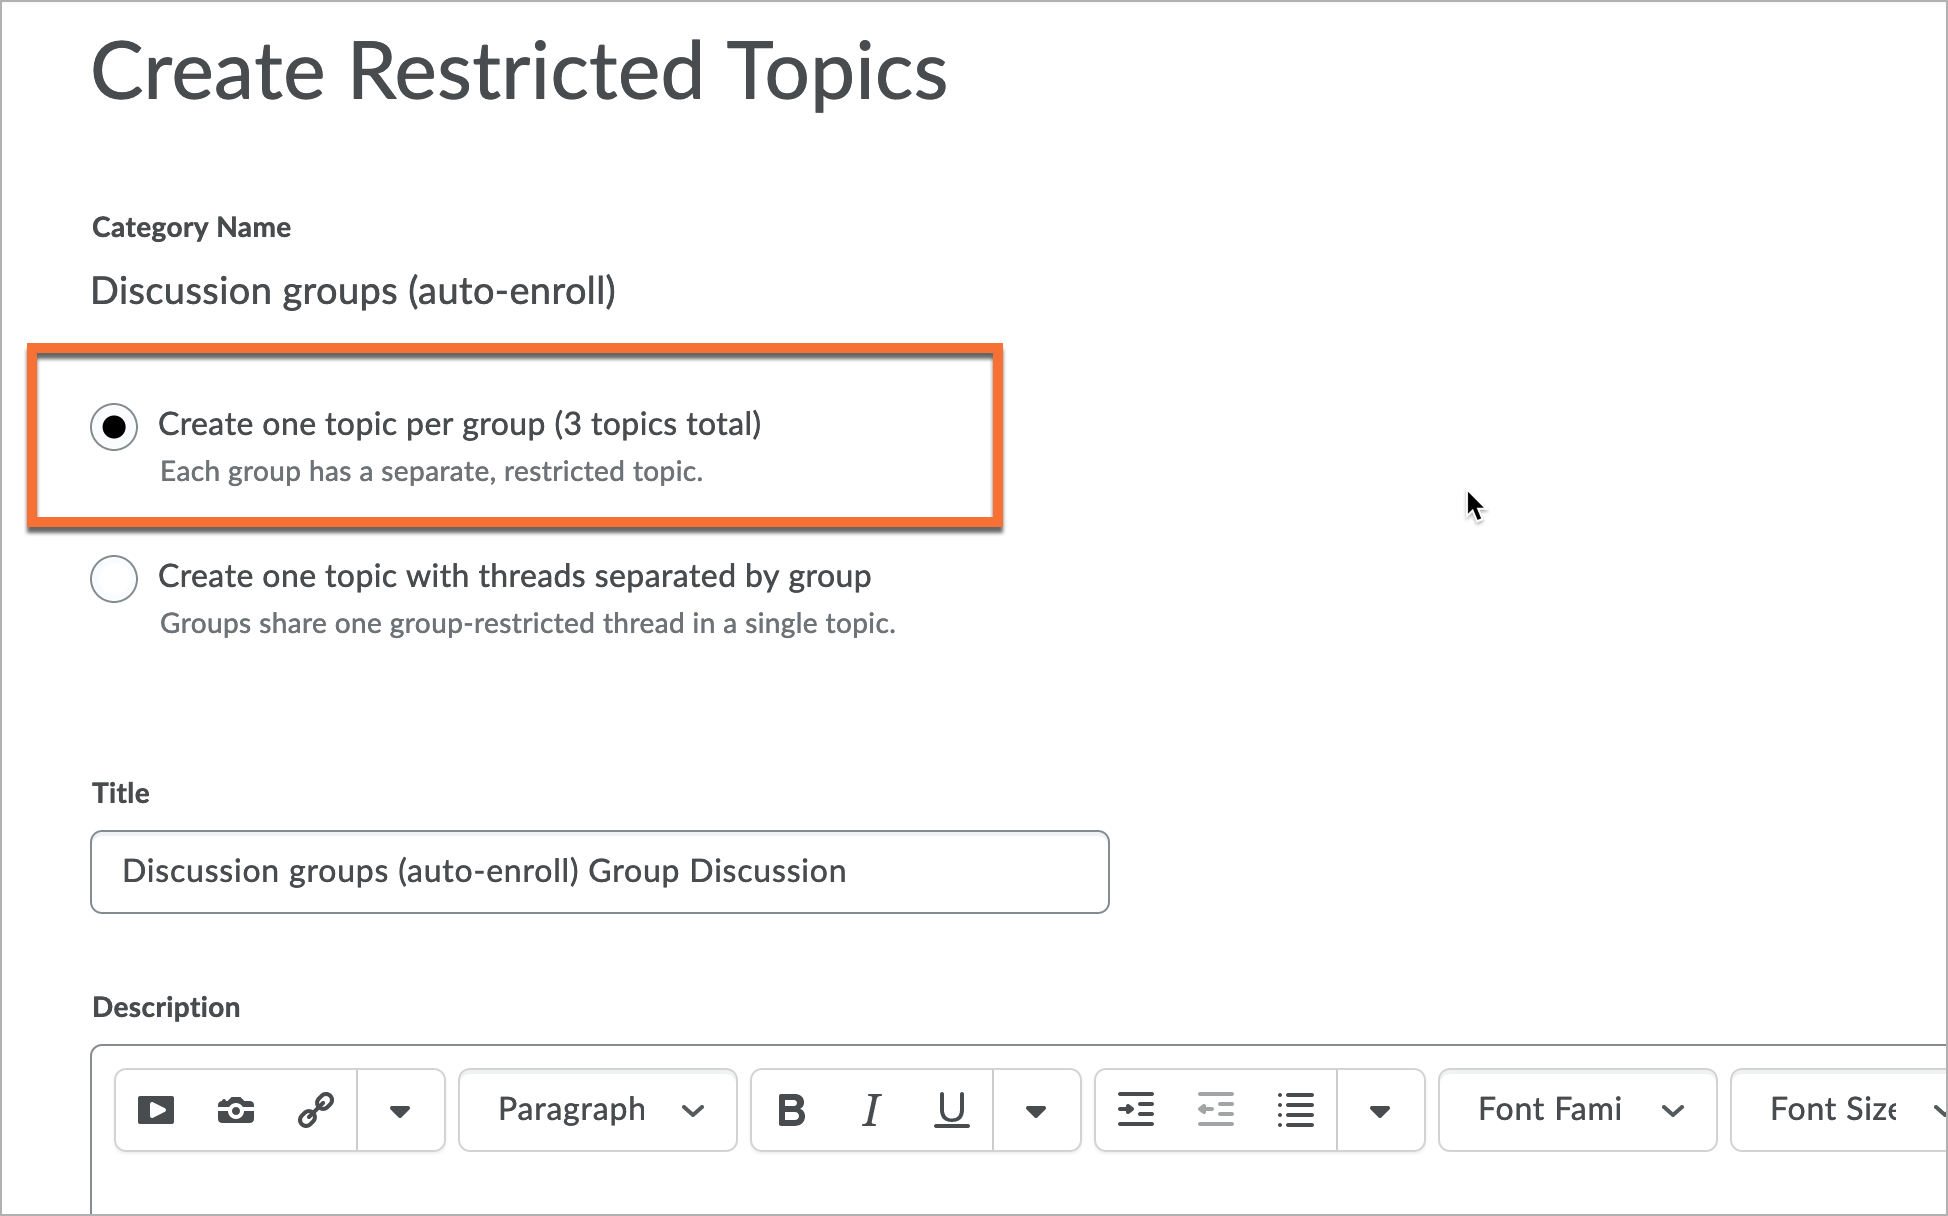
- Select either "Create one topic per group" or "Create one topic with threads separated by group". We have some tips below to help determine which option might be better for you.
Note that you can also set group-based restrictions on ANY discussion forum or topic, but the above method is the quickest way to generate a separate private topic for each group.
When to use "Create one topic per group"
This is not the default option, but I find it easier for instructors to manage, as long as it isn't being used for a graded discussion*. This option will create a separate discussion topic in the forum for each group.
Considerations when using this option:
- Do not use this option if you plan to enable assessment for this discussion, as you would need to have a separate grade item for each topic created.
When to use "Create one topic with threads separated by group"
If you plan to use the discussion assessment features to grade these discussions, this option is for you! Since you need to enable the topic for grading, you can easily connect this combo topic to one grade item.
Considerations when using this option:
- To the teaching team (Instructors, TAs, facilitators), all of the group discussions will appear in one big topic, which may seem overwhelming. There are tools to filter the threads by group name, however, and you can always see which group the thread comes from.
- Students will only ever see the threads from their own groups - they will never see the others.
Have you been contacted by a student who hasn't been added to a group?
Sometimes it is necessary for the instructor to manually add students to a group. The first step is to figure out which students are without groups, and then to put them into groups.
- Go into the Groups tool, and select the appropriate group category from the "View categories" dropdown menu. This will ensure you are looking at the right category and groups.
- Take a quick look at the membership numbers for the groups, and make note of any groups that have fewer members than the others - you can add the students to these groups first, to ensure balanced numbers.
- Click the arrow icon next to the appropriate category (above the list of groups), but this time click "Enroll Users". Here, you will see a list of all of the students in the class along the left side, and all of the groups along the top.
- Click the "Show search options" link, then uncheck the "Enrolled" box so that only "Not Enrolled" is checked. This will give you a list of only the students who don't yet have a group in this category.
- Click the magnifying glass icon (in the search field near the top) to complete the search.
- You should now see a list of only the students without a group. Simply click the box for the group you want to add each student to. You can ignore the Library demo student account (ds_library), as this is not a real student.
- Click "Save".
Did you know that you can export the group membership from your D2L Brightspace course shell... and then use that information to pre-assign students to Zoom breakout rooms?
There is a workflow on our Zoom Breakout Rooms page to help walk you through the process.
Here is an overview of the stages involved:
- Ensure breakout rooms are enabled in your Zoom account
- Enable pre-assign for breakout rooms in your Zoom meeting
- Export the group membership from D2L Brightspace
- Download the breakout room template from Zoom and populate with the Brightspace group membership
- Upload a CSV of the group members to the Zoom meeting
If you are teaching multiple sections of students all in the same Brightspace shell, you may be interested in creating groups that are made up only of students in a particular section.
This is possible by creating section-specific group categories.
This option may work for you if...
- You want to assign groups whose members are all enrolled in the same section.
- The group membership will be used to create Zoom breakout rooms.
This option may not work for you if...
- You need to deliver group assignments and want/need to use the same Brightspace group assignment to deliver it. Group assignments can only be associated with one group category and one grade item - so you would have to create a separate assignment (and grade item) for each section.
When creating groups, you always start by creating a "Group Category", which provides the criteria for the groups within.
In this case, you would need to create a group category for each section, and specify that you want to "Restrict Enrollments to..." a specific section of students. As a result, all of the groups in that group category would contain students from that selected section of students.
Here is an example:
Group category 1: Seminar section 011 groups
- Section 011 group 1
- Section 011 group 2
Group category 2: Seminar Section 021 groups
- Section 021 group 1
- Section 021 group 2
Did you know that the Groups tool can be used to help facilitate individual student reflections?
This kind of activity is commonly used in classes to collect students' thoughts and analysis of the week's topics and activities. Often a quick in-class activity (on paper), Brightspace can be used to convert this to a remote learning activity.
Using this workflow, you will create a private group for each student, and create a private discussion topic for each. Once created, the students can find their private topics by going to the Discussions tool. As always, the instructor can access all groups and all discussion topics.
When creating the new group category, use the following settings:
- Enrollment type: choose "Single-user, member-specific groups"
- Additional options: check "Set up discussion areas", then create a new forum with a name like "Individual reflections".
- When prompted to choose the discussion settings on the "Create Restricted Topics" page, select the option to "Create one topic per group". This will ensure the students each get their own private topic in which to post.
Caution: If these reflections will be graded, and count toward the final grade in the course, you may wish to take a slightly different approach, creating the groups, then separately creating the discussion Forum and Topic. Then, in the Topic settings, under Group and Section Restrictions, select “Restrict topic and separate the threads”, and the group category you just created. This will allow all students to access one topic, but they will only see their own posts. You can assess the topic to grade all students who contributed.
If you have students in your class with either the same, or a very similar name, it can be challenging to tell them apart in the list.
In the Groups tool, you can also show students' usernames, which may make it easier to distinguish students.
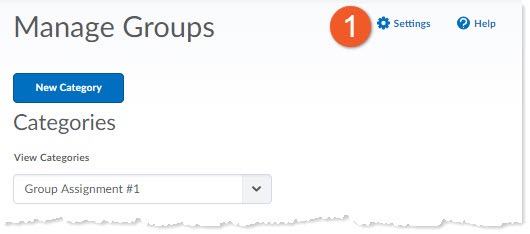
1. In your course, go to Communications > Groups. In the upper-right of the page, click on Settings.
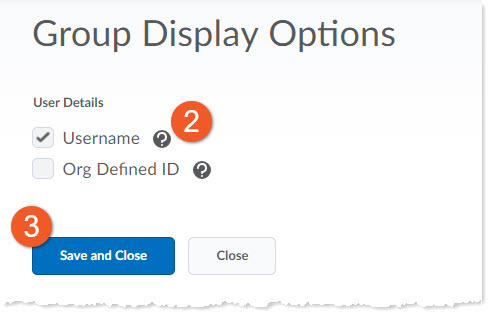
2. Check the box beside Username. A student's username is the same as their email address at TMU.
It is not valuable to check the box beside Org Defined ID, as this is a number that is distinct to the student only in Brightspace. It is NOT the student's TMU student number.
3. Click on the blue Save and Close button to save your change.
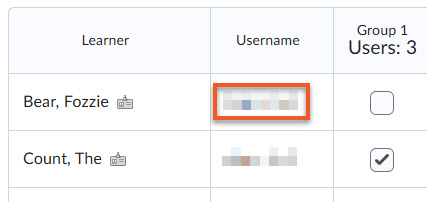
If you then go to Enrol Users in either a group category or an individual group, you can now see the student's username displayed to the right of their name.
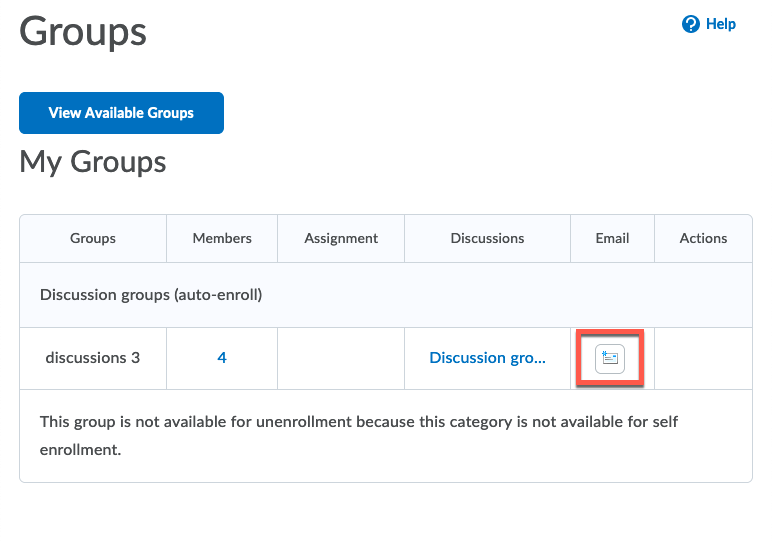
If you have created self-enroll groups, there are a few additional features that you can make use of.
- Setting start and end dates for self-enrollment
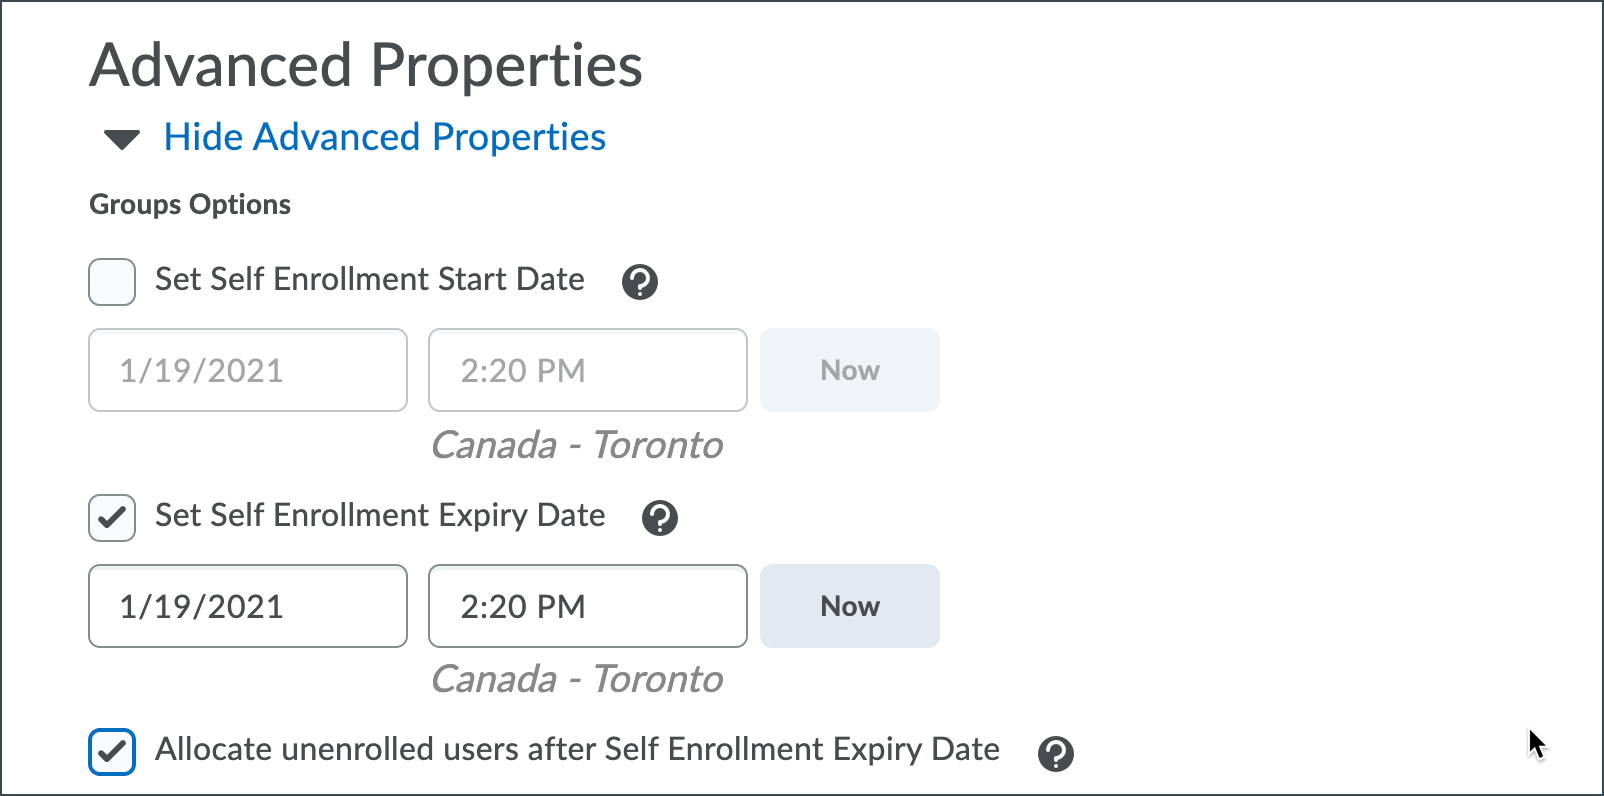
While editing a self-enroll group category, you will see some options that are unique to this type of group enrollment.
Scroll down to the "Advanced Properties" section of the page and make sure you are viewing the advanced properties (the arrow should be pointing down).
After clicking on the group membership link, do you get a blank pop-up window? Not to worry - this is a known bug in Brightspace, and there is a workaround.
To start, it may be worth trying a different web browser to see if you have a better experience. Generally, we recommend the use of Google Chrome (especially if you are also using Google Drive in your course, for sharing content and activities). Mozilla Firefox should also work well.
If that doesn't fix the problem, you can try this:
- Move your mouse to the bottom-right corner of the pop-up window and, when the mouse changes to a double-handled arrow, click on the corner and continue to hold the mouse button down.
- Very slowly move the mouse to resize the pop-up window. If the window appears too narrow, move the mouse to the right to make it wider. If it appears oddly long, move the mouse toward the top to make it shorter.
- At some point, text should display inside the window. If this happens, let go of the mouse button.
If you have created a group category that you will not use, it is possible to delete that category.
WARNING: When you delete a group category, all assessments (assignments and discussions) that use that group category will also be deleted. If this is not desired, perhaps because you want to use a different group category, or don't wish to use groups for your assessment, you need to edit that assessment to change or remove the group/group category first. If you neglect to make this change, all student submissions and evaluations will be deleted.
Delete a group category
If you have confirmed that you will not need any assessments that are associated with the group category (they will be permanently deleted), you can proceed.
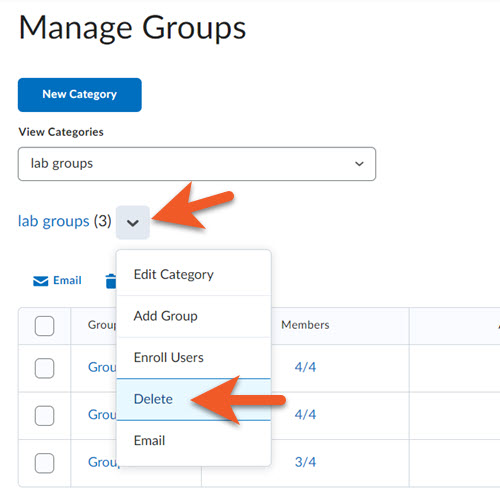
1. Go to Communications > Groups, and select the desired group category from the dropdown list.
2. To the right of the category name, click on the down arrow, to see your options.
3. Click on Delete.
Note: In the popup message, you may notice a warning that “Groups and their associated activities are deleted in the background. This may take a few minutes to complete.” If you are deleting a category that contains only a few groups (<100), this will typically only take a few seconds. You may need to refresh the page to see the changes.

4. You will see a popup message that warns you the deletion will be permanent, and also indicates how many associated assignments/discussion topic(s) will also be deleted. If you wish to proceed, click on Delete Category.
5. The group category (and any associated assessments) are deleted, and you are returned to the Manage Groups page.
If you have created a group (within a group category), or a group category that you will not use, it is possible to delete that category.
However... Please note that when you:
- Delete a group category, all assessments (assignments and discussions) that use that group category will also be deleted. If this is not desired, perhaps because you want to use a different group category, or don't wish to use groups for your assessment, you need to edit that assessment to change or remove the group/group category first. If you neglect to make this change, all student submissions and evaluations will be deleted. You will need to restore the group category, and then separately restore the assessment, if you need to access that information.
- Delete an individual group (within a group category), while you may still be able to view discussions and assignments, the students in the deleted group will no longer see those items. To fix this problem, you will need to restore the group first, then go to the assessment to determine if the students' work is still there. If it is gone, restore it from that assessment tool, then change the settings to ensure the student's work does not disappear.
If you want to set up group assignment submission folders, it's important that you first set up groups. You can choose to create the group assignment during the group creation process, or after the groups have already been created.
NOTE: We recommend creating the group assignment using the Assignments tool, after the groups have been created, as you will have easier access to all of the settings.
A group assignment:
- Allows any member of the group to submit on behalf of the group.
- Ensures the instructor only needs to grade one submission per group.
- Provides all group members the same grade and feedback (in both the assignment and any associated grade item).
Group submission folders are marked on the Assignment Submission Folders page with the Group Submissions icon.
If you haven't created an Assignment in D2L Brightspace before, you may want to start by referencing the instructions to create an assignment.
If your groups already exist, you can create a group assignment by selecting the 'Group submission folder" when first creating the assignment.
The assignment type cannot be changed for a pre-existing assignment.
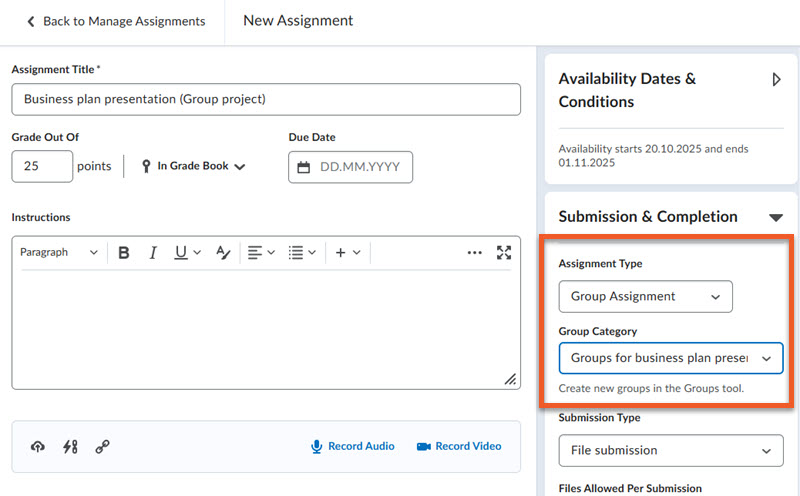
If your groups already exist, when creating the assignment, you can create a group assignment by:
- Click on the Submission & Completion panel.
- Select Group Assignment as the Assignment type.
- Click on the Group Category dropdown, and the set of groups that will be able to access this assignment.
- Proceed with any other settings required in your assignment.
NOTE: Once the first student uploads a submission, the assignment type cannot be changed. If you made a mistake, you will need to create a new assignment with the correct type, and ask students to submit to that new assignment.
If you are creating new groups and already know you will want a group assignment, it is possible to include it in the group creation process ('though we recommend against using this method. It's better to finish creating groups, then go create the group assignment, as you won't have access to all assignment settings if you use the process below).
Please follow the instructions above to start creating groups, and apply the following settings.
Set up assignment submission folders:
Click on the dropdown to choose either a File submission (typical), Text submission (students will type their assignment into a text box in Brightspace), On paper submission (hard copy handed in), or Observed in person (speech or presentation).
If you select this item, there will be a subsequent screen to allow you to fill in some details about the group submission folders, so that they can be created and linked to the groups.
Most fields can be edited again later, in case you don't have all the information you need, or change your mind about some details.
10. Click Save.
If you chose to set up assignment submission folders:
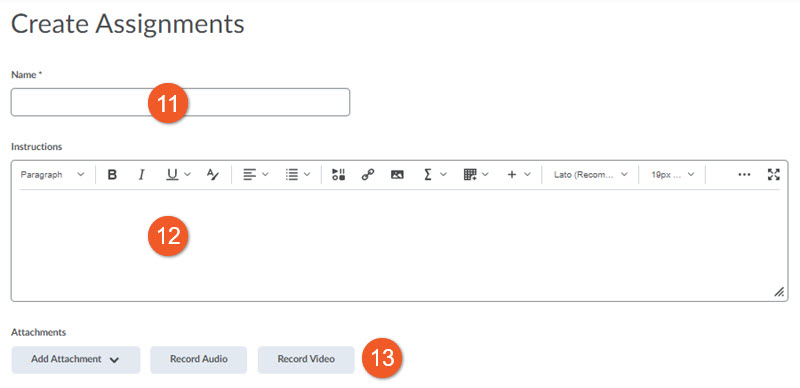
11. Type in a Name for the group assignment. Typically, you might want this to be the same as the group category and discussion area, so that students can easily identify all elements related to this assignment.
12. Add instructions for users. This can include the assignment description from your course outline, desired file format, expected length, etc.
13. Attachments
You may also attach files, if there are long instructions, or reference materials (case studies, spreadsheets, templates, etc) that students need to complete the assignment. You can also record audio or video instructions if you want.
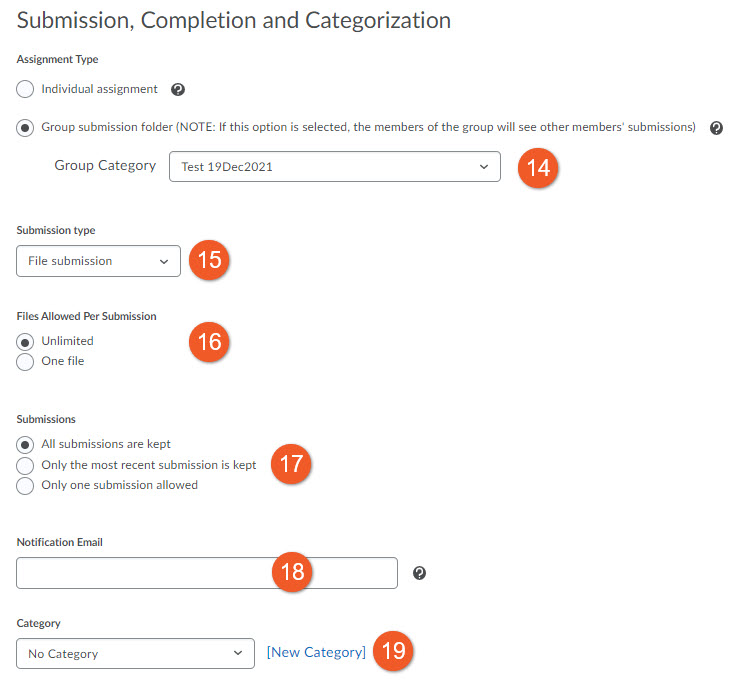
14. Assignment Type indicates that this is a group assignment, and you can see that the group category you just created is connected to this assignment.
15. Submission type is most often set as “File submission”, meaning that students will upload one or more files. If this will be a different type of assignment, such as an in-class presentation, or a physical item that is collected, you can select that option.
16. Files Allowed Per Submission
You can decide whether students can only upload one file, or unlimited files. We recommend unlimited, in case an assignment requires multiple files/formats, and also if students notice a problem with their submission before the due date, they can upload again without the need to email you.
17. Submissions
You can decide if all submissions are kept (recommended), only the most recent submission is kept, or only one submission is allowed. We usually recommend keeping all submissions. If there's a problem with the last submission, you can refer to previous submissions.
18. Notification Email
If you wish to receive an email notification each time a student uploads an assignment, type your email address into the Notification Email field. Multiple email addresses can be comma-separated, if desired. Most instructors do not want this, as it could result in a lot of emails in your inbox.
19. Category
If you have a series of similar assignments, you may wish to organize them within a category (similar to a folder on your computer), but most of the time, you do not need to use this.
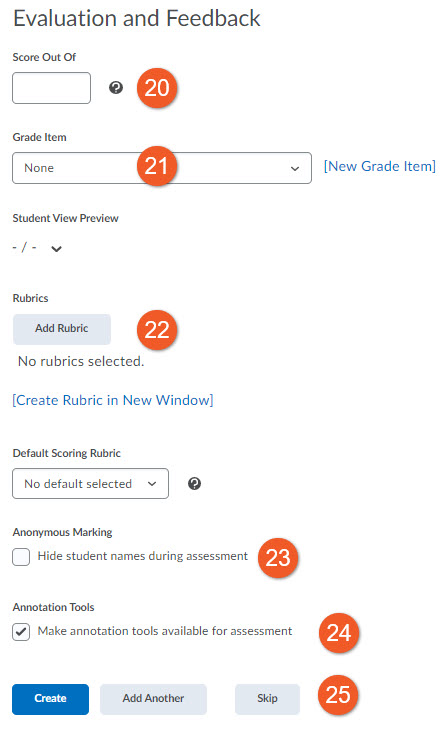
20. Enter a value in the Score Out Of field for the assignment score.
Tip: If you associate the assignment with a grade item, maintain consistency for your students by matching the value of the Score Out Of field to the grade item's Max. Points value.
Typically, instructors will either grade items out of 100, or out of the same score as the weight that this item contributes toward the final grade.
21. Associate the assignment with a Grade Item if you want submissions tied to an item in your grade book.
If you have not already created a grade item for this assignment, click the New Grade Item link to create a new grade item for the assignment.
Tip: If your assignment is not linked to a grade item, marks will not transfer to the gradebook.
22. Click Add Rubric to associate the assignment with a rubric that you have already created in the Rubrics tool. Click the Create Rubric in New Window link if you want to create a new rubric. You can also select an existing rubric and set it as the Default Scoring Rubric. Learn more about how to create and use rubrics, including controlling visibility of rubrics to students.
23. Only check the Hide student names during assessment box, if you wish to grade students anonymously. Student names will not be visible to you until after you publish grades and feedback.
24. By default, the Make annotation tools available for assessment box is selected. This enables a tool so you can mark up students’ submissions with comments, highlighting, etc. If you are unsure if you will use this, just leave it selected.
25. Click on the blue Create button to create your group assignment submission folder. If you want to make changes to the settings for this assignment folder later (but before students start submitting), you can go to Assessment > Assignments. We recommend avoiding making changes after students start submitting their assignments, if possible, as this can introduce integrity issues, and can complicate the evaluation process.

You can now see a summary of the groups, discussion areas and assignment submission folders that were created.
Click on the blue Done button to finish.
You will return to the group category page, where you can make changes if you wish. Click Save if you made changes, or Cancel if you did not.
Enrollment
Depending on the settings you chose for your Group Category, if you didn't choose auto-enroll or self-enroll, you may need to enroll students into groups before students can work together on their assignment and submit it.
Related topics
Announcements and notifications