peerScholar instructor guide

What is peerScholar?
peerScholar is a customizable peer assessment tool that helps develop your students’ critical and creative thinking skills. The tool allows instructors to set up individual, group or case study assignment submissions for students to peer review. This is done through three phases: creating, assessing, and reflecting. peerScholar is designed for peer to peer evaluation and grading as well as self-assessment.
What are the benefits to using peerScholar for your students?
- An opportunity for students to acquire analytical, learning skills and perform critical thinking developed by the critical thinking aspect of peerScholar.
- Students attain continual practice in self-reflection, assessing quality of feedback and a sense of where their own work fits relative to the work of peers.
- Feedback is prompt and timely which maximizes learning impact.
- Students learn to communicate their ideas in an efficient manner.
Want a guided start? Email courses@torontomu.ca to schedule a one-hour Zoom tutorial with our support staff. We’ll help you tailor peerScholar to your specific course needs.
Support
- Access the peerScholar knowledge base and report issues directly in the peerScholar app by clicking the question mark icon in the lower right corner.
- Student Guide
- Instructor Guide
- Faculty can email: support@peerScholar.com
Update your course outline
Several key considerations must be addressed when using educational technology tools in your course. It is your responsibility to ensure that students are fully informed about the tool, its costs, and other details to align with University policy and Provincial acts.
We strongly encourage you to include all of this essential information in your course outline, to ensure students are aware of how it impacts them.
Refer to the TMU course outline template for some ways to incorporate this information into your course outline and to the Senate Course Outline Policies for guidance on what needs to be included in your course outlines.
Sample course outline content
This course utilizes peerScholar, an external educational technology tool in addition to D2L Brightspace. This tool is used to enhance your course learning experience by allowing you to evaluate your peers’ work, offer constructive feedback, and reflect critically on your own work.
Costs: The tool does not result in additional costs to you.
Other requirements: There are no additional technical requirements for its usage.
Account creation: An account is automatically created through your use of this tool in your D2L Brightspace course.
Data privacy and usage: This tool will have access to your name, TMU email address, and academic work, and it is visible to all course instructors, academic assistants, and graders. This information will be retained within peerScholar for two years, in case of potential appeals or FIPPA requests.
Opt-out options: This tool does not have an opt-out policy
For technical support regarding peerScholar, please visit the peerScholar Student Guide.
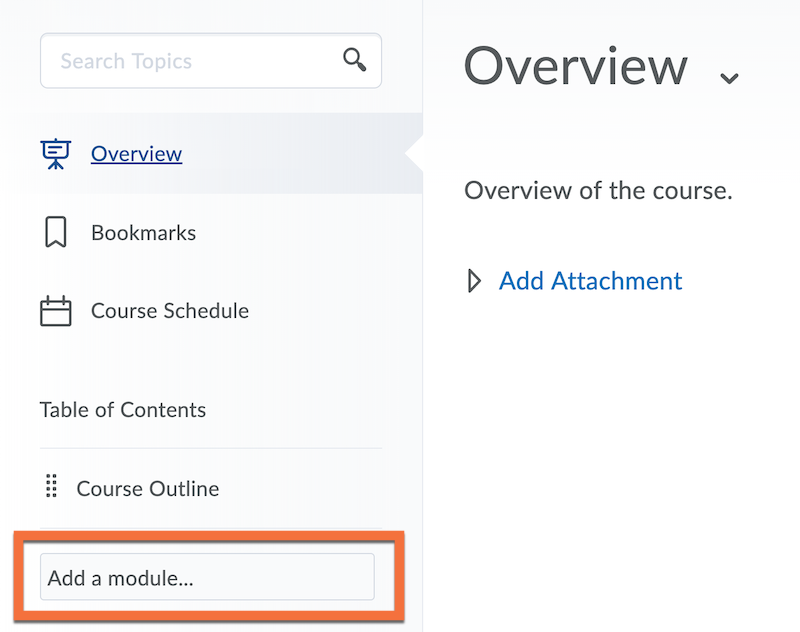
Access the Content tab in your D2L Brightspace course shell. Add a module to the left-hand navigation bar by clicking Add a module… and give it a name.
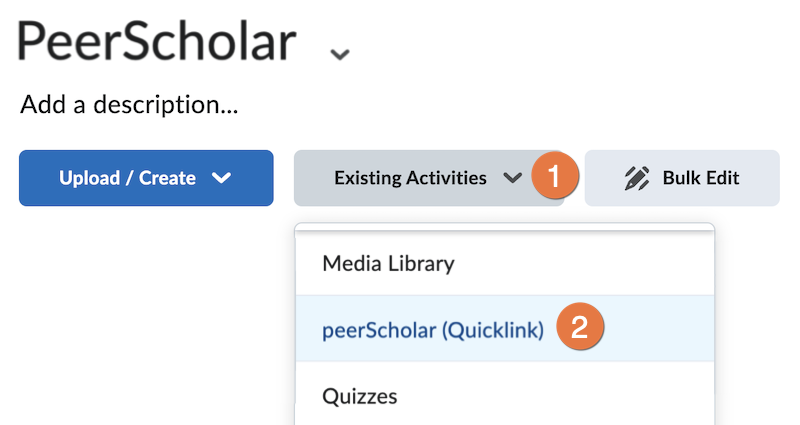
1) Inside your new module, expand the Existing Activities drop down menu.
2) Choose peerScholar (Quicklink) from the listed options.
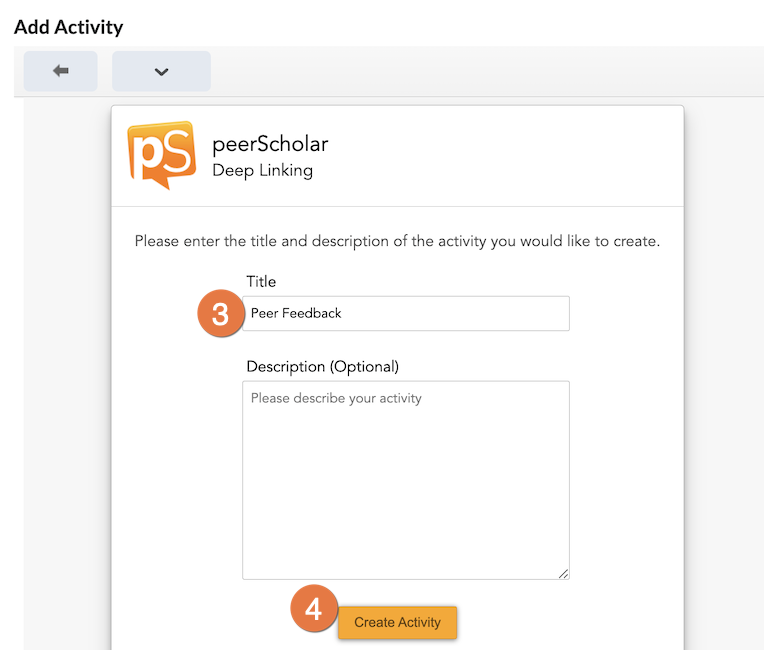
3) A window will pop-up on your screen. Input the title of your peerScholar Activity and if desired, add a description.
4) Click Create Activity
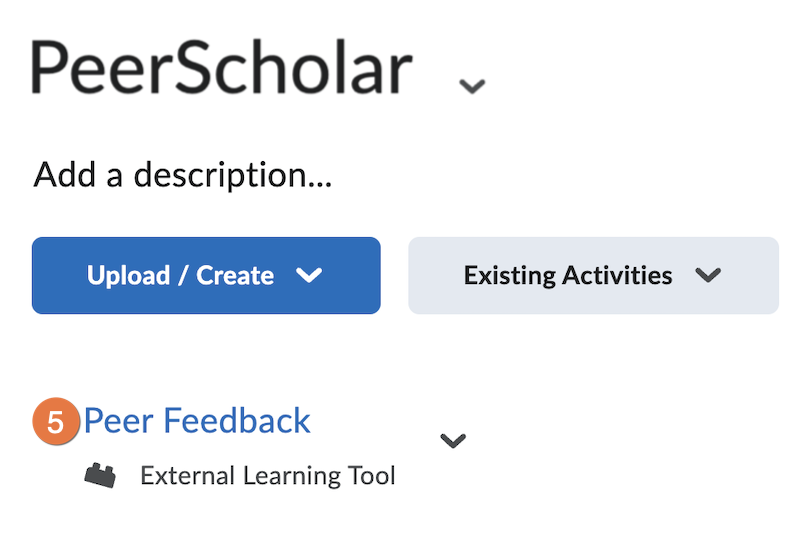
5) Click the title of the activity in your Brightspace module to launch peerScholar.
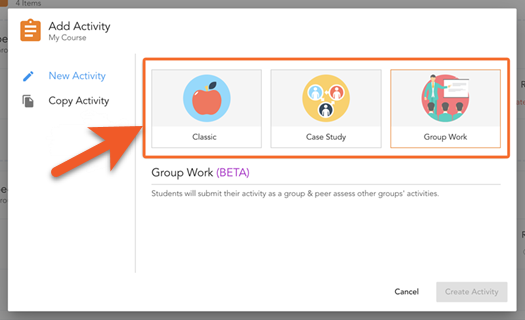
Once you have launched peerScholar through your D2L Brightspace course, you will be automatically brought to the Add Activity menu. There are 3 options to choose from:
Classic allows you to create an assignment and various assessments for your students to complete. This will be done individually and students give/receive feedback to/from a random set of peers.
Case Study allows you to create different cases (topics) to assign to different students. Students can give feedback to peers who did the same case or a different case.
Group Work allows you to create an assignment and various assessments for grouped students. Students will submit as a group & peer assess other groups.
Click the type of activity of your choice and you will be entered into the builder, then click Let’s Go!
Select the type of activity you are creating:
Classic Activity Setup
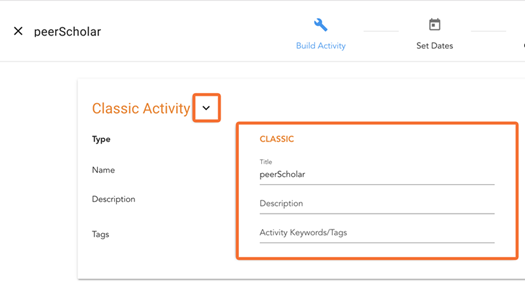
If you have selected the Classic activity type, you will be automatically entered into the Build Activity tab.
You may click on the drop-down menu of the header, allowing you to edit the name of the activity, the description and add tags.
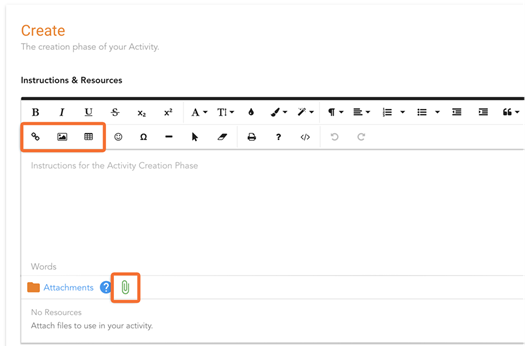
Create Phase
Provide details of the specific assignment in the text box. You may attach images, create hyperlinks and tables by accessing the icons in the header above. Attachments such as an external grading rubric may be included by clicking on the paperclip icon at the bottom.
If your assignment is a written composition, use your instructions to direct students to copy and paste their compositions into the Create Phase text editor instead of uploading a pdf or word document file. This way, the students and instructors evaluating them later can interact directly with the written content within peerScholar and don't have to mark downloaded files separately.
Use your instructions field to set expectations by breaking down the peerScholar process. This can help make the experience more intuitive for your students by specifying steps in the process for your particular assignment.
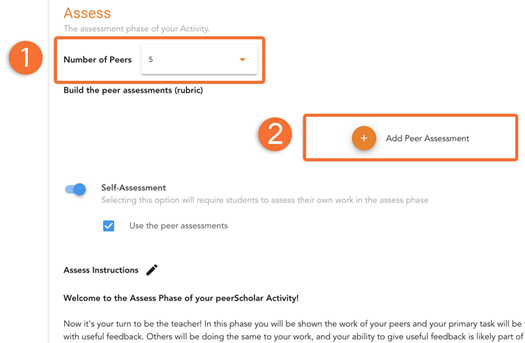
Assess Phase
1. Select the Number of Peers you want each student to assess. For works ranging from 1 - 2 pages, peerScholar recommends that 5-6 peers should be used.
2. Add in assessments by clicking the orange Add Peer Assessments button. Assessments created here are used by students to assess other students.
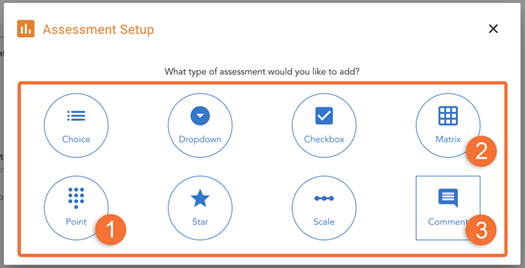
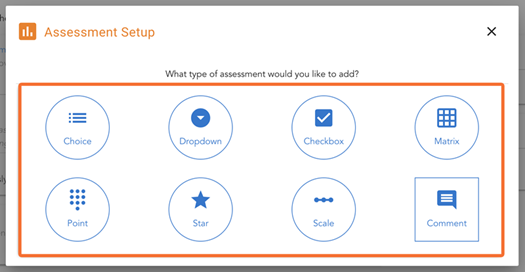
The Assessments Setup menu will pop up. There are currently 8 different types of assessments to choose from. Add in assessments by clicking on the ones you would like to use and following the prompts. You may add multiple assessments to evaluate your students. Some notable ones are:
1. Point: allows you to ask students to provide a value to their peers’ work by setting up minimum and maximum values.
2. Matrix: allows you to mimic a provided rubric where students score their peers’ work in the matrix.
3. Comment: a qualitative option allowing you to ask students to provide insights and feedback on their peer’s work and answer any questions about the work.
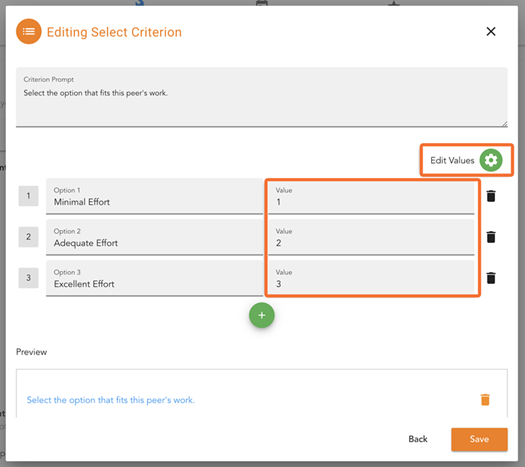
All assessments, excluding Comment can be assigned a quantitative value towards each option. This value will be used to quantify qualitative options. For example, the assessment tool Choice allows you to create qualitative options that students can select when assessing their peers’ work. By assigning a value to each option, this allows for more Peer Ratings grading options in the Customize Grading menu.
To access the quantitative values, click on the gear icon located on the top of the menu.
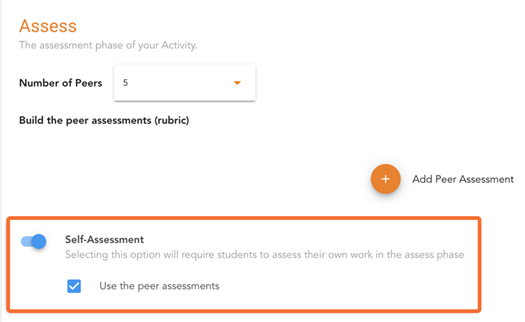
The blue Self-Assessment slider can be toggled on and off to determine if you want students to self-assess their own work.
When toggled on - you may choose if they assess themselves using the peer assessment you created above and if not, you may add new assessments that cater to the specific self-evaluation task.
Reflect Phase
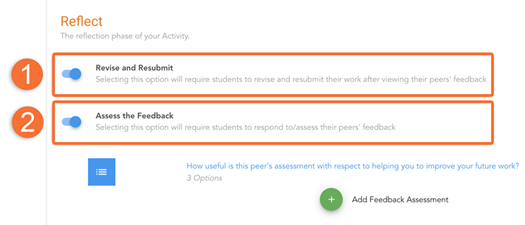
1. You may toggle Revise and Resubmit on and off. When on, students may revise their work after peers have assessed it and resubmit it to be marked. When off, students will not have this option.
2. You may choose to toggle Assess the Feedback on and off. When on, you may add feedback assessments using the assessment types found in the assessment section to create questions that will require students to assess the feedback given to them. When off, students will not have this option.
Case Study Setup
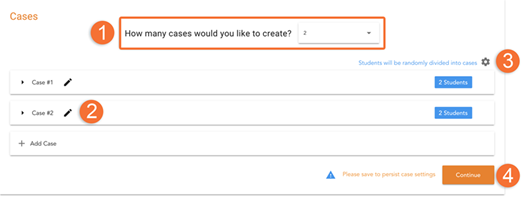
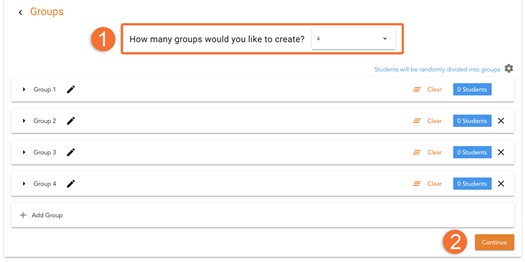
If you have selected the Case Study activity type, this menu will appear before you have built the activity allowing you to setup case perimeters.
1. Select the number of cases you would like to create in the drop-down menu. This will determine the variety of selection your students will have.
2. Add a name to each of the cases and a description to provide more detail to students.
3. On the right-hand side, a gear icon is shown. This will give you options to divide students into groups. Select the option that best fits your activity.
4. Click Continue.
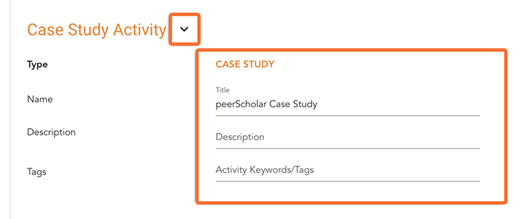
Case Study Activity Setup
Once in the Build Activity menu, the create phase will display.
You may click on the drop-down menu of the header, allowing you to edit the name of the activity, the description and add tags.

Create Phase
Provide details of the specific assignment in the text box. You may attach images, create hyperlinks and tables by accessing the icons in the header above. Attachments such as an external grading rubric may be included by clicking on the paperclip icon at the bottom.
If your assignment is a written composition, use your instructions to direct students to copy and paste their compositions into the Create Phase text editor instead of uploading a pdf or word document file. This way, the students and instructors evaluating them later can interact directly with the written content within peerScholar and don't have to mark downloaded files separately.
Use your instructions field to set expectations by breaking down the peerScholar process. This can help make the experience more intuitive for your students by specifying steps in the process for your particular assignment.
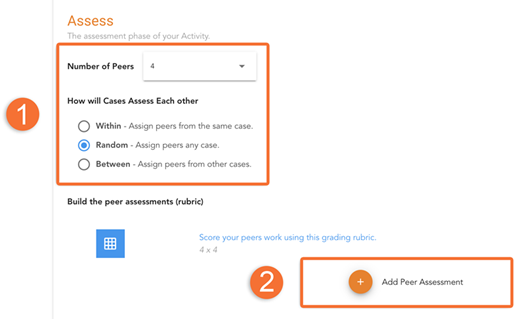
Assess Phase
1. In the Number of Peers section, peerScholar recommends that 6 peers should be used to provide an accurate assessment. The How will Cases Assess Each Other area will determine the peers that students will be assessing in the assess phase. Select the option that best suits your assignment.
2. Now, add in assessments by clicking the orange Add Peer Assessments button. Assessments created here are used by students to assess other students.
The Assessments Setup menu will pop up. There are currently 8 different types of assessments to choose from. Add in assessments by clicking on the ones you would like to use and following the prompts. You may add multiple assessments to evaluate your students. Some notable ones are:
1. Point: allows you to ask students to provide a value to their peers’ work by setting up minimum and maximum values.
2. Matrix: allows you to mimic a provided rubric where students score their peers’ work in the matrix.
3. Comment: a qualitative option allowing you to ask students to provide insights and feedback on their peer’s work and answer any questions about the work.
All assessments, excluding Comment can be assigned a quantitative value towards each option. This value will be used to quantify qualitative options. For example, the assessment tool Choice allows you to create qualitative options that students can select when assessing their peers’ work. By assigning a value to each option, this allows for more Peer Ratings grading options in the Customize Grading menu.
To access the quantitative values, click on the gear icon located on the top of the menu.
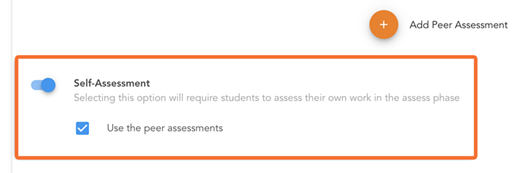
The blue Self-Assessment slider can be toggled on and off to determine if you want students to self-assess their own work.
When toggled on - you may choose if they assess themselves using the peer assessment you created above and if not, you may add new assessments that cater to the specific self-evaluation task.
Reflect Phase
1. You may toggle Revise and Resubmit on and off. When on, students may revise their work after peers have assessed it and resubmit it to be marked. When off, students will not have this option.
2. You may choose to toggle Assess the Feedback on and off. When on, you may add feedback assessments using the assessment types found on the assessment section to create questions that will require students to assess the feedback given to them. When off, students will not have this option.

Group Work Activity Setup
If you have selected the Group Work activity type, you will be automatically entered into the Build Activity tab.
You may click on the drop-down menu of the header, allowing you to edit the name of the activity, the description and add tags.
Create Phase
Provide details of the specific assignment in the text box. You may attach images, create hyperlinks and tables by accessing the icons in the header above. Attachments such as an external grading rubric may be included by clicking on the paperclip icon at the bottom.
If your assignment is a written composition, use your instructions to direct students to copy and paste their compositions into the Create Phase text editor instead of uploading a pdf or word document file. This way, the students and instructors evaluating them later can interact directly with the written content within peerScholar and don't have to mark downloaded files separately.
Use your instructions field to set expectations by breaking down the peerScholar process. This can help make the experience more intuitive for your students by specifying steps in the process for your particular assignment.
Assess Phase
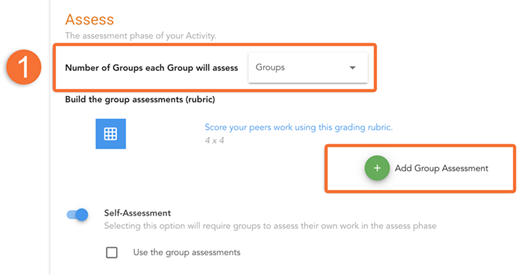
1. Next, the Number of Groups each Group will assess, will determine how many groups are assigned to one another to peer review. Select a number that best fits your assignment.
2. Now, add in assessments by clicking the green Add Group Assessments button. Assessments created here are used by students to assess other students.
The Assessments Setup menu will pop up. There are currently 8 different types of assessments to choose from. Add in assessments by clicking on the ones you would like to use and following the prompts. You may add multiple assessments to evaluate your students. Some notable ones are:
1. Point allows you to ask students to provide a value to their peers’ work by setting up minimum and maximum values.
2. Matrix allows you to mimic a provided rubric where students score their peers’ work in the matrix.
3. Comment is a qualitative option allowing you to ask students to provide insights and feedback on their peer’s work and answer any questions about the work.
All assessments, excluding Comment can be assigned a quantitative value towards each option. This value will be used to quantify qualitative options. For example, the assessment tool Choice allows you to create qualitative options that students can select when assessing their peers’ work. By assigning a value to each option, this allows for more Peer Ratings grading options in the Customize Grading menu.
To access the quantitative values, click on the gear icon located on the top of the menu.
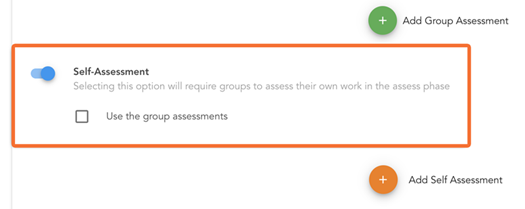
The blue Self-Assessment slider can be toggled on and off to determine if you want students to self-assess their own work.
When toggled on - you may choose if they assess themselves using the group assessments you created above and if not, you may add new assessments that cater to the specific self-evaluation task.

You may toggle Revise and Resubmit on and off. When on, students may revise their work after peers have assessed it and resubmit it to be marked. When off, students will not have this option.
You may choose to toggle Assess the Feedback on and off. When on, you may add feedback assessments using the assessment types found on the assessment section to create questions that will require students to assess the feedback given to them. When off, students will not have this option.
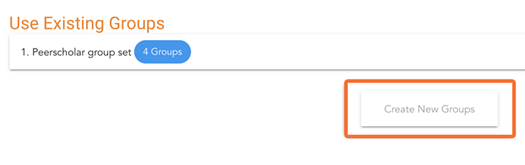
Manage Groups
Once you have built your activity, the Manage Group Menu will appear. You may create new groups for your activity, or you may use existing groups from previous activities.
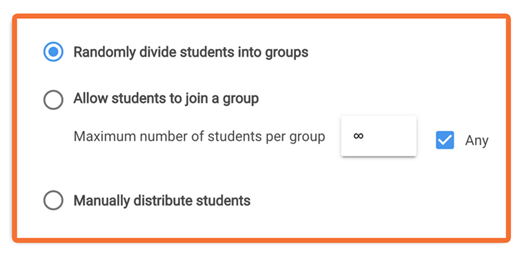
This menu allows you to determine how students will be divided into groups. Students may be:
- Divided randomly by the peerScholar system
- Given the freedom to choose their own groups
- Can be manually distributed with your control
1. Afterwards, select how many groups you would like to create. Consider the nature of the assignment and the number of students in your course.
2. Click Continue once you are done.
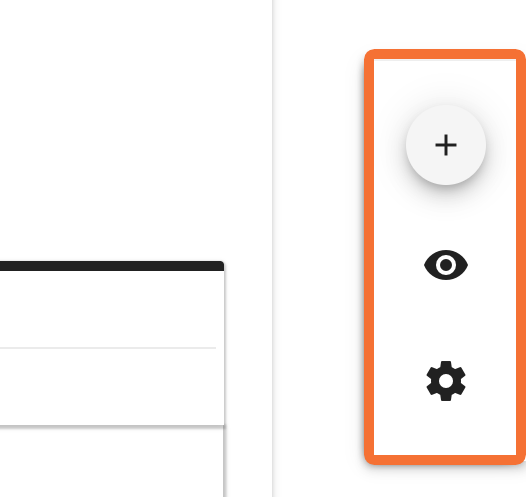
Shortcut Tools
On the right-hand side of the builder, there is a menu with 3 icons. A Plus Sign, an Eye Icon and a Gear Icon.
The Plus Sign will allow you to access additional assessments that will be prompted to students as a last response at any phase (create, assess and reflect).
The Eye Icon allows you to preview how students will view each phase.
The Gear Icon shows advanced phase settings. You are able to set a word limit in this menu. You may also enable require completion of Assess Phase to participate in Reflect Phase in this menu.

Manual Control
Once you have built your activity and performed any additional steps, you must set the dates where your activities will open and close to students.
You may choose the Manually Control Due Dates option to control the opening and closing of the phases from the Activity dashboard. This is useful for in class assessments or for instructors that want more manual control.
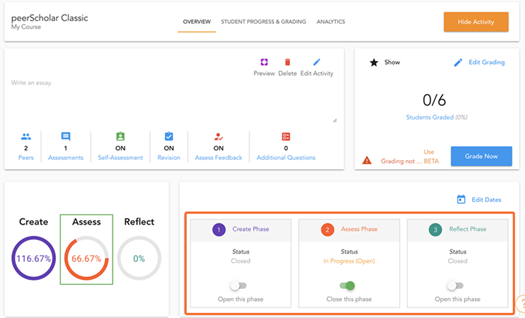
If you choose to manually control due dates, you can toggle each phase on or off from this panel on your peerScholar dashboard after completing your activity setup.
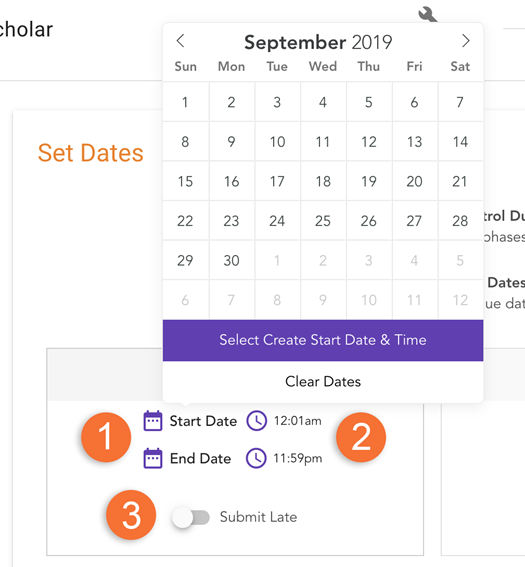
Automatic Scheduling
You may choose the Schedule Due Dates option to pre-schedule due dates and times so that phases open and close automatically.
1. Dates schedule by clicking on the pencil icons of each phase. You can choose the range in which they run using the calendar provided.
2. Time confirms and sets the times as well.
3. Submit Late allows for late submissions by toggling on the slider.
Please note: if there in an overlap in dates and timing, you will not be able to continue to the next stage until it is resolved.
Click Continue.
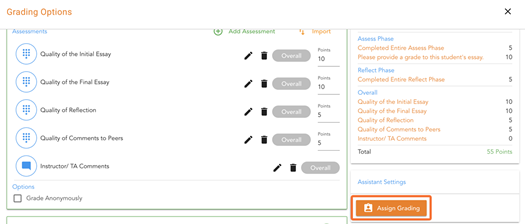
The grading menu allows you to create grading assessments for yourself or members of your teaching/grading team that you've associated with your course. Make sure you complete the Customize Grading Menu before you begin the grading process.
Types of Grading
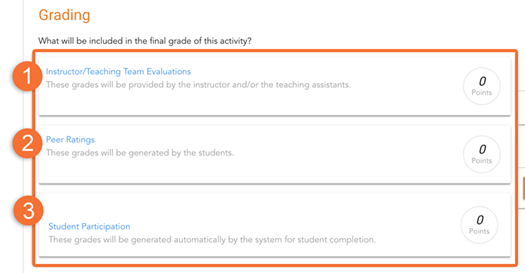
After you have finished building your activity and setting your dates, grading is the next step. There are 3 types of grading options.
1. Instructor/Teaching Team Evaluations is a manual grading process. This option allows you to set up grading assessments, similar to the ones created in the Assess phase of the Build Activity Menu. From there, you and your teaching team will undergo a grading process that will display peer evaluations, self-evaluations and revisions of a student’s work.
2. Peer Rating is an automatic grading process that uses peer assessments to generate or contribute to the student’s grade.
3. Student Participation is an automatic grading process that provides grades based on the completion of each phase.
Select the grading process that is appropriate for the activity and your teaching team.

Instructor/Teaching Team Evaluations
When Instructor/Teaching Team Evaluations is selected, click on the Add Assessment button. This will allow you to create grading assessments that will be the platform of your marking.
The Assessments Setup menu will pop up. There are currently 8 different types of assessments to choose from. Add in assessments by clicking on the ones you would like to use and following the prompts. Keep in mind that these assessments should be catered towards grading hte student's work and can include grading based on all revisions (initial and final), grading self-reflections and grading the student’s peer assessments.
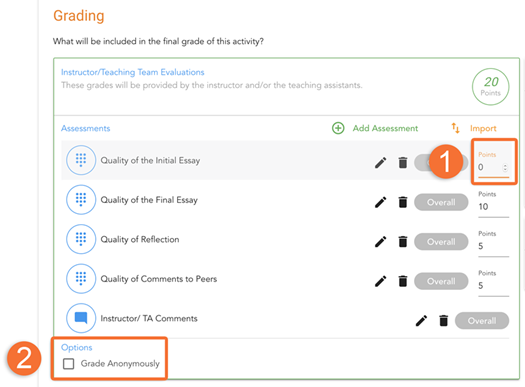
1. After you have finalized your grading assessments, you must dedicate points to each assessment. Use the up and down arrows in the points box to add a weight to each grading assessment. The sum of all the points for each assessment will equal to a final mark.
2. You may also choose to select Grade Anonymously which will hide the name of the student from the grader to avoid unconscious bias or preconceived ideas.
Peer Rating
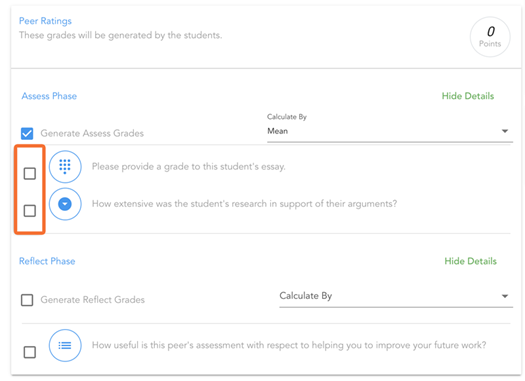
When Peer Rating is selected, the peer assessments that you initially created in the Assess phase of the Build Activity Menu will display. To use the peer assessment gradings, select the check box on the side to allow the assessment given to the student by a peer to be used towards their final grade.
All assessments created in the assess phase have allocated quantitative values to each option except for the Comments assessment and therefore can be used to provide a quantitative grade.
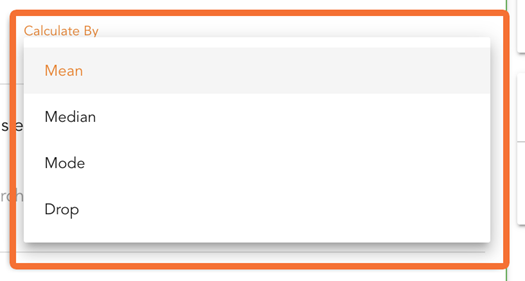
Now select the Calculate By dropdown menu and select the option that fits your activity. The option Drop simply drops the lowest and highest assessment grades given and then takes the mean of the remaining.
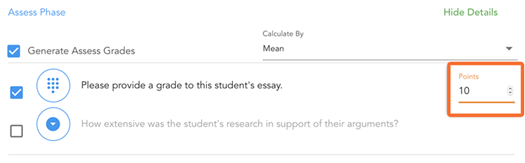
After you have finalized your grading assessments, you must dedicate points to each assessment. Use the up and down arrows in the points box to add a weight to each grading assessment. The sum of all the points for each assessment will equal to a final mark.
It is recommended that points follow the assessment quantitative values in a logical manner. For example, if the highest value in the “choice” assessment option is 3, it is recommended that you dedicate 3 points in the marking scheme.
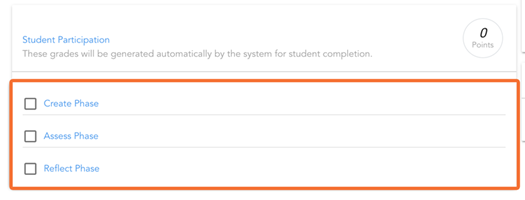
Student Participation
When Student Participation is selected, the three phases found in the Build Activity Menu will be visible.
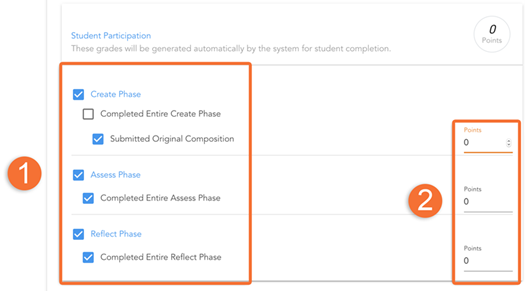
1. To incorporate the student’s completion of each phase as a grade, select the check box beside each phase that you want to grade the student on. From there, you may select if you wish to grade the student based on if they completed the entire phase (including any additional questions) and/or if they submitted or assessed work.
2. After you have finalized your grading assessments, you must dedicate points to each assessment. Use the up and down arrows in the points box to add a weight to each grading assessment. The sum of all the points for each assessment will equal to a final mark.
Assign Grading
Once your grading assessment is completed, you have the option to Assign Grading.
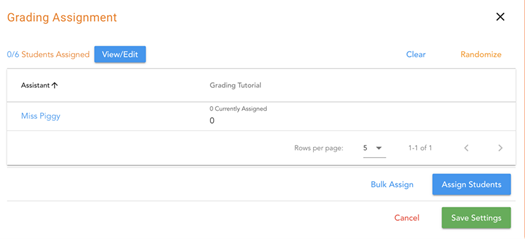
Clicking on the button will yield a menu, showing a list of users from your Brightspace course shell who have the instructor, teaching assistant, or grader role.
Methods to assign students to evaluators are:
- Randomize
- Manual Input
- View/Edit
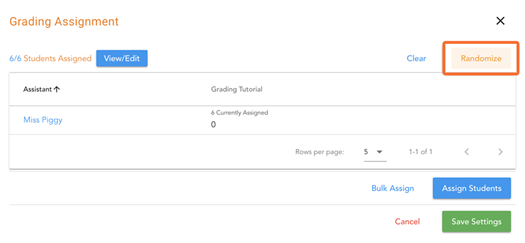
Randomize
Randomize will randomly assign students to different evaluators, this function is good for splitting students equally between multiple evaluators.

Manual Input
1. Type in the number of students you want to assign to each evaluator into the box.
2. Then click Assign Students to confirm the number.
This method is useful as it allows you to have more control over how many students each evaluator will be assigned.
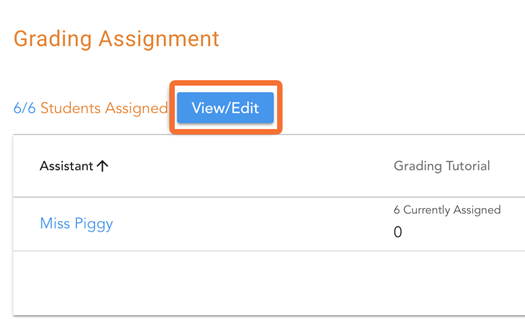
View/Edit
This function allows you to view all the students in your course.
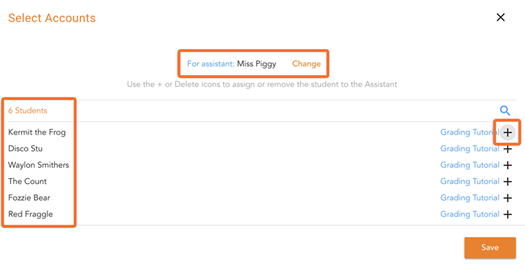
You have the option to assign a specific student to a specific evaluator by clicking on the plus symbol. You may also unassign as well.
Additional Information
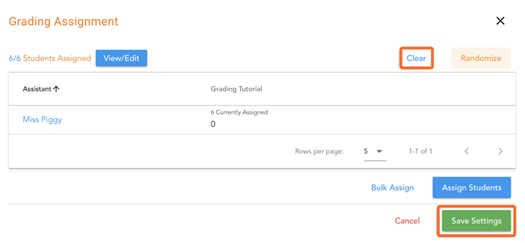
- You can clear numbers and options you have set, by clicking on the Clear button.
- Evaluators will only see students that they are assigned to.
- In the case of a situation where students are not being properly assigned to an Evaluator, please refresh the page and try again.
Once you are ready, click the Save Settings button and then the Save button.
Your teaching/grading team will access peerScholar through D2L exactly the same as students.
Note: Make sure they are set up as Teaching Assistants or Graders through D2L first, and once they access peerScholar, they should be listed under the Teaching Team.
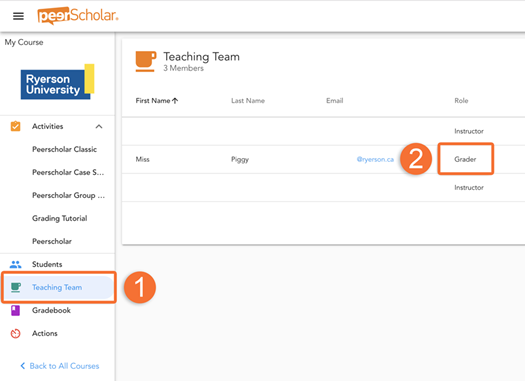
1. Teaching Team: To view the teaching team, click on Teaching Team on the sidebar on the left.
2. Role: To give access to your TA to grade make sure their role is set to Grader by clicking on the option in the role column.
Now you may assign students to the TA in the Customize Grading Menu and allow your TA to mark student work.
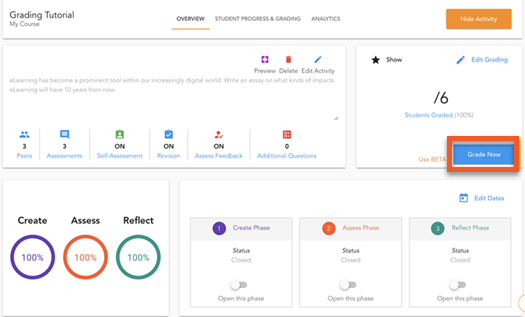
Once you have completed the Customize Grading Menu and students have submitted their assignments, assessed their peers’ assignments and reflected, it is time to grade their work.
From the dashboard of your course, click on the Grade Now button. The grading system will appear for you.

Student Identification
In the centre of the grading system, the student’s name will appear and you are able to cycle through all the students.
Note: if Mark Anonymously was checked in the customized grading menu, the student's name will not appear when grading. However, the student’s name will still be accessible next to their grade in D2L Brightspace. peerScholar recommends using the anonymous grading feature as it can remove unconscious bias or preconceived ideas based on the name of the student.

Peers
Underneath the student’s name, are the peers that have assessed the student’s work. Clicking on each peer will show their assessments. You may also view the self-assessment that the student has completed if that option was toggled on during the Build Activity phase.
Student's Composition
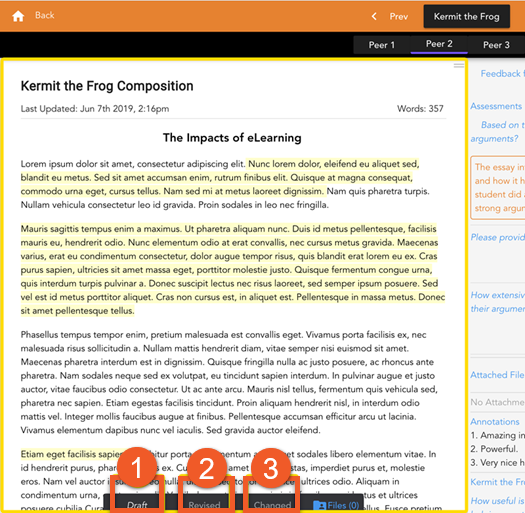
The left-hand panel displays the Student’s composition that they have submitted.
At the bottom of the composition, there are 3 options:
1. Draft: shows the initial submitted work.
2. Revised: shows the revised submitted work after peer edits.
3. Changed: shows the changes made to the work. Changes will only show if the student edits directly on the peerScholar system.
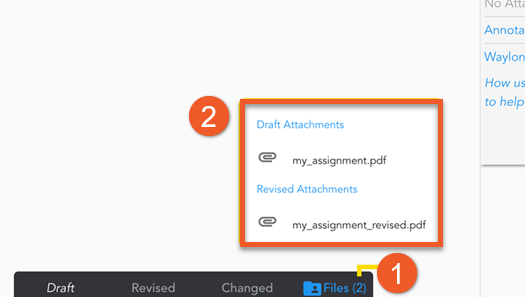
Attachment Submissions
If your students have submitted an attachment in addition to or instead of a written composition, the files will be downloadable at the bottom of the screen.
1. Click Files to open the file popup menu
2. Click on the file names to download each file individually and open separately on your computer in the appropriate software
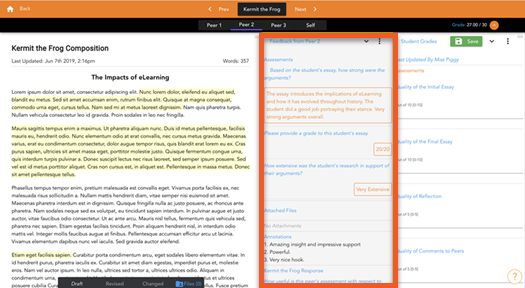
Assessment from Peers
The middle grey panel displays the assessments and feedback from each peer conducted in the Assess phase.

Grader's Assessments
The white panel on the right-hand side is the grading portion of the system.
Teaching Assistants or Instructors will complete the assessment they created in the Customizable Grading menu.
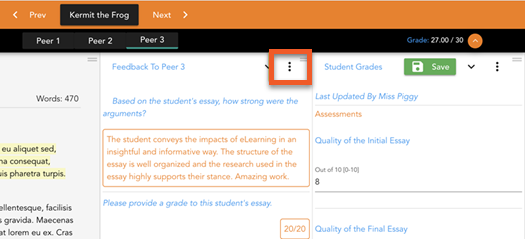
View Feedback given to Peers
Clicking on the three dots [...] will allow you to view feedback given to peers. This means that you are able to see the assessments that the student has conducted on their peers. The grading system changes and the left panel now shows the peer’s composition and the middle panel shows the student’s comments on their peers' work.
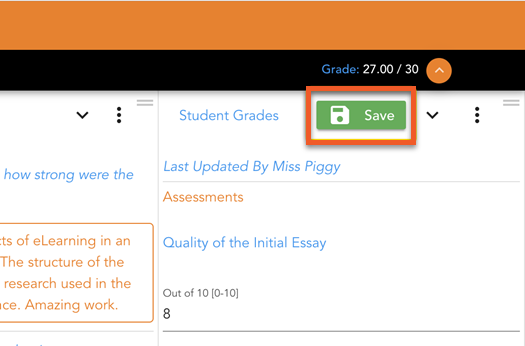
Saving
After you or your teaching assistant have completed grading, click on the green Save button and move onto the next student.
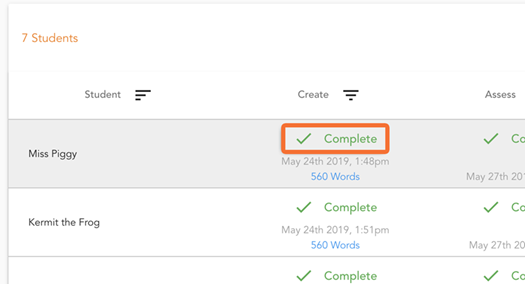
Once all students are graded, the dashboard should indicate that all students have been marked.
peerScholar’s dashboard offers many options to view the progress of your student’s work.
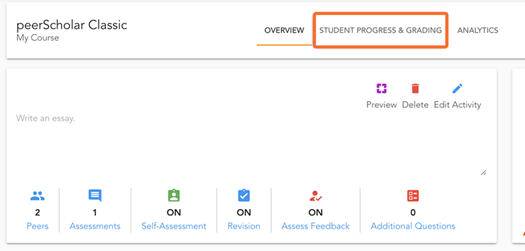
In the dashboard, locate the tab called Student Progress & Grading. Under this menu, you are able to view the progress of each student’s work in every phase.
Clicking on the status of the student’s work will open a menu of options.
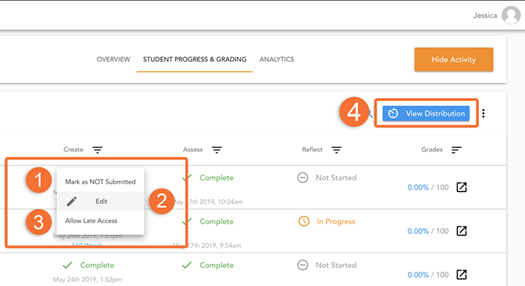
This menu allows you to:
1. Mark as NOT Submitted: this will change the student’s status to “In Progress”
2. Edit: this option allows you to edit the student’s submission in the Create phase and in the Reflect phase. This may also be useful for manual submissions by the instructor in the case that students submit their work to you and not the system.
3. Allow Late Access: grants the individual student permission to submit late in any phase. It is recommended that in the Assess phase, all students submit their assessments on time to avoid unequal distribution of peer assessments.
4. View Distribution: allows you to see the distribution of peer to peer in the Assess phase.
After you or your teaching assistant have completed the grading, you are able to transfer them to D2L Brightspace.
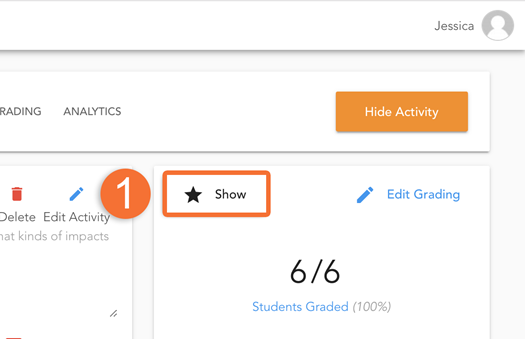
1. On the peerScholar dashboard, you are able to click Show to make your grades visible to students in the peerScholar system. You may also hide grades if you wish to do so after showing them.
2. Clicking Gradebook will take you to the grades that you have submitted into the system.
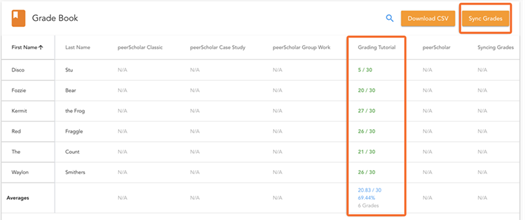
In the Gradebook panel, grades that you have allocated to each student are displayed. This panel shows all the grades of every activity that you have made.
To sync the grades to D2L Brightspace, simply click on the Sync Grades button.
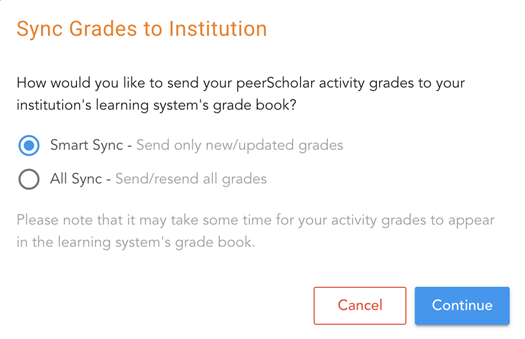
A menu will pop up confirming how you would like the grades to be transferred.
Smart Sync: this function allows you to send only new/updated grades. This function is useful for syncing grades for later activities, as previous activities would have been completed and resending grades is unfavourable.
All Sync: this function allows you to send all grades. This includes every previous activity that has been completed.
Once you have clicked Continue. The grades will take time to process before they enter into D2L Brightspace. Once they are processed, follow the procedures in which you would manage and enter grades.
peerScholar general information
Learn about peerScholar, an assessment tool used for assignments where students evaluate each others’ work. peerScholar is integrated with D2L Brightspace, and is accessed through your course shell.