Generic Accounts

To request a generic account:
- Log in to the my.torontomu portal.
- Under the Self Service section, select Guest and Generic Accounts.
- Select Request Generic Account and follow the prompts to submit the form.
- Before creating the generic account, Computing and Communications Services (CCS) will verify the request with your authorization contact via email.
- If approved, CCS will notify you once the account is created.
If you need to make any account changes, please contact the Computing and Communications Services (CCS) Help Desk via the IT Help portal, help@torontomu.ca or 416-979-5000, ext. 556840 (students) or ext. 556806 (employees).
Since generic accounts do not have access to the my.torontomu portal, in order to log in to Gmail or other Google Apps for a generic account, you must do the following:
- Go to gmail.torontomu.ca.
- Log in using the generic account’s username and password.
If you don’t know the password for this generic account, you (as the owner of the account) can reset it. To do so:
- Log into the my.torontomu portal using the account owner's my.torontomu username and password.
- In the Self Service section on the right side of the screen, select Guest And Generic Accounts.
- In the Security section, select Change Contact Password.
- Select the account you wish to reset the password for.
- Enter a new password.
- Enter your new password again to confirm
- Select Change Password to confirm your new password.
To set up two-factor for a generic account, you’ll need to do so through your personal TMU account:
- Log in to the my.torontomu portal using login credentials for your individual TMU account.
- Under the Self Service section, select Guest and Generic Accounts.
- Within the Security section, click Two-Factor Authentication for Generic Accounts
- Next, proceed through the prompts to complete two-factor setup
If you have any questions, please contact the Computing and Communications Services (CCS) Help Desk via the IT Help portal, help@torontomu.ca or 416-979-5000, ext. 556840 (students) or ext. 556806 (employees).
Before you can manage your generic account’s email (or any other employee's email), you must first gain access to the Gmail account, as follows. You as the owner of the account can do the following:
To connect a generic account to a personal TMU account via delegated account access, the owner of the generic account can do the following:
- Visit gmail.torontomu.ca and log in with the generic account’s username and password.
- Click the gear icon followed by See all Settings.
Click the Accounts tab, and under Grant access to your account, click Add another account. (Here, you can also choose to mark conversations as read or unread when delegates open them.)
4. In the Email address field, type your personal TMU email address, and then select Next Step.
5. In the confirmation message box, select Send email to grant access.
6, Log in to your personal Gmail account.
7. Open the confirmation email, and then select the acceptance link to activate delegated access to the generic email account.

Delegated access may take up to one hour to take effect. Once activated, you can reach the delegated account any time by doing the following:
- Log in to gmail.torontomu.ca with your personal TMU account credentials.
- In the top-right corner, click on your avatar.
- Click on your delegated account.
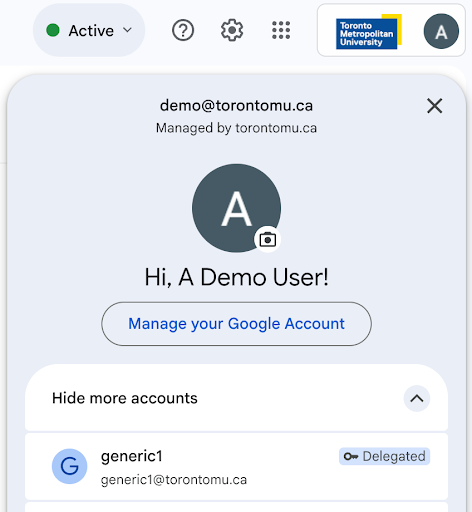
Once your generic account is set up, you can access the generic Gmail account while signed in to your personal TMU account. Here's how:
- Log in to gmail.torontomu.ca with your personal TMU username and password.
- In the upper-right corner of the page, click on your avatar, then select your generic account’s address from the drop-down menu.
- A new Gmail window or tab will open, showing your generic account’s email inbox. You can now send and manage email for the generic account
As Google’s security standards allow only applications that use OAuth as an authentication method, you will need to set up your email and calendar apps to use OAuth.
- Outgoing: SMTP
- Server host name: smtp.gmail.com
- Port: 465
- SSL: SSL/TLS
- Authentication: Generic account username and password via OAuth protocol.
Note, there are limitations to using generic accounts to send emails within applications, especially if a large number of emails are expected to go out in a single day. If this is the case, it’s recommended you seek an alternative solution for setting up email function in your application. For example:
- If the application is hosted within TMU, please contact the CCS Help Desk to configure your settings via Relay
- If the application is hosted on the cloud, please explore the possibility of utilizing the cloud server to send email.
When you send a message using your generic account, the message is listed in the recipient’s Inbox as coming from the generic account. Once the message is opened, however, the from field will show that you sent the message on behalf of the generic account, like so:
G Suite at TMU <gsuite@torontomu.ca> (sent by yourname@torontomu.ca)
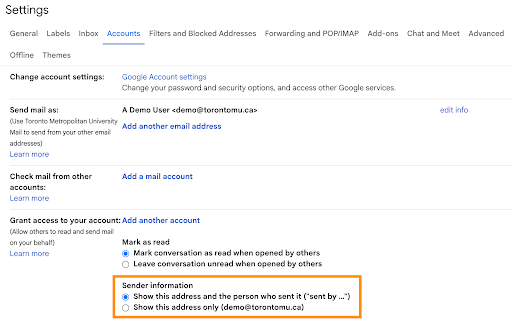
If you need to send email from your generic account without referencing your personal address, you can:
To send email directly from your generic account without showing your personal address:
- Log in to gmail.torontomu.ca with your generic account username and password.
- Click the gear icon followed by See all Settings.
- Click the Accounts tab.
- Under the Grant access to your account section, go to Sender information.
- Choose the Show this address only option to hide the ("sent by...") information.
- Click Save Changes at the bottom of the settings page.
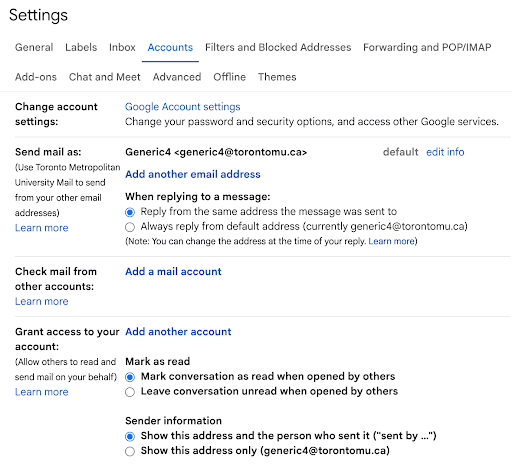
If you don’t want to log into a separate account each time you send an email from your generic account, you can set it up so that you can change the “from” field when sending an email on your main account.
- Log in to gmail.torontomu.ca with your personal TMU username and password.
- Click the gear icon followed by See all Settings.
- Click the Accounts tab.
Under the Send mail as section, click Add another email address.
.png)
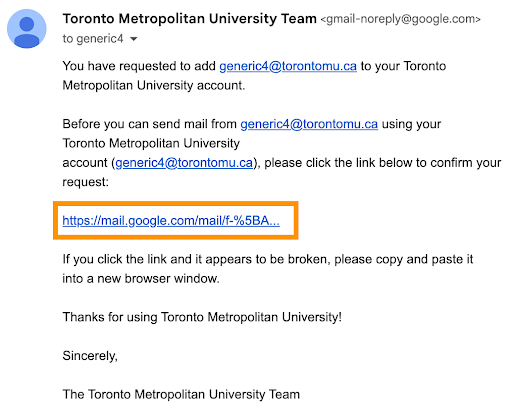
5. Enter the name you’d like to appear when people receive generic account emails that are sent from your personal account.
6. Enter the generic account’s email address and uncheck the Treat as an alias box, then click Next Step .
7. Click Send Verification and log in to the generic Gmail account. You may need to sign into the account using a private browsing/incognito window.
8. The generic account should receive an email asking for confirmation. Open the provided link and click Confirm or use the provided code to confirm the account.
9. You should now be able to send emails as your generic account by creating a new draft on your main account and clicking on the from line.
Note, if you need to change the name that appears when sending generic account email via your personal TMU account, you can do so any time by repeating steps one to three and clicking Edit info next to the generic account options.

- Log in to calendar.torontomu.ca with the generic account username and password.
- On the left-hand side of the Calendar, find the My calendars section.
- Next to the generic account calendar, click the options setting followed by Settings and sharing.
- Scroll down to the Share with specific people section. Click on the +Add people button. In the pop-up dialogue, type your primary email address along with the email address of anyone else you would like to share the generic Calendar with.
- In the drop-down menu, select the appropriate permission, and then click Save.
Note that the:
- "Make changes to events" option lets others edit the Calendar
- "Make changes and manage sharing" option lets others edit the Calendar's sharing options too. This is a good setting for the owner since they can then share the generic account’s Calendar directly.

- Open the Google Contacts Manager (external link) . Make sure you are in the generic accounts Contact Manager. If not, please try signing in using incognito mode in Chrome. (external link)
- Click the gear icon followed by Delegate access.
- In the Invite people box, type the name or address of the person to whom you’d like to grant permission to manage your contacts.
- You can enter up to 25 names, separated by commas. You can only delegate your contacts to other TMU Google Account holders.
Click Send. The users you invited should now have access to your Contacts group.
You can:
- Add new contacts with the Create contact or New contact buttons
- Edit contacts in the delegated contacts list
- Delete contacts from the delegated contacts list
You can’t:
- Print contact information
- Import contacts
- Export or forward contacts
- Find and merge duplicates
- Undo changes
- Manage labels for delegated contacts
- Get delegated contacts to autocomplete in Gmail or other Google services
Find more on how to give another user access to your contacts (external link) on the Google Help Centre site.