Zoom Whiteboard
Zoom Whiteboard is a digital collaboration tool that replicates the experience of using a physical whiteboard in a classroom. It allows for the creation of a shared digital canvas, where educators and students can draw, write, and visually brainstorm ideas.
Whiteboards can be used both within Zoom meetings and separately from them.
It’s beneficial for explaining concepts that may need to be worked on visually, for example solving math problems, jotting down class discussions, and facilitating group activities. This interactive element makes lessons more hands-on and provides students with a more accessible way of engaging with the material.
Creating a Zoom Whiteboard
You can create a Zoom Whiteboard in various ways. The method varies based on your access point: desktop client, mobile app, TMU’s Zoom web portal (external link) , or Zoom Web App.
- Sign in to the Zoom desktop client following the steps on the How to sign in to Zoom with Single Sign On (SSO) page.
- Click the Whiteboards button at the top of the page.
- In the case you can not see the Whiteboards button, click the More button and then click Whiteboards from the resulting list.
- At the top right, click New to create a new whiteboard.
Use your Whiteboard for more than Zoom meetings! Make the most of Whiteboards by using them as your digital notebook, an alternative to traditional slideshows, and even for hosting virtual games with friends. With this tool, you can personalize your study notes with images, drawings, and diagrams and create visual aids for your learning. You can also use Whiteboards to replace traditional slideshows and create dynamic visual presentations with their different features, or get creative and play Pictionary, brainstorm story ideas, or create collaborative drawings with friends. There's a whole world of ways to use Whiteboards outside of Zoom meetings, and these are just a few examples to get you started!
- Start a meeting (external link) from the Zoom desktop client.
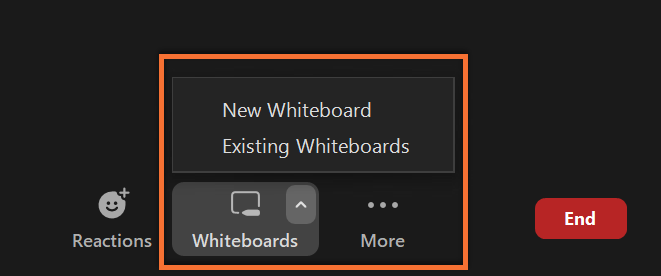
- On the in-meeting controls, select the Whiteboards button.
- If you want to add a pre-existing board, select Existing Whiteboards.
- Select the one you want to use, and grant participants permission to either collaborate or view the board.
- If you want to create a new one for this meeting, select New Whiteboard.
- The whiteboard will open in the meeting window.
From here, you can choose a template for your Whiteboard based on your needs, or start playing around with the blank canvas. Think of this feature as a digital version of the traditional classroom whiteboard. It extends the classroom’s reach beyond physical boundaries, making the learning experience more accessible and interactive.

- Select the upward-pointing arrow on the Whiteboard button.
- Choose whether to allow participants to share Whiteboards at the same time or to reserve this ability for the host.
- Choose who in the meeting can initiate a new Whiteboard.
Note: All Whiteboards created in the meeting will automatically belong to the host.
- Access Zoom through the desktop client.
- On the page's top toolbar, select the Whiteboards button.
- Here, you can browse your existing Whiteboards, and access templates by selecting All Templates on the top right side of the page.
- Once in the Templates pop-up, you can explore all the categories based on your specific needs.
- To use a template, select it and then click Use Template to start a new whiteboard using that template. You can star your favorites to make them easier to find.
- Start a meeting (external link) from the Zoom desktop client.
- On the in-meeting controls, select the Whiteboards button.
- Here, you can choose a predefined template by clicking All Templates and view the options.
- To use a template, select it and then click Use Template to start a new whiteboard using that template. You can star your favorites to make them easier to find.
Templates are useful for brainstorming, project planning, and lesson structuring. Educators can use this tool to keep their Zoom meetings organized and create interactive online classes. Some of the most useful in-class collaboration templates are simple enough for users to navigate, while still providing a great level of interactivity:
- "Brainwriting Brainstorming"- This template allows students to capture ideas, links, drawings, or images in separate squares.
- "Mind Map"- This template helps students branch off ideas from a central concept into organized sections.
- "Learning Experience"- This template serves as a visual planning tool for structuring effective lesson plans.
Every template includes a brief explanation of its features, which can be found on the top left corner of the Whiteboard. However, you can edit any part of the canvas to fit your needs.
Additional Resources
For helpful guides on using Zoom Whiteboard, visit the Getting started with Zoom Whiteboard (external link) page, where you can find guides on How to use the Zoom Whiteboard tools (external link) , Sharing a whiteboard (external link) , Deleting a Whiteboard (external link) , and learn how to manage your whiteboards and other settings.