Additional features for hosts
Additional features to help you manage your meeting room or make it more interactive. Please note that some features are turned off by default for privacy reasons or to minimize distractions in online lectures.
You can review and enable any feature or settings by visiting your Zoom Settings page. (external link)
Support
- Zoom's video tutorials (external link)
- Zoom's help center (external link)
- Email the main Help Desk at: help@torontomu.ca using your TMU email address.
Polling
Create various polling questions during your meeting. This feature allows instructors to ask their students questions before or during their online presentation.
Breakout rooms
Breakout rooms allow you to split your Zoom meeting into small groups automatically or manually. Mimic in-person small group discussions, separate from the main meeting.
Whiteboard
Replicate the experience of using a physical whiteboard in a classroom. Instructors and students can draw and visually brainstorm ideas using a shared digital canvas.
Screen sharing
Only meeting hosts can share their screen by default. If you'd like a participant to share their screen, you can temporarily assign them as a co-host (giving them administrative access to the meeting), or you can enable screen sharing for all participants using Host tools.
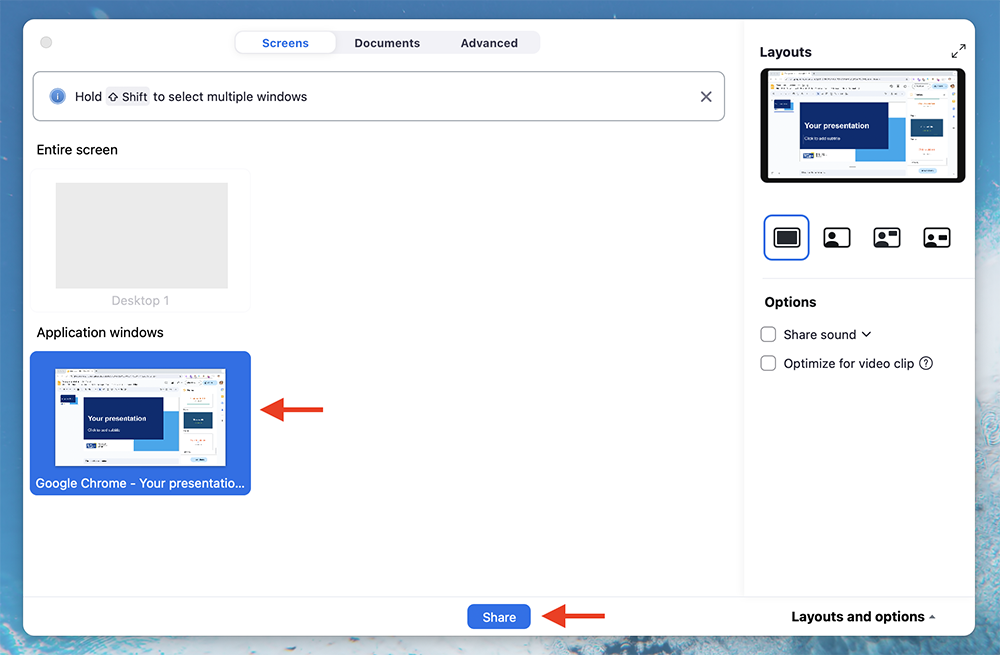
Select the green Share button within the toolbar.
You will be asked to select which window to share. You can either share your entire desktop or a specific window. Select the window that contains your presentation, and then select Share.
If you have videos in your presentation, select the Optimize for video clip checkbox.
Add a participant or teaching assistant as a co-host
If you have a large meeting or class, you can assign a participant or teaching assistant to co-host the meeting. The co-host feature allows the host to share hosting privileges with another user, allowing the co-host to manage the administrative side of the meeting, such as managing participants or starting/stopping the recording.
Limitations
Co-hosts do not have access to the following controls as they are only available as host controls in a meeting:
- Closed captioning
- Start live streaming
- End meeting for all participants
- Make another participant a co-host
- Start breakout rooms or move participants from one breakout room to another
- Start the waiting room (co-hosts can place participants in the waiting room or admit/remove participants from the waiting room).
- Co-hosts cannot start a meeting.
To add a co-host
Navigate to the Meetings section of Zoom. (external link, opens in new window)
If you are scheduling a future meeting, navigate to the Alternate Host field and enter the teaching assistants email.
If the meeting is already scheduled, find the meeting you would like to add a co-host to. Select the Edit this meeting button, and navigate to the Alternative Host field. Enter the teaching assistant's email.
Opt-in to feature
- Go to your Zoom Settings page. (external link)
- Navigate to Virtual background and click on the toggle to enable.
- Tip: Press Ctrl + F (or Command + F on MacOS) and search "Virtual background" to quickly find the setting.
Note: You must logout of the Zoom Desktop Client and login to it again for this setting to take affect.
How to enable on desktop application
- In a Zoom meeting, select the Video submenu ().
- Select Choose virtual background...
- If prompted, select Download to download the package for virtual background without a green screen.
Virtual background tips
- It's recommended that you position yourself in front of a wall with no objects in the background.
- Make sure there are minimal shadows and good lighting.
Cloud recordings
When you record a meeting and choose Record to the Cloud; the video, audio, and chat text are recorded in the Zoom cloud.
Meetings recorded to the Zoom Cloud are automatically transcribed. This can help accommodate students in the audience who may be D/deaf or hard-of-hearing, or more familiar with another language, respectively.
Please review privacy recommendations for online classes and recordings.
How to share recordings
Due to limited cloud storage, we ask that you download the files locally and delete it from the Zoom cloud, after the video and transcription has processed. We highly recommend uploading the Zoom recording to Google Drive instead. You can then share the Google Drive link by email or with D2L Brightspace. Learn how to share audio and video using Google Drive.
Zoom general information
Zoom is a live streaming and web conferencing tool for online meetings & seminars in real-time.
- Accessibility in ZoomPage Description:Discover and customize Zoom's accessibility settings to meet your specific needs.
- Additional features for hostsPage Description:Learn about additional Zoom features to help you manage your meeting room or make it more interactive.
- Changing your name in a Zoom meetingPage Description:If you need to change how your name appears in Zoom, follow these steps in the Zoom interface.
- How to create polls in ZoomPage Description:The polling feature in Zoom allows you to create single choice or multiple choice polling questions during your meeting.
- How to host a meetingPage Description:How to host a virtual meeting or classroom in Zoom.
- How to set up recurring tutorial sessions for TAs/GAsPage Description:How to set up recurring tutorial sessions for teaching and graduate assistants in Zoom.
- How to sign in to Zoom with Single Sign On (SSO)Page Description:For your safety, some meetings require you to authenticate with your TMU credentials. Before joining a meeting, we recommend you sign in to the Zoom desktop or mobile app using Single Sign On (SSO).
- Record lecture components using ZoomPage Description:Zoom is known as an online meeting platform, but it can also be used to pre-record materials to be shared with your class.
- SecurityPage Description:Zoom has several security features to keep your meetings safe.
- Zoom AI CompanionPage Description:The Zoom AI Companion enhances the accessibility, efficiency, and effectiveness of virtual meetings.
- Zoom Breakout RoomsPage Description:Breakout Rooms allow you to split your Zoom meeting into small groups automatically or manually. Breakout rooms mimic in-person small group discussions, separate from the main meeting.
- Zoom for Google Workspace add-onPage Description:With the Zoom for Google Workspace add-on, you can use Zoom to easily schedule, join, manage, and customize meetings from GMail and Google Calendar.
- Zoom WhiteboardPage Description:Zoom Whiteboard is a digital collaboration tool that replicates the experience of using a physical whiteboard in a classroom.
