Discussions
Engage your students in an online discussion around course topics!
The Discussions tool is a collaboration area with a variety of uses in a course:
- initiate and contribute to discussions on course-related topics
- provide a space for students ask questions of you and their peers
- enable collaboration on assignments and homework in a safe environment
- minimize course-related email by hosting a class FAQ
Find Discussions in the top menu, under Communication. If it isn't there, review how to enable course tools.
Point your students to our Student guide to Brightspace discussions.
| Level | Description |
|---|---|
| Forum | Organize discussions into broader groups. Most courses only need one main forum. In order to have any discussions happen, a forum must be created by the Instructor (or someone with a role such as a TA). |
| Topic | Group discussions into sub-groups under a forum. For example, if the students are expected to post on a weekly discussion concept, a 'Week 1' "topic" would be appropriate here. In order to have any discussions happen, a topic must be created by the Instructor (or someone with a role such as a TA). |
| Discussion thread | This is the real meat of the Discussions tool. The actual discussions that are comprised of the initial post and all replies to that post. Instructors, TAs and students can create and respond to discussion threads. |
In your course shell, go to Communication > Discussions.
You need to create at least one forum (and at least one topic in each forum) for the discussion area to be usable by students.
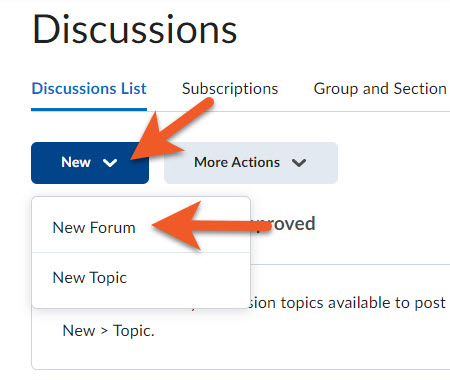
To create a new forum, click on New > New Forum.
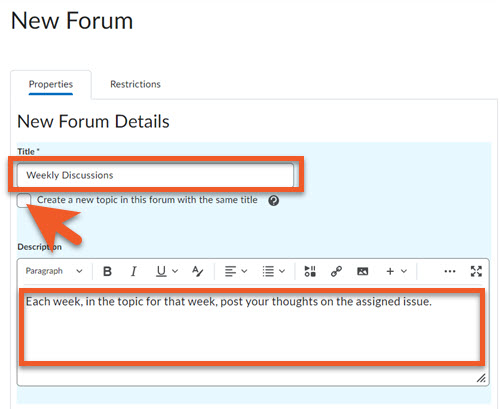
Enter a Title for your forum.
If you will only have one topic in the new forum, select the Create a new topic in this forum with the same title check box to create a topic in the forum with the same name. You can manually create topics after creating a forum, if you wish them to have unique names.
Enter a Description for your forum (optional), if you wish to explain the purpose of this forum, or provide instructions that apply to all topics within this forum.
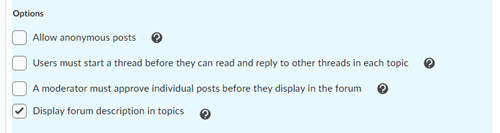
Below the Description, you will see a number of options. Select only those that you wish to apply to the entire forum.
Allow anonymous posts
Selecting this option allows users to post anonymously to topics created within this forum. Anonymous posts display with the author "Anonymous" in the thread, and are genuinely anonymous. You cannot see the name of the author, and you cannot assess these posts. If, for example, for safety reasons, you need to investigate who posted a particular message, please contact our team, at courses@torontomu.ca, with the details.
This option cannot be selected alongside the "Users must start a thread before they can read and reply to other threads" option.
Users must start a thread before they can read and reply to other threads in each topic
Selecting this option will require a user to start a new thread in a topic before viewing or replying to other threads in that topic in the forum. If this forum requires post approval, users will not be able to view or reply to other threads until their thread is approved.
This option cannot be selected alongside the "Allow anonymous posts" option.
A moderator must approve individual posts before they display in the forum
Selecting this option will require a moderator to approve posts to topics created within this forum before they display to users.
Display forum description in topics
Selecting this option will display the forum's description in addition to the topic description when viewing a topic

Click on Save and Close to save your work.
Or, click on Save and Add Topic, to immediately create a new topic, Save, to save your work but stay on this page, or Cancel, if you changed your mind about creating a new forum.
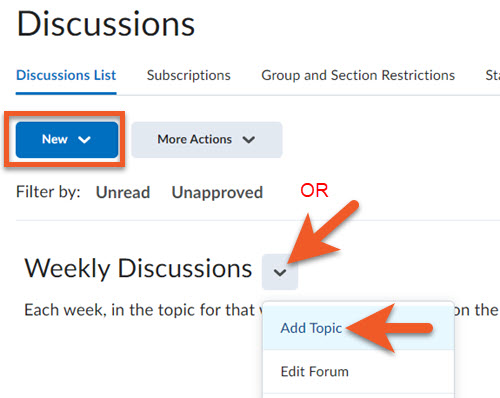
You must create at least one topic in each forum, for the discussion area to be usable by your students.
Make sure you are on the Communication > Discussions page.
Either click on New > New Topic OR click on the contextual menu beside the forum name, then click on Add Topic.
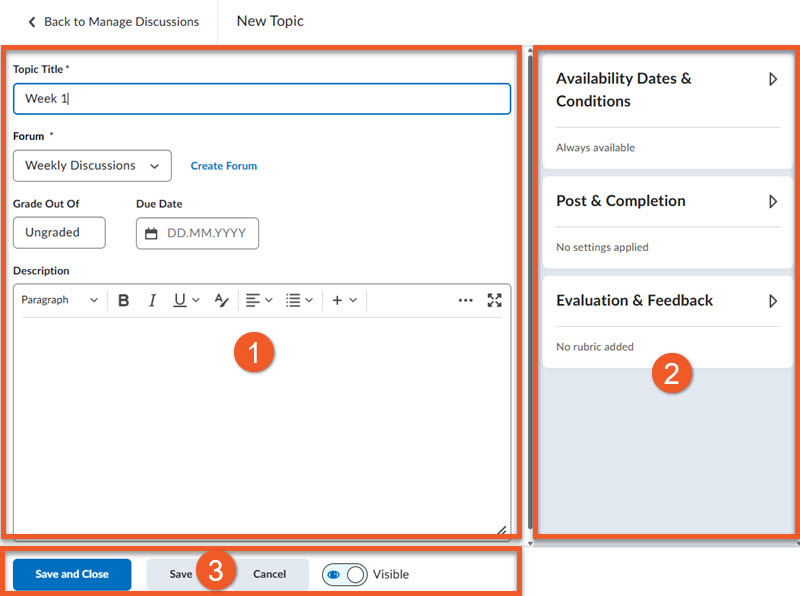
The Create/Edit Topic Interface
This page has a similar layout as the Assignments and Quizzes tools.
- The main panel contains the bare basics for your discussion topic.
- The right side of the page contains expandable panels, where you can control more details of your discussion topic, such as availability dates, release conditions, and evaluation settings.
- The bottom panel controls overall visibility for the topic, as well as the ability to save your work.
You must have at least one topic in each forum, for the discussion area to be visible to your students.
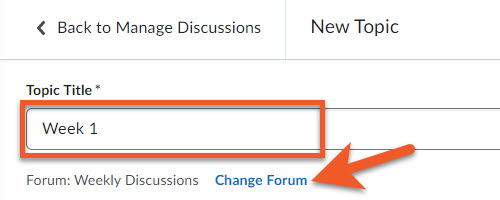
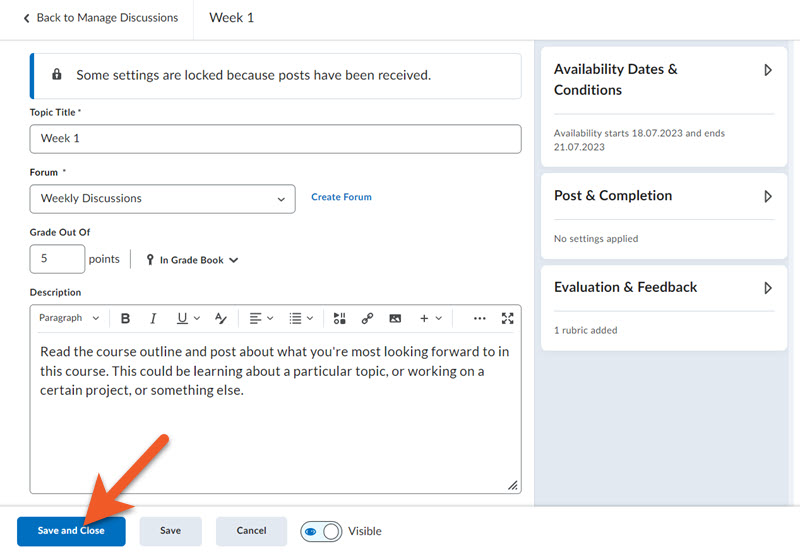
Type in a Topic Title.
If the forum is incorrect, you can click on Change Forum to select a different (existing) forum.
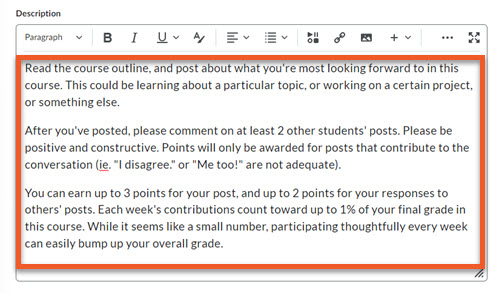
In the Description field, type or include any information that students need to participate in this discussion topic. This could include a question or writing prompt, instructions, a reminder of when this contribution is due, or an explanation of how it will be evaluated.
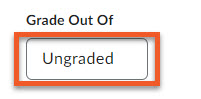
If you WILL NOT grade this discussion
If participation in this topic will not count toward the final grade in the course, you can leave Grade Out Of set as “Ungraded”.
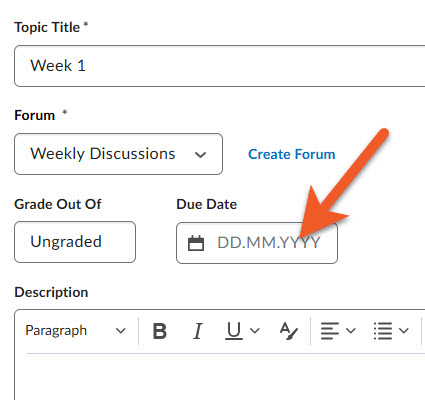
In December 2025, D2L introduced the ability to set a Due Date for a discussion topic.
Warning: However, our testing has revealed that this functionality has a defect, so it may not work as expected for all users. D2L is working on a solution. When this is resolved, these instructions will be updated.
For now, you may click on this field to select a date, but please be aware that this information may not be saved, may not appear in your course shell where you expect it, and may not tag late submissions.
Please make any discussion deadlines very clear to your students using other means, such as including in the Description field, in your Course Outline, and perhaps through judicious use of Announcements and emails to your students.
If you create 2-part assessments in Discussions, where you expect students to post, then respond to other students’ posts, please note that the Due Date functionality (when it’s working) will only apply to their first post in the topic. Use the End Date, under Availability Dates & Conditions, with appropriate visibility settings, to prevent students from posting after a given date, but still be able to view posts, if desired.
If participation in this discussion topic will count toward the final grade in the course, we highly recommend that you first go to Grades, and create a grade item for this discussion topic, then return here to follow the rest of the instructions.
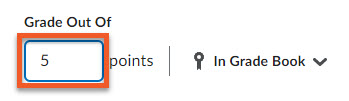
Click in the Grade Out Of box, and type in the number of points this topic will be marked out of.
You will notice an “In Grade Book” item appears to the right of the Grade Out Of box.
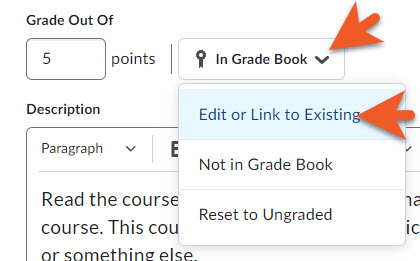
Now you need to connect this assessed discussion topic with the gradebook.
Click on In Grade Book (or the down arrow to the right of it), and select Edit or Link to Existing.
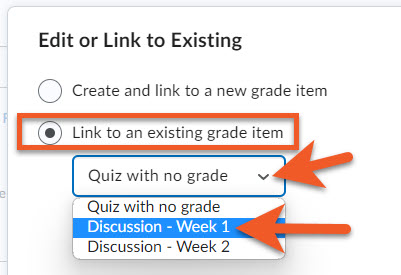
In the popup window that appears, click on the second option, Link to an existing grade item.
Then, in the dropdown, select the desired grade item from the gradebook.
NOTE: If you did not previously create this grade item in the gradebook, you can choose “Create and link to a new grade item” instead but you will not have access to all of the settings. A grade item will be created with incorrect settings, and you will need to go to Grades afterward, and fix it.
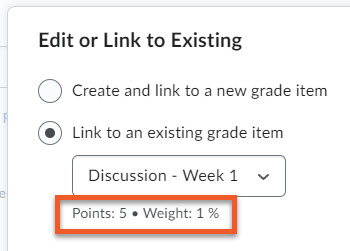
Below the grade item dropdown, you will now notice the points and weight values that were set up in Grades. If these are incorrect, you will need to go to Grades later (before you start grading this item!) to correct those values. If these are incorrect when you start grading, your students’ final grade in the course will be calculated incorrectly.
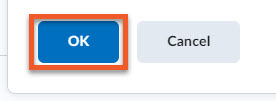
Click on OK to save this setting.
If you need to go create a grade item, click on Cancel, fix it, then return (and repeat the steps above).
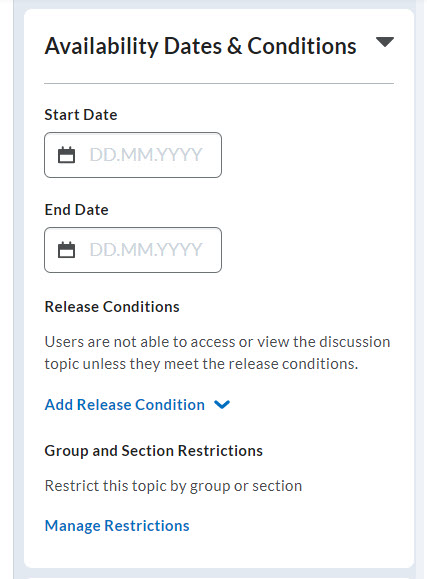
On the right side of the page, click on Availability Dates & Conditions to expand the panel. This section is where you can control when and who has access to this discussion topic.
Start/End Date/Time
The start and end date and time determine the window of time that students can access the discussion topic. You can use one or both.
Release Conditions (optional)
You can use Release Conditions to control access to the discussion topic, depending on some other factor, such as posting in another topic, or viewing certain content first.
Manage Restrictions (optional)
Limit access to this topic to a specific group or section of students.
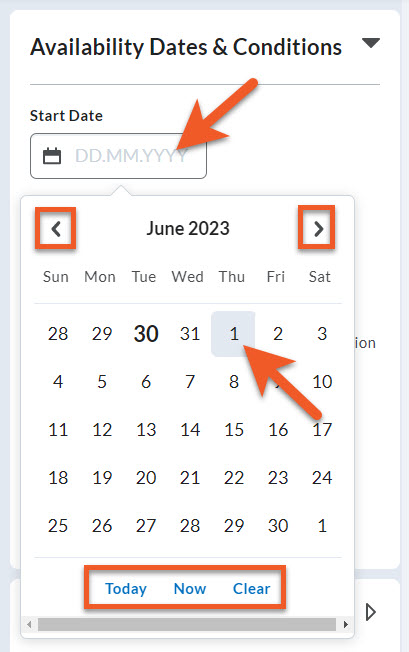
Select the start date and time
The start date and time determines when the student can first access the discussion topic.
To set the start date, click on the Start Date box. A calendar will pop up. Click on the desired date.
If the date is in the future, use the arrows to advance the months.
At the bottom of the popup, you also have the option of selecting Today, Now (the current day and time), or Clear (if you wish to remove a start date that you have previously set).
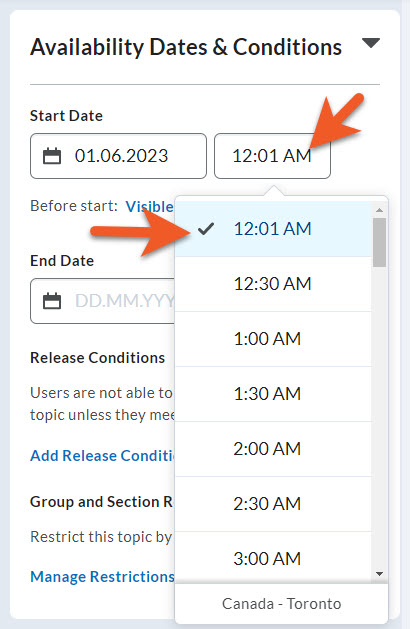
Once you have made a date selection, the calendar popup will collapse, and you will see a time field appear to the right of the date field.
Click on the Time field, and either select a time from the dropdown list, or type in the desired time.
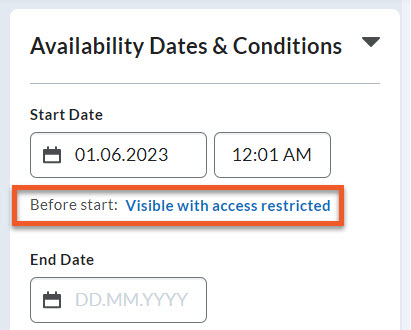
Determine what happens before the start date/time
Click on the Before start option to decide what happens before the start time you just set up.
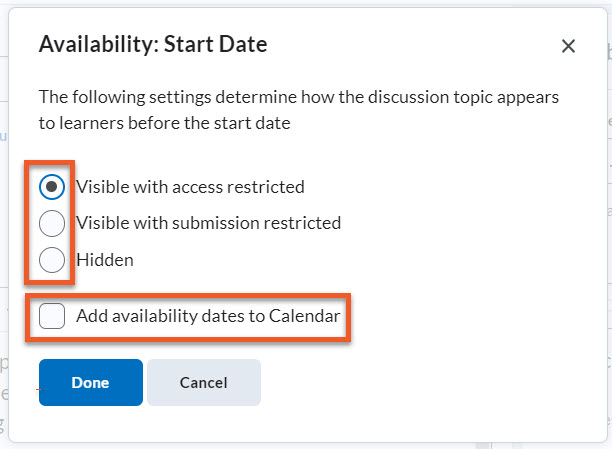
In the popup window, you will see your options:
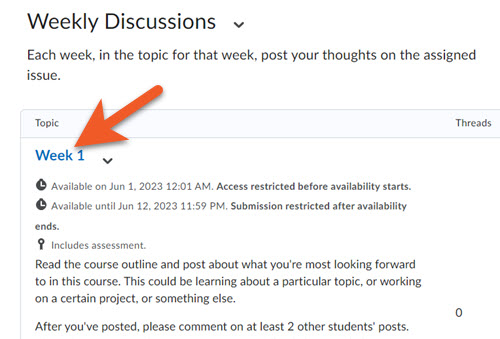
- Visible with access restricted - Prior to the start date/time, students can see the name and description of the topic, and the availability dates, but cannot click on it.
- Visible with submission restricted - Prior to the start date/time, students can see the topic name, description, and availability dates, and can click on the topic name to read instructions (if you have provided any), but cannot post.
- Hidden - Prior to the start date/time, students cannot see or click on the topic.
You can also select Add availability dates to Calendar, if you want students to see this information in the D2L Calendar widget.
Click on Done when you have finished making your selection(s).
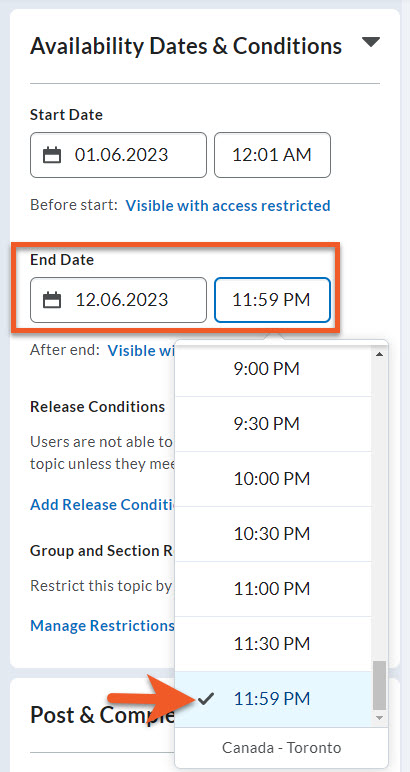
Select the end date and time
You will set the end date in the same way as you did for the start date. Click on the End Date box. A calendar will pop up. Select the desired date.
Once you have made a date selection, the calendar popup will collapse, and you will see a time field appear to the right of the date field.
Click on the Time field, and either select a time from the dropdown list, or type in the desired time.
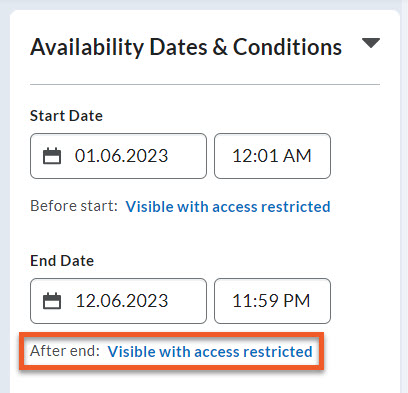
Determine what happens after the end date/time
Click on the After end option to decide what happens after the end time you just set up.

In the popup window, you will see your options:
- Visible with access restricted - After the end date/time, students can see the name and description of the discussion topic, and the availability dates, but cannot click on it.
- Visible with submission restricted - After the end date/time, students can see the topic name, description, and availability dates, and can click on the topic name to read any instructions (if you have provided any), but cannot post.
- Hidden - After the end date/time, students cannot see or click on the topic.
You can also select Add availability dates to Calendar, if you want students to see this information in the D2L Calendar widget.
Click on Done when you have finished making your selection(s).
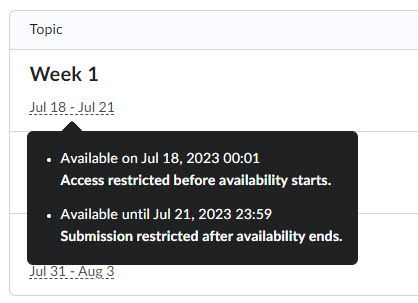
What do students see?
If you have selected Visible with access restricted, students see the discussion topic name and availability date(s), but cannot click on anything. If they hover their mouse over the dates, they can see more details about availability.
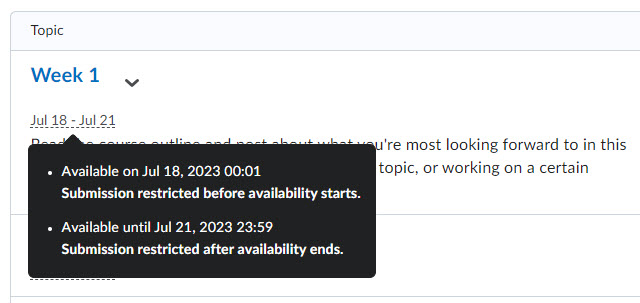
If you have selected Visible with submission restricted, students can see the discussion topic name and availability date(s). Students can click on the assignment name to view instructions for the assignment, if you have provided any, but no links to allow them to post appear in the interface. If they hover their mouse over the dates, they can see more details about availability.
If you have selected Hidden, students do not see the discussion topic at all in the list of assignments at Communication > Discussions.
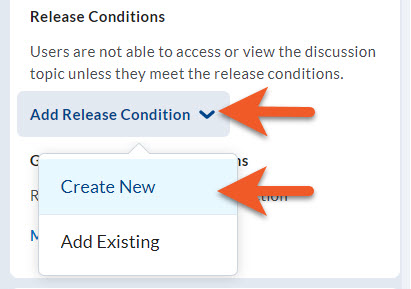
Add new release conditions if, for example, you want the discussion topic to be available to users only after they complete a task, or have viewed particular content first.
To add a new condition, in the Availability Dates & Conditions panel, click on Add Release Condition, then select Create New.
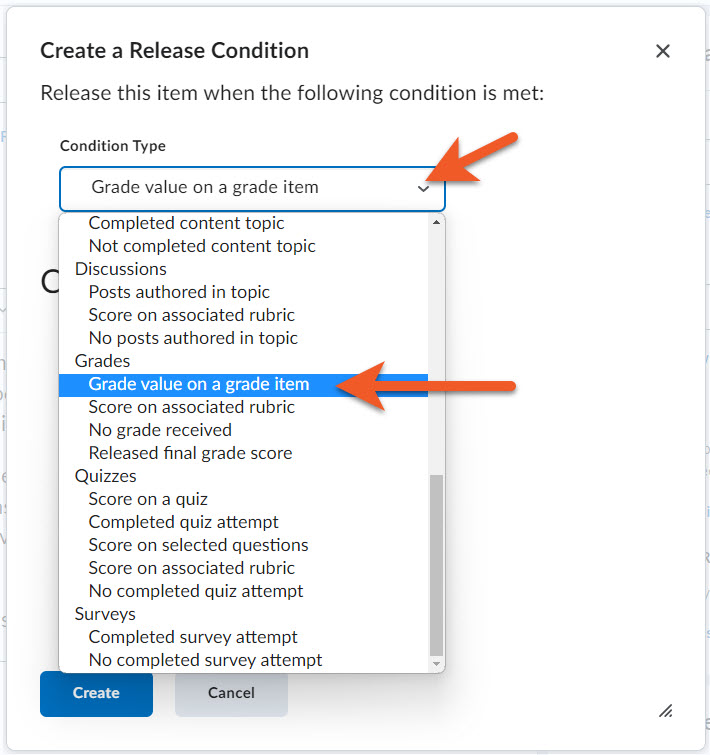
In the popup that appears, click on the Condition Type dropdown, and select the type of condition that applies (ie. visited a content topic, or submitted a different assignment).
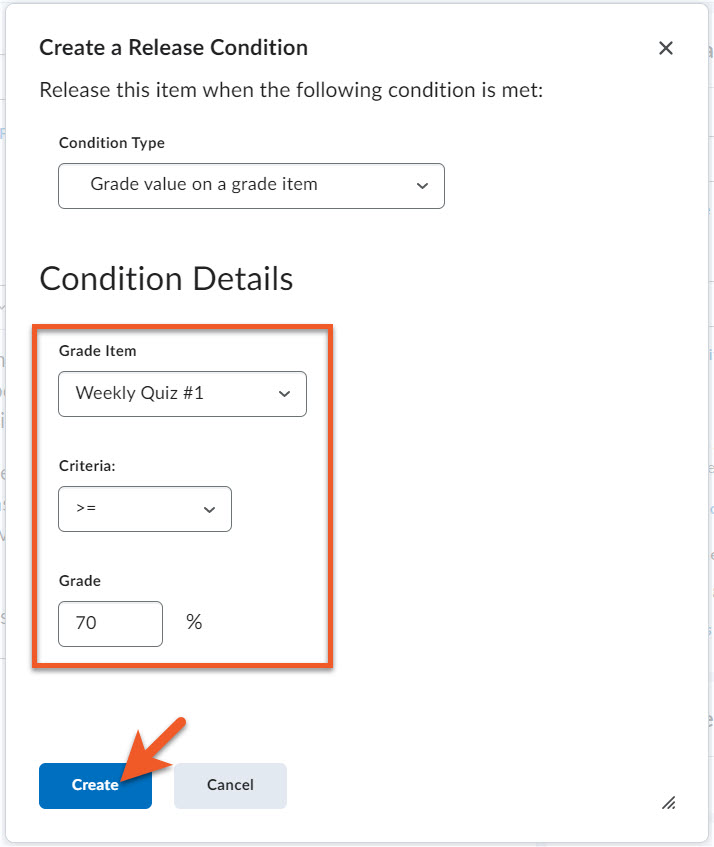
A Condition Details dropdown will now appear, and you may also see additional options below that. Select the specific detail(s) that apply (ie. which content/assignment, grade, etc). In this example, the student must have scored 70% or higher on the Weekly Quiz #1, to have access to this discussion topic.
Click on the Create button to create your release condition.
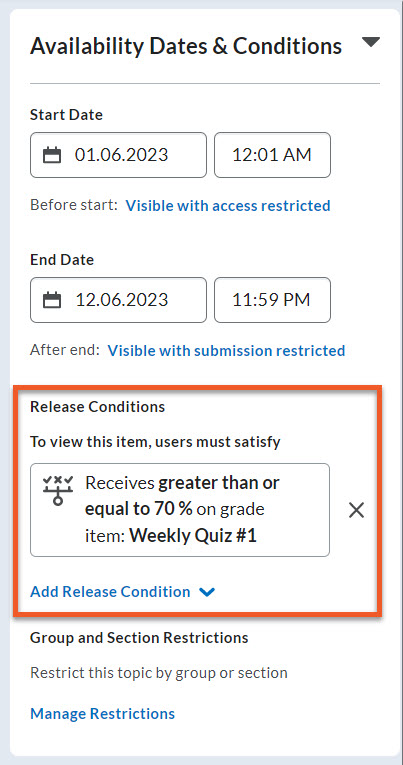
You will now see your release condition listed in the Availability Dates & Conditions panel.
If you realize you made a mistake, click on the X to the right of the release condition, to remove it.
If you wish to add an additional release condition, click on Add Release Condition.
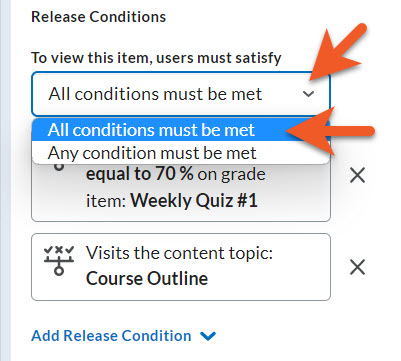
If you have added more than one condition to a topic, you will see a dropdown appear above those conditions. You must decide whether the student should only see the discussion topic if:
- All conditions must be met
OR - Any condition must be met
NOTE: Sometimes, if a student can’t view a discussion, this setting may be set too strictly, preventing them, even though they have met the condition you intended.
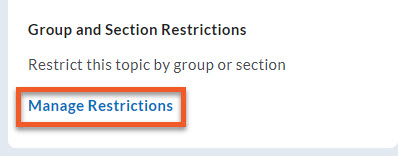
If you want to limit access to the discussion topic to members of a particular group or course section, click on Manage Restrictions (in the Availability Dates & Conditions panel).
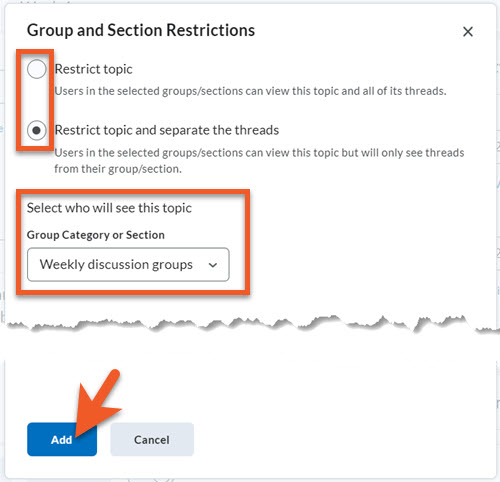
In the popup window that appears, you will see two options:
- Restrict topic limits access to this discussion topic to only the specified group(s) and/or section(s)
- Restrict topic and separate the threads allows the specified group(s) and/or section(s) access to this discussion topic, but members will only see threads from their group/section.
Select the option you require, then below that, you’ll see appropriate options. Select the section(s)/group(s) that should apply.
Click on Add to complete the setup for your restrictions.
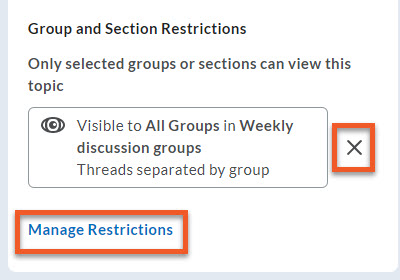
Back on the edit topic page, in the Availability Dates & Conditions panel, you’ll see a summary of the restrictions you’ve set up. If you need to remove the restrictions, click on the X. If you need to change the restrictions, click on Manage Restrictions.
Overview
If you teach several course sections in one course shell, and want each section’s discussions to be in separate topics, it's pretty simple -- without needing to use Release Conditions or create groups. You can also use this method for groups.
This section assumes that you already know how to create discussion forums and topics, and so will not go into detail about their setup.
This method can only be used if you haven't yet created your discussion topics. Please see the instructions elsewhere on this page for how to release pre-existing topics by section.
Create section-specific topics (not forums)
While Brightspace enables you to create separate forums or topics for each section, we highly recommend creating section-specific topics underneath one shared forum.
Why? Forums take up quite a lot of screen real estate, which will result in lots of scrolling for you and your Academic Assistants.
As such, the instructions below are specific to having one shared forum with section-restricted topics within.
This method can only be used to create new discussion topics. The instructions on how to release pre-existing topics by section can be found elsewhere on this page.

If you are currently editing a forum or topic, save and close to exit. Go into the Discussions tool, look at the top of the page and click on Group and Section Restrictions.
In the Group or Section Category dropdown, if you want to create separate topics for each course section in this shell, select “Section”. If you want to create separate topics for each group in a group category that you have already created, select that group category.
Click the link to "Automatically create restricted topics".
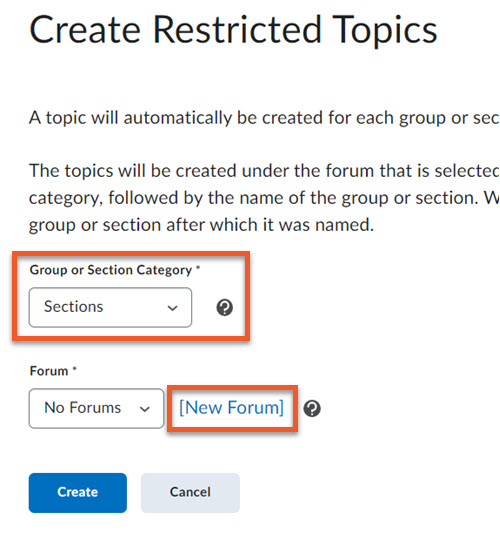
Locate the dropdown menu for "Group or Section Category" and select "Sections" (or the group category, if you are creating topics for groups). Wait for the screen to refresh.
In the "Forum" section, click the link to create a New Forum.
A pop-up window will appear.
Give the new forum a title, keeping in mind that all of the students will see this forum, but will have a private section-specific topic inside.
Click on Save.
Once you have returned to the main screen, note that the title of your new forum appears in the "Forum" dropdown menu.
Click on Create.
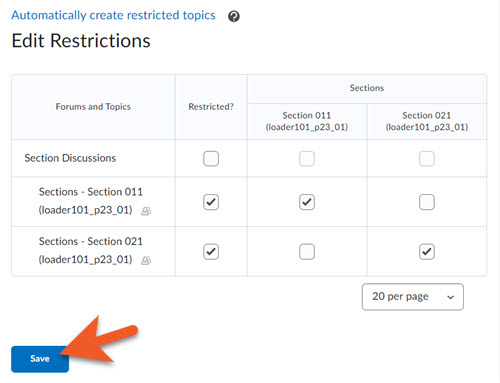
You will be brought back to the Group and Section Restrictions main page. Look in the "Edit Restrictions" section to see that a new discussion topic has been created for each section, and access has been restricted to the students in that section.
Click on Save.
Rename the section-specific discussion topics
The automatic creation process creates discussion topics named after the actual section names, which isn't very elegant.
You can rename these at any time.
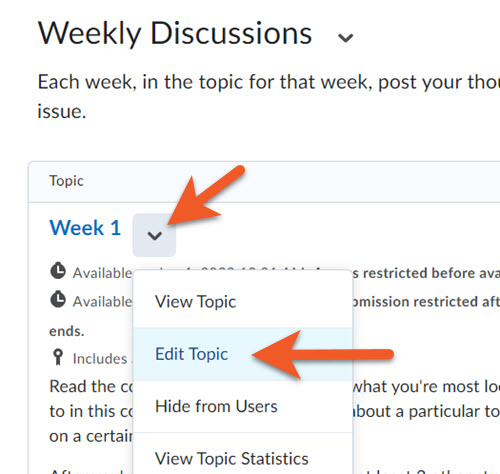
On the main Discussions List page, locate the topic that you would like to rename and click the arrow to the right of the topic name.
From the menu, select Edit Topic.
You can revise the title as you like.
Click on Save and Close.
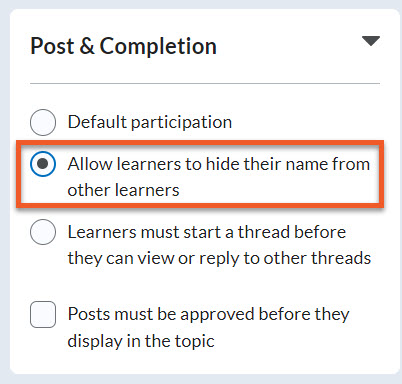
If you want students to post anonymously in a discussion topic, open the Post & Completion panel, and select Allow learners to hide their name from other learners.
Anonymous posting means that you and your students will not be able to identify who contributed to the discussion topic.
To follow up with an anonymous post, you may choose to reply to the post and ask the user to email you.
Under extenuating circumstances, such as in the case of a student posing a safety concern on the discussion board, you may contact courses to escalate the issue.
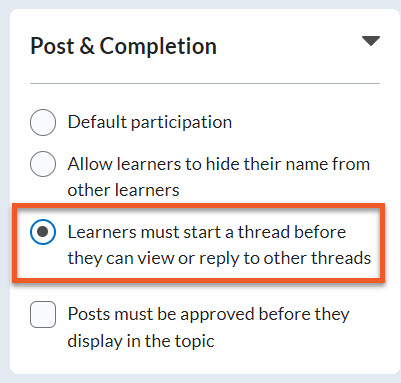
In the Post & Completion panel, select Learners must start a thread before they can view or reply to other threads to force students to post a message in a new thread in the topic before they are able to view or reply to other students’ posts.
Note: If you create 2-part assessments in Discussions, where you expect students to post, then respond to other students’ posts, please note that the Due Date functionality (when it’s working) will only apply to their first post in the topic. Use the End Date, under Availability Dates & Conditions, with appropriate visibility settings, to prevent students from posting after a given date, but still be able to view posts, if desired.

In the Post & Completion panel, you can select Posts must be approved before they display in the topic if you wish to moderate all posts. Keep in mind that this can be time-consuming, and discourage discourse, if posts are not approved in a timely manner.
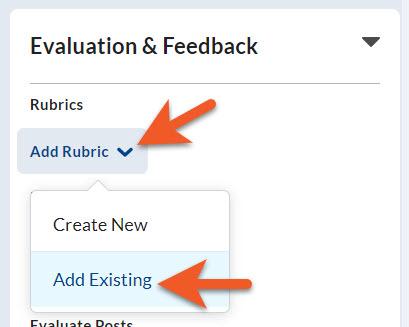
If you wish to grade the discussion topic using a rubric, it’s best if you go to the Rubric tool, and create the rubric, then return here to connect it. If you have done this, and you are ready to connect your rubric to the discussion topic, open the Evaluation & Feedback panel, and click on Add rubric > Add Existing.
Or, you can click on Add rubric > Create New, and follow these instructions to create your rubric. When you are done, you will return to the assignment settings.
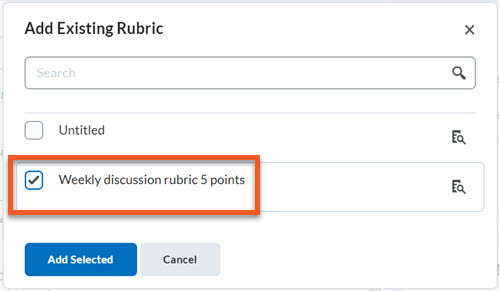
In the popup, you will see a list of rubrics that exist in this course shell. Select the checkbox to the left of the rubric(s) you wish to use.
NOTE: It is possible to have more than one rubric connected to a discussion topic, for example, if students have a choice between two options for their posts. However, when grading, you will need to choose which rubric to use to grade each student.
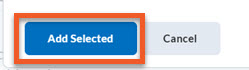
At the bottom of the popup, click on Add Selected, to connect the rubric.
Please note: When you’re done setting up the discussion topic, and have saved your work, on the Discussions list page, you will now notice a “rubric icon” next to the discussion topic name. This indicates that this topic has a rubric connected to it. It makes it easy to see at a glance that you have set this up.
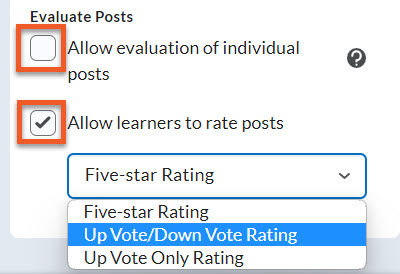
Select Allow evaluation of individual posts if you wish to assign points to each post in a topic (if a student posts multiple times). If you select this option, you will see additional settings for how to calculate the student’s grade.
Select Allow learners to rate posts if you want students to upvote/downvote or give a 5-star rating to other students’ posts. If you select this option, you will see a dropdown list of rating types.

When you are done setting up the topic, make sure the visibility is set to “Visible” so that the topic will appear on the start date.
And remember to click on Save and Close, to save your work.
Once at least one topic has been created inside a forum, and both the topic and forum are available to students, either you or your students can start a thread or reply to a thread.
First, go to Communication > Discussions, and click on the blue topic name.
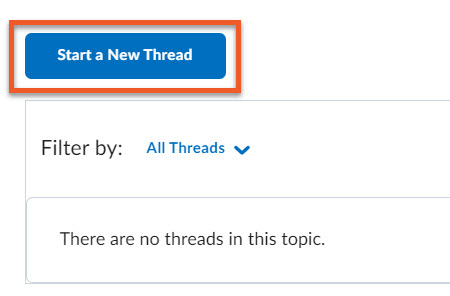
Click on the blue Start a New Thread button.
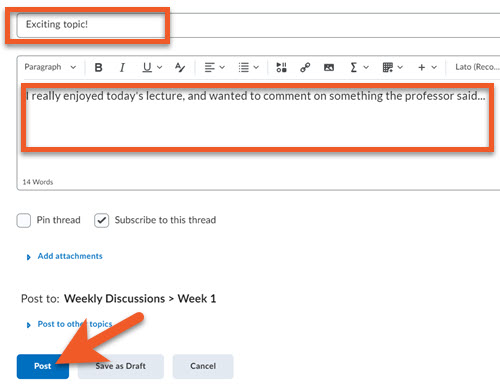
Type a Subject for your message.
In the text editor window, type your message, and format as you wish.
If you want, you can add an attachment, such as an image or reference document.
Click on Post to save your message and make it available to everyone who has access to this topic.
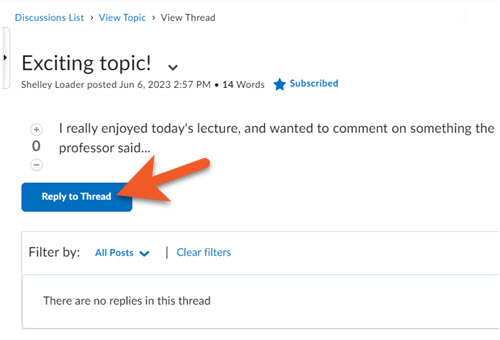
Reply to a thread inside a topic
When you want to reply to an existing thread, make sure you click on the topic name, to show the thread, then, even if you think you can see the entire thread, click on the blue subject line for the thread, to open the full message.
You will then be able to click on Reply to Thread to post a response.
On the Discussions List page, click Edit from the context menu of the forum or topic you want to edit.
Make your changes.
Click on Save and Close.
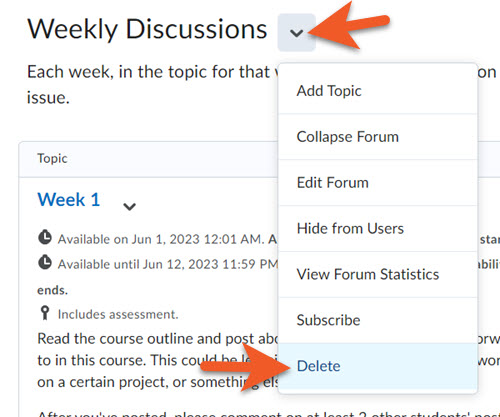
Click Delete from the context menu of the forum, topic or thread you want to delete.
Note: If you delete a thread, all replies to the thread are subsequently deleted.
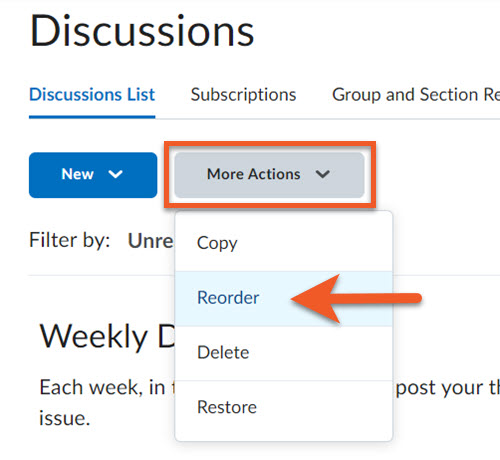
On the Discussions List page, select Reorder from the More Actions menu.
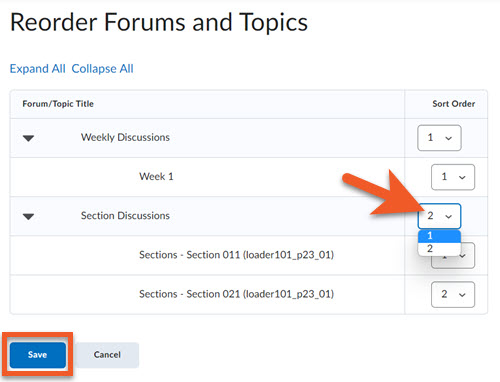
Select the position in the list where you want each forum or topic to appear using the Sort Order drop-down list.
Click on Save.
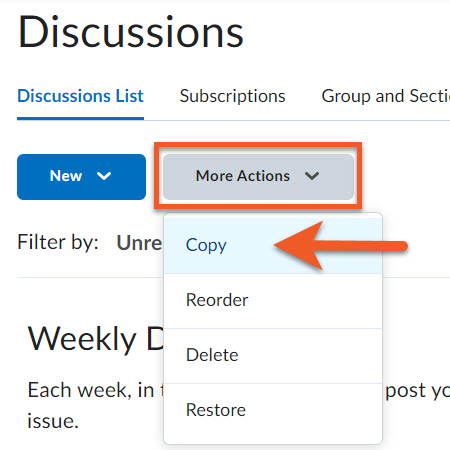
On the Discussions List page, select Copy from the More Actions menu.
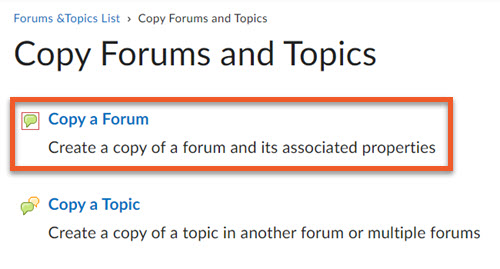
Click on Copy a Forum.
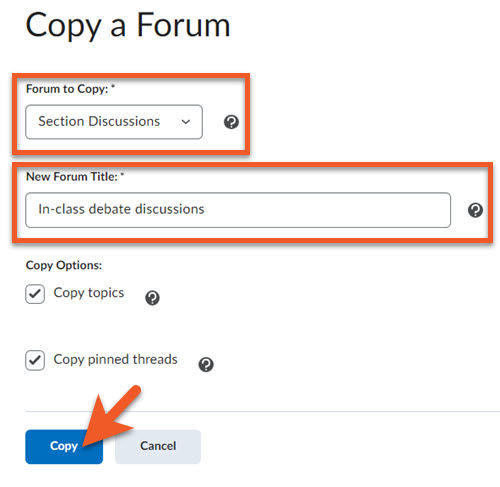
Select the forum you want to copy from the Forum to Copy drop-down list.
In the New Forum Title field, enter a name for the copied forum.
Select your Copy Options (optional):
- Copy topics: Select this option to copy all of the topics inside the forum; this creates new topics with the same titles and properties as the existing ones.
- Copy pinned threads: Select this option if the existing forum has topics with threads you have pinned, and wish to copy with the same details.
Click Copy.
The copied forum will appear at the bottom of the Discussions List page.
Copying a topic creates a new topic with the same properties as the original. Links to grade items or competency activities are not copied. You can choose to copy pinned threads along with the topic. Copying a topic does not copy any normal, unpinned threads inside the topic; however you can copy or move individual threads from inside the existing topic after you create the new topic.
On the Discussions List page, click Copy from the More Actions menu.
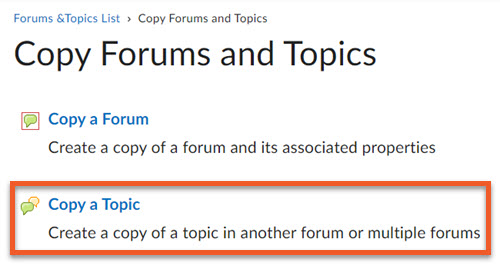
Click Copy a Topic.
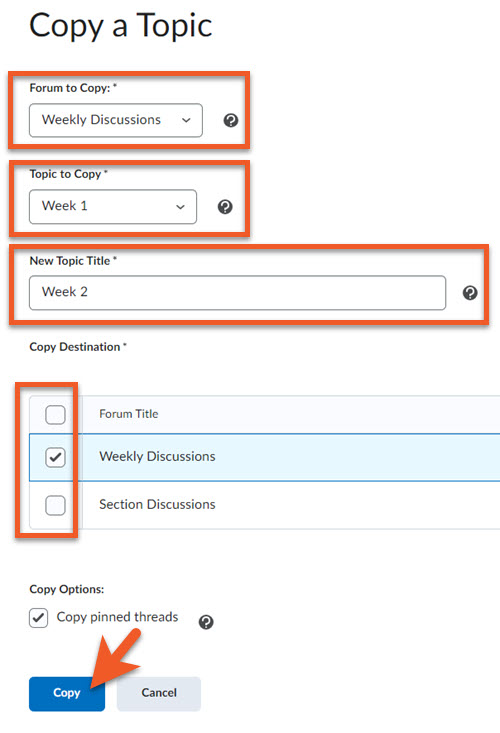
Select the forum that contains the topic you want to copy from the Forum to Copy drop-down list.
Select the Topic to Copy from the drop-down list.
In the New Topic Title field, enter a name for the copied topic.
In the Copy Destination list, select the forum you want to copy the topic to. If you select multiple forums, each forum creates a copy of the topic.
Click Copy.
The copied topic will appear at the bottom of the list of topics in the specified forum(s).
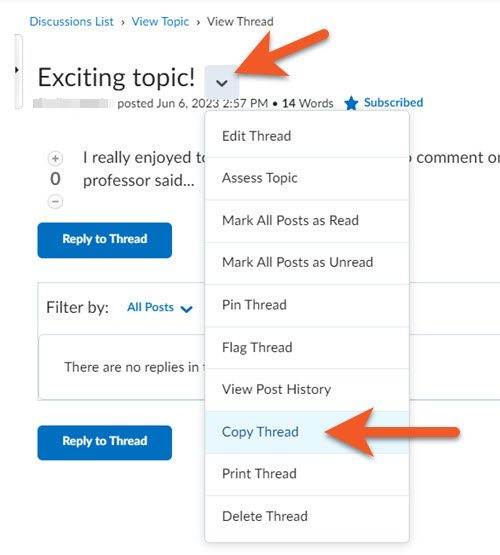
In Discussions, navigate to the Forum/Topic/Thread you wish to copy. Make sure to click on the thread’s title, so you see the full thread.
Click on Copy Thread from the thread's context menu.
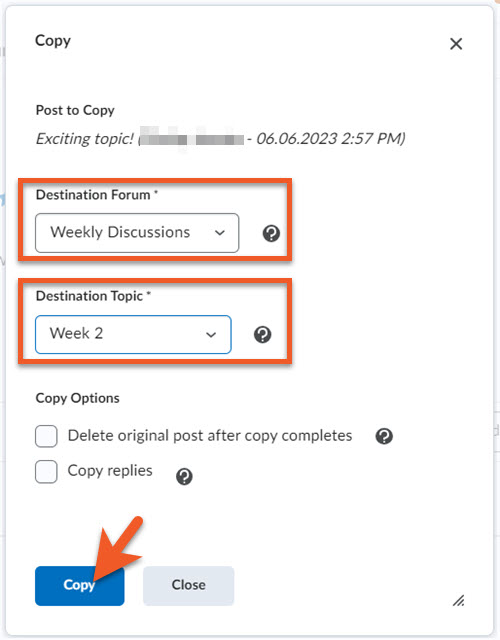
Select where you want to copy the thread to in the Destination Forum and Destination Topic dropdown lists.
Select the Delete original post after copy completes check box if you want to delete the original post in the thread after the copy completes.
Select the Copy replies check box to include any replies from the original thread (ie. if you want to move the entire thread to a different location).
Note: If you choose to delete the original thread post, it will still be visible in the original topic to users with the appropriate permissions.
Click Copy.
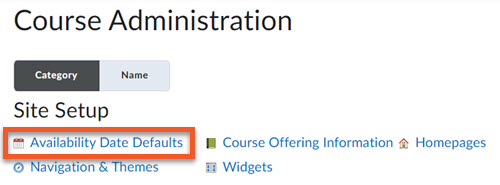
If you are confident that you want students to have the same kind of access to all discussions in this course shell before and after the start/end window, you can set up the default settings for your course.
In the top navigation, click on Course Admin, then Availability Date Defaults.
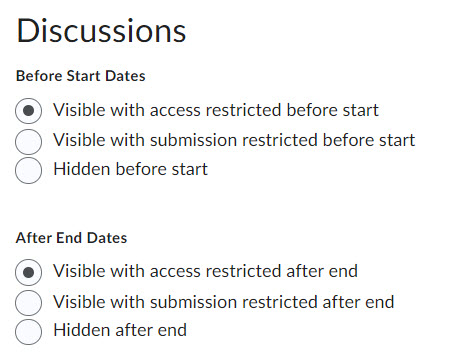
Determine what happens before the start date/time
- Visible with access restricted before start - Prior to the start date/time, students can see the name of the discussion, and the availability dates, but cannot click on it.
- Visible with submission restricted before start - Prior to the start date/time, students can see the discussion name and availability dates, and can click on the topic name to read the description (if you have provided any).
- Hidden before start - Prior to the start date/time, students cannot see or click on the discussion.
Determine what happens after the end date/time
- Visible with access restricted after end - After the end date/time, students can see the name of the discussion, and the availability dates, but cannot click on it.
- Visible with submission restricted after end - After the end date/time, students can see the discussion name and availability dates, and can click on the topic name to read the description (if you have provided any).
- Hidden after end - After the end date/time, students cannot see or click on the discussion.
Click on Save to save your changes.
Related topics
Announcements and notifications