Zoom Breakout Rooms
Breakout Rooms allow you to split your Zoom meeting into small groups automatically or manually. Breakout rooms mimic in-person small group discussions, seperate from the main meeting. Participants have full audio, video and screen sharing capabilities.
- Each breakout room can have a maximum of 200 participants.
- You can create up to 50 separate sessions/breakout rooms. Meetings with 200 participants may only have 30 breakout rooms, while meetings with fewer participants may have more.
- If you already know how you want to split up your participants, you can pre-assign breakout rooms.
- Breakout rooms can be populated with members of your D2L Brightspace course groups.
- Note: Live transcription is currently not supported in breakout rooms.


- Go to torontomu.zoom.us (external link) and click Sign In. Enter your TMU Login and Password.
- Click Settings, on the left hand menu.
- Then click In Meeting (Advanced).

4. Enable the Breakout Room option by clicking on the grey slider, once activated it will turn blue.
5. You may also enable “Allow host to assign participants to breakout rooms when scheduling” by clicking on the box beside the option.

Step 1: In a Zoom meeting, click on the 'Breakout Room' icon located on the bottom menu bar of the Zoom meeting.
Step 2: Select how many breakout rooms will be available to assign participants into.
Step 3: Choose if this assignment is:
- Automatic: Zoom will automatically assign participants into random rooms
- Manual: The host manually assigns participants into rooms
Step 4: Click 'Create Breakout Rooms' when done.

Step 5: Distribution
A) Manual: Click the 'Assign' button to assign specific participants to each breakout room.
B) Automatic: You should see that the participants have been automatically assigned to the requested breakout rooms.

Step 6: To move participants from the main session, to the breakout rooms, click 'Open All Rooms.'

Once the rooms are open, participants will be prompted to join their respective breakout rooms.
The host has the following options:
- Join any breakout room, at any time, by clicking 'Join' beside the desired Breakout Room.As the host, you also have the option to move participants from one room to nother by clicking 'Move To' beside the participant’s name.
- Exchange a participant from one Breakout Room for another participant in another breakout room by clicking 'Exchange' beside the participant’s name (not shown).
- Broadcast a message that will be seen to every breakroom by clicking the 'Broadcast a message to all’ button at the bottom of the Breakout Rooms window.
- End the breakout rooms by clicking the red 'Close All Rooms' button at the bottom of the Breakout Rooms window. It is important to note that you can close all rooms, and open all rooms once again.

- Move all participants into breakout rooms automatically.
- This option allows you to automatically move participants into breakout rooms in manual mode.
- Allow participants to return to the main session at any time
- This option allows participants in breakout rooms to move back to the main session at any time.
- Breakout Rooms close automatically after: __ minutes - Notify me when time is up
- This option allows you to automatically set how long breakout rooms will be opened for.
- Countdown after closing breakout room - set countdown timer: __ seconds
- This option creates a countdown with the determined duration after the “close all rooms” button is clicked.
Pre-assign students to breakout rooms
If you know how you want the students to be grouped in advance, you can pre-assign the students to their respective breakout rooms in Zoom. If you are using the Groups feature in D2L Brightspace, you can even export the group membership to use for Zoom breakout rooms.
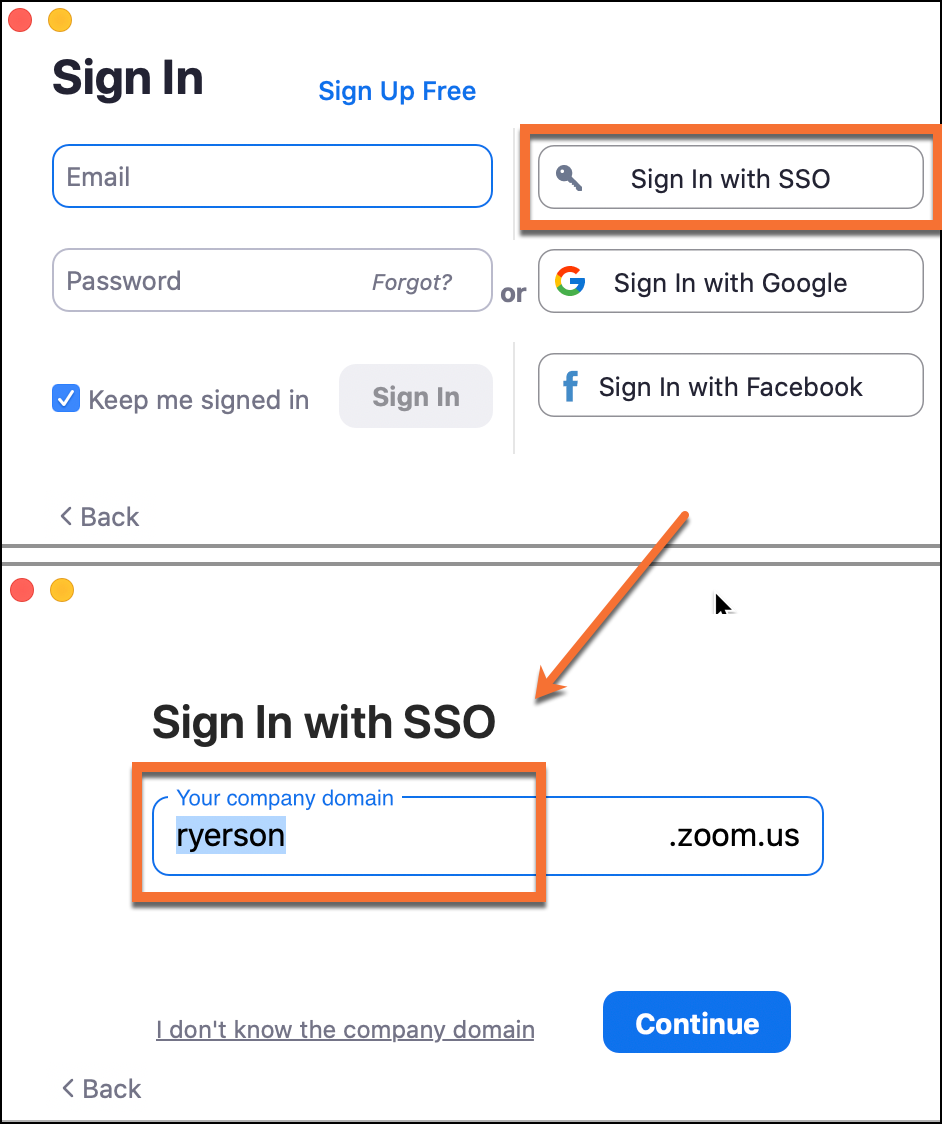
Sign in to Zoom with SSO
Ensure you are logging into your TMU Zoom account properly.
- Log out from the Zoom application before your meeting.
- When logging in, select "Sign In with SSO".
- Enter "ryerson" as the company domain.
- Click "Continue".
- Your web browser will open with the TMU CAS login screen. Login using your my.torontomu username and password.
- Proceed to launch Zoom.
If you are the meeting host, you will always know which users are not logged in properly, because they will appear as "Guest" in the participant list.

Sign into torontomu.zoom.us, (external link, opens in new window) make sure you have 'Breakout Rooms' enabled and 'Allow host to assign participants to breakout rooms when scheduling' enabled. These options are found in the Advanced Meeting settings in the settings menu.
Step 1: On the left hand side, select 'Meetings.'
Step 2: Then click on 'Schedule a New Meeting.' Fill the prompts and create a new meeting. If you already have scheduled a new meeting previously, click on 'Edit this Meeting' to access the next steps.

Step 3: Located at the bottom of the page are Meeting Options. To pre-assign participants into breakout rooms, checkmark the 'Breakout Room pre-assign' box.
You may:
- Create Rooms: create your own breakout rooms and invite participants manually.
- Import from CSV: create breakout rooms through a CSV file.

Create Rooms
Step 1: Create breakout rooms by clicking the + sign next to the word 'Rooms.'
Step 2: Add participants by entering their email and clicking enter.
Step 3: Click Save.

Import CSV
Step 1: Download the template provided by Zoom in the window and follow the template and assign participants into rooms according to the template.
Step 2: Once done, drag and drop or browse for the CSV file and import it into.
Step 3: The CSV should populate into the window and you are able to see the rooms you have created and the emails assigned to them. Click Save.
If you are using D2L Brightspace Groups, you can export the group membership for use in your Zoom breakout rooms.
The instructions below cover the following steps:
- Exporting the D2L Brightspace group membership using the Grades tool
- Preparing the data for use in the Zoom breakout rooms template
From there, proceed to the instructions on this page for pre-assigning breakout rooms using a CSV.
Learn more about the D2L Brightspace Groups tool.
Download the group membership from D2L grades

Step 1: In your D2L Brightspace course shell, go to 'Grades.'
Step 2: Click 'Enter Grades.'
Step 3: Click 'Export.'

Step 4: Select 'Groups' or 'All Users' from the 'Export Grade Items For' drop-down list and select Group from the 'Groups' drop-down list.
Step 5: Select the 'Key Field' you want to use to identify users.
Step 6: Select the 'Sort By' option you want to use.
Step 7: Uncheck all the Grade Values.
Step 8: Select the 'User Details' you want to use to identify users. It is critical to have 'Email' and 'Group Membership' selected.

Step 9: In the 'Choose Grades to Export' unselect all Grade Items.
Step 10: Click 'Export to Excel or CSV.' A pop-up window will appear. Click download and save the file on your computer.
Sort and transfer the D2L groups data into the Zoom CSV template

Step 1: Open the Excel Sheet or CSV obtained from D2L into Excel and select all data columns and rows by clicking and dragging your cursor from one corner of the data to the other corner.
Step 2: Click the 'Data' tab at the top.
Step 3: Click 'Sort.'

Step 1: Sort by the column that correlates to the group number, in this case it is called ‘Group Assignments.’
Step 2: Checkmark the box that says 'My list has headers.'
Step 3: Click 'OK.' You should see that the data has sorted in order of group number.

Step 4:
- In the D2L Excel Sheet/CSV file, select the column with the header 'Group Assignments' by clicking and dragging your cursor along the cells.
- Copy the column by right clicking and selecting 'copy.'
The column will appear to have dashed lines to indicate it has been copied.

- Open the Zoom Template in Excel and select the column with the header 'Pre-assign Room Name' by clicking on the A2 cell.
- Paste the information by right clicking and selecting paste.
The column will have the information populated from the D2L file into the column.

Step 6: In the D2L Excel Sheet/CSV file, select the column with the header 'Email' by clicking and dragging your cursor along the cells. Then copy the column by right clicking and selecting 'copy.'
The column will appear to have dashed lines to indicate it has been copied.

Step 7: Open the Zoom Template in Excel, select the column with the header 'Email' by clicking on the B2 cell. Then, paste the information by right clicking and selecting paste.
The column will have the information populated from the D2L file into the column.

Step 8: Once both columns in the Zoom Template have been populated with the data from the D2L CSV file, on the top menu, click 'file' and then 'save as.' Select 'CSV' as your file format.
Step 9: Then click 'Save.' You can now upload the CSV file into Zoom and it will automatically import the data.
Sometimes, a student will join the Zoom meeting but won't be added into their pre-assigned breakout room.
First, be sure the students are all logged in to their TMU Zoom account, using SSO (see instructions above). Once you are sure the students have done this, try the following.
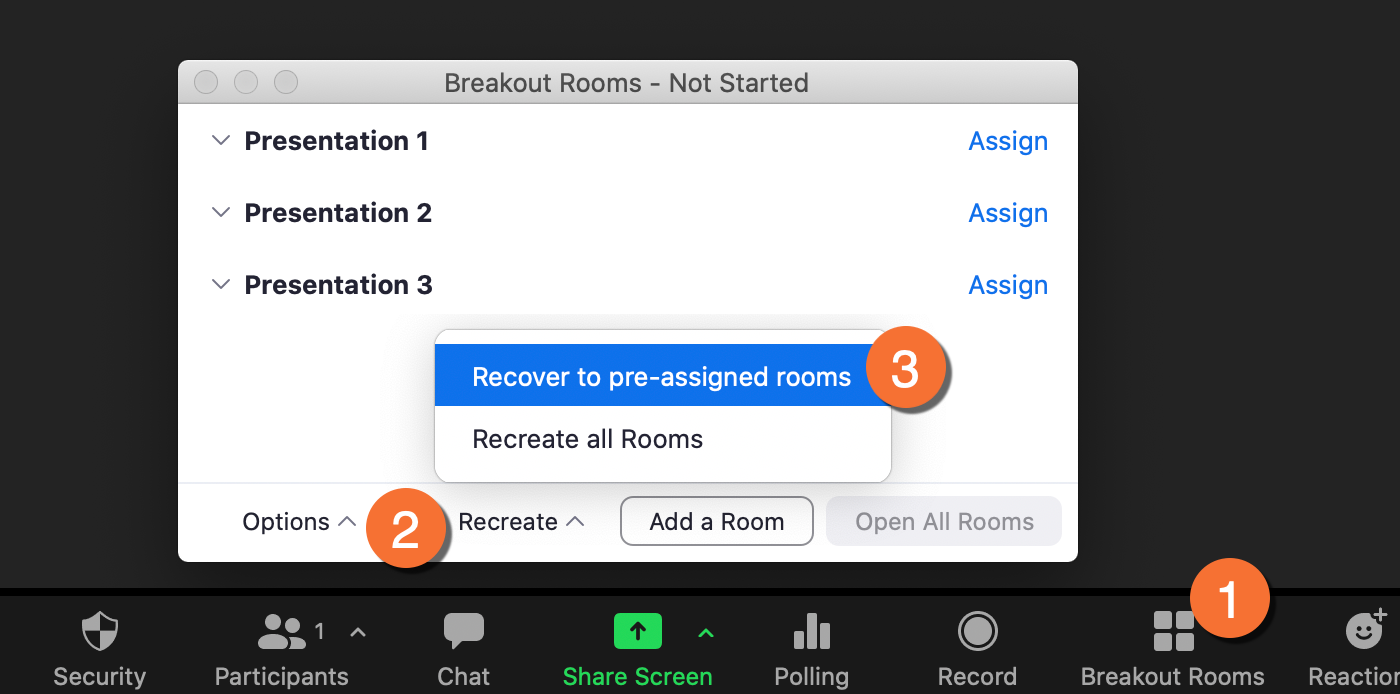
Recover pre-assigned breakout rooms
Use this to refresh the breakout rooms to their original pre-assigned state.
- Click "Breakout Rooms" to open the breakout rooms window.
- At the bottom of the window, click "Recreate", then select "Recover to pre-assigned rooms".
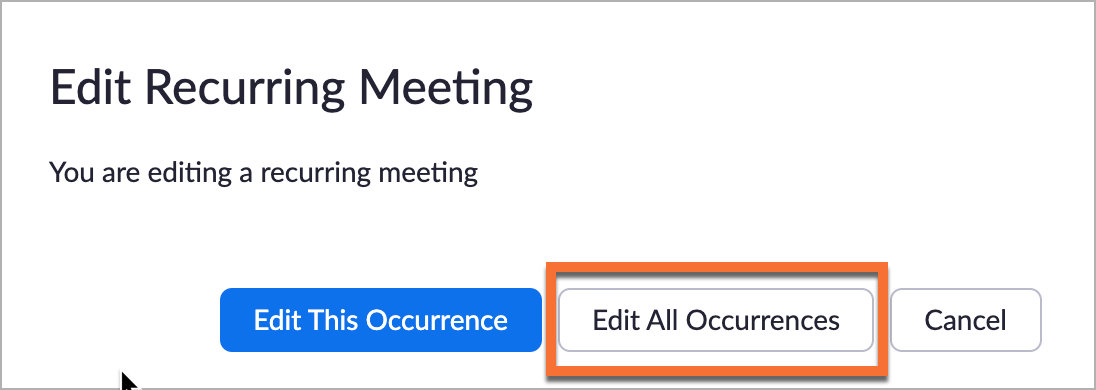
If you are using a recurring meeting, and plan to use breakout rooms, there are a few things to keep in mind.
- If you "Edit All Occurrences" and make a change, your existing breakout rooms may be lost and you will need to recreate them.
- You will not be able to create or modify pre-assigned breakout rooms for the individual meetings ("This Occurrence") - only "All Occurrences".