Stream Video Platform (integration with Brightspace)
What is Stream Video Platform?
Stream is a video streaming platform powered by YuJa (external link) . All faculty and staff have access to upload video content to Stream through the integration with D2L Brightspace.
Why should I use Stream Video Platform instead of Google Drive?
Stream Video Platform is integrated with D2L Brightspace, so you can ensure that content sharing with your class is secure. Sharing with Stream is simpler and only takes a few clicks. Stream can also provide you with your students’ usage analytics in how they are engaging your content
On this page:

Support
- To request access, please fill out the (google form) Stream Video Platform Request Form. (external link)
- More documentation and how-to videos are also available through YuJa’s support page. (external link)
Related video tutorials
Find all of our Stream Video Platform video tutorials on the DMP Stream Channel.
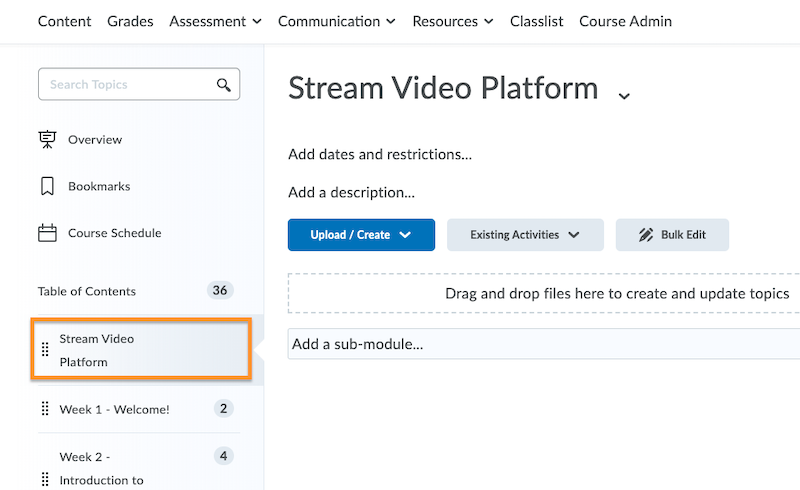
Access the Content tab in your D2L Brightspace course shell.
Add a module to the left-hand navigation bar by clicking Add a module… and give it a name.
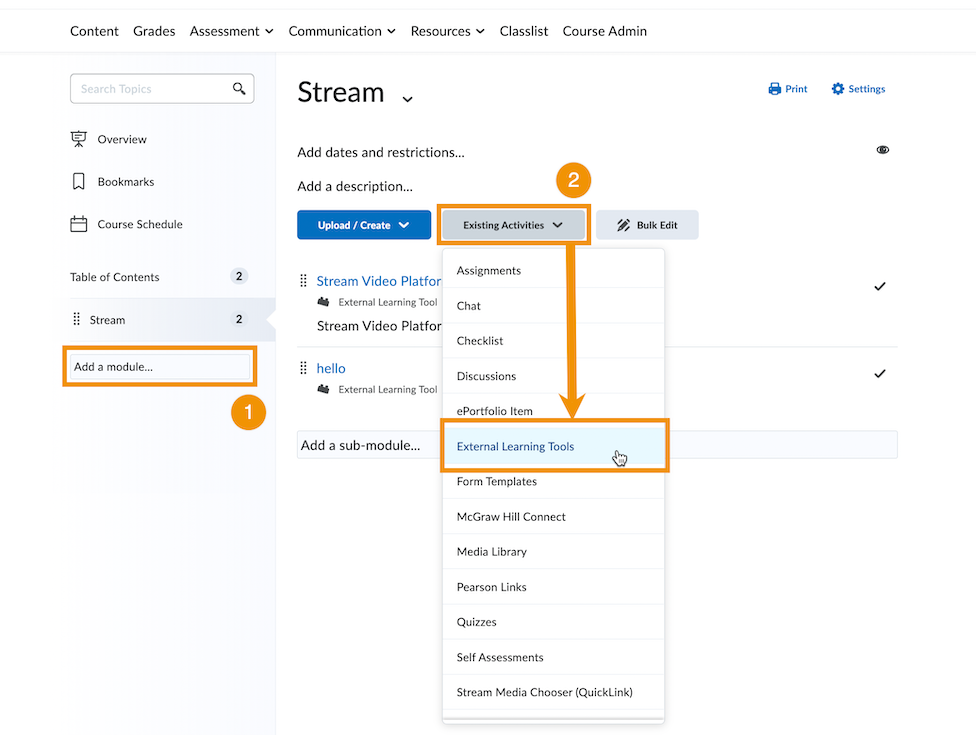
Inside your new module, select the Existing Activities dropdown menu, then External Learning Tools.

Scroll down and select Stream Video Platform.
Click on the tool link you just added in your content. This will launch the Stream Video Platform in a new tab. This will direct you to your new Media Channel in Stream.
Sharing content to Brightspace
You can upload various types of media to the Stream video platform including PDFs, URLs, videos, folders, quizzes, etc. The process of sharing these files is called Publishing.
Publishing content makes them available to anyone with permission to access that Media Channel. The video also remains available in My Media. The steps to publishing videos to a course or public portal are similar.
You can publish more than one video at a time by clicking and dragging your mouse to select the videos.
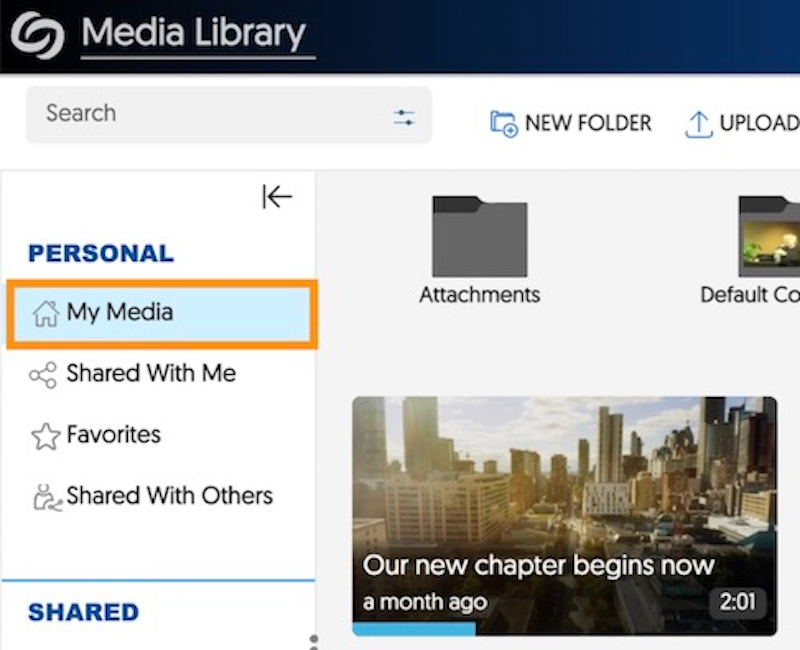
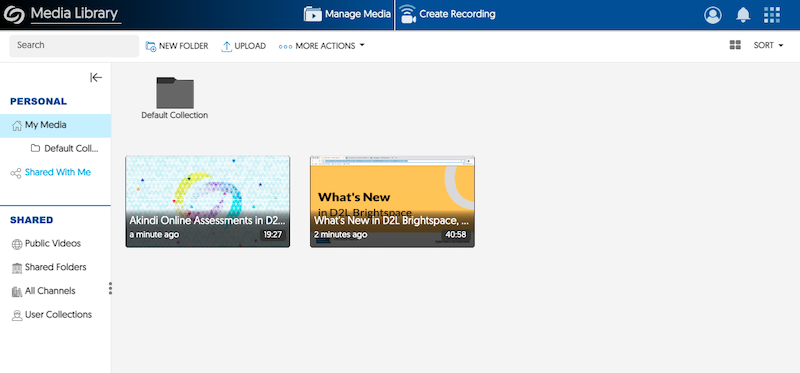
1. Under the Personal section, click on My Media.
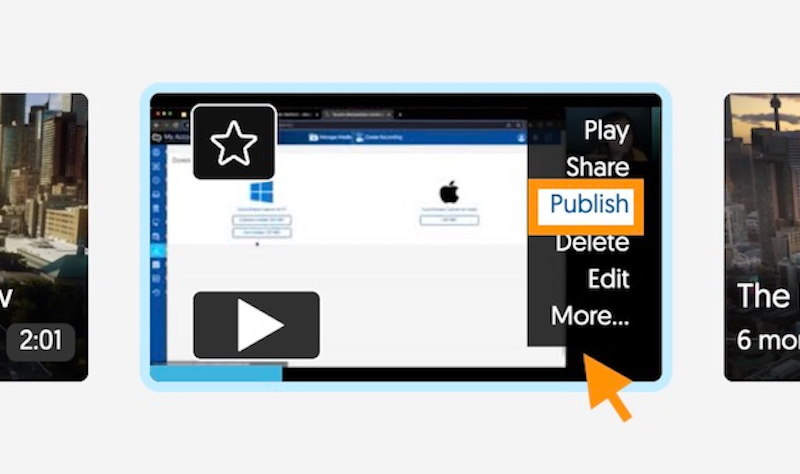
2. Hover your mouse over a video and click Publish.
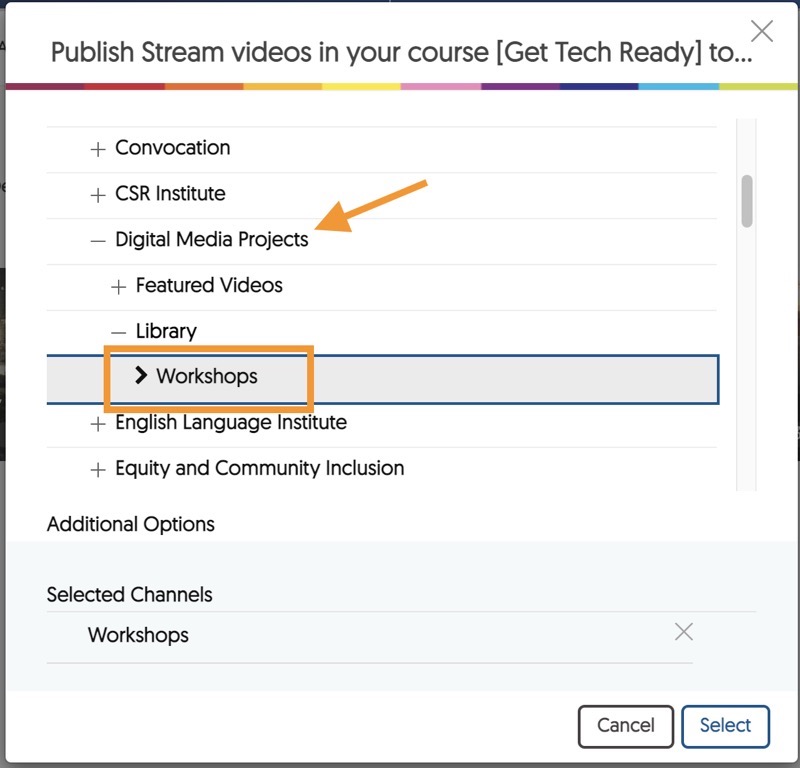
3. Select the Course or Organization Channel under All Channels, or your designated channel under Public Videos.
4. Select the folder you want to share to.
5. The Selected Channels will be listed at the bottom.
6. Click Select.
7. You should now find the video(s) added to your channel.
To unpublish a Folder/ Channel, click on it, then click More Actions > Unpublish Sub-Channel/ Folder.
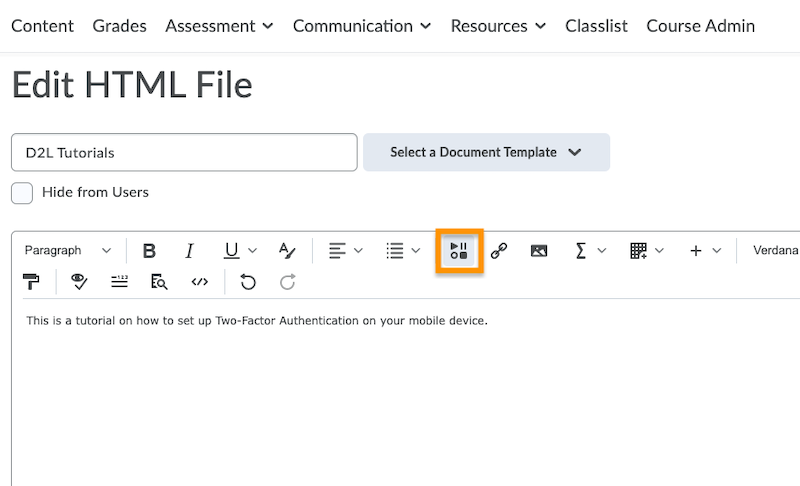
1. On D2L Brightspace, open the rich text editor.
2. Click the Insert Stuff button.
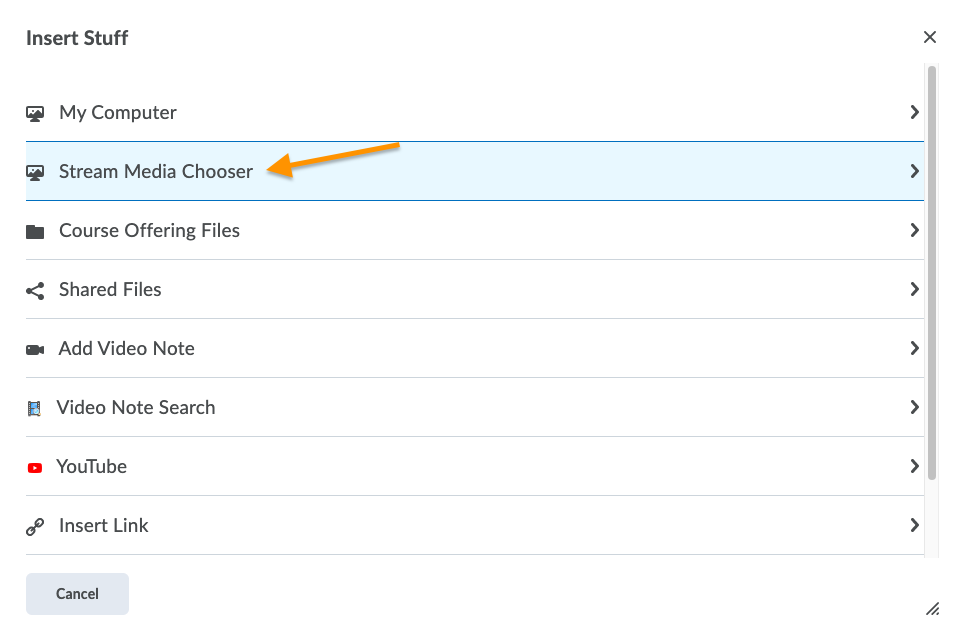
3. Select the Stream Media Chooser.
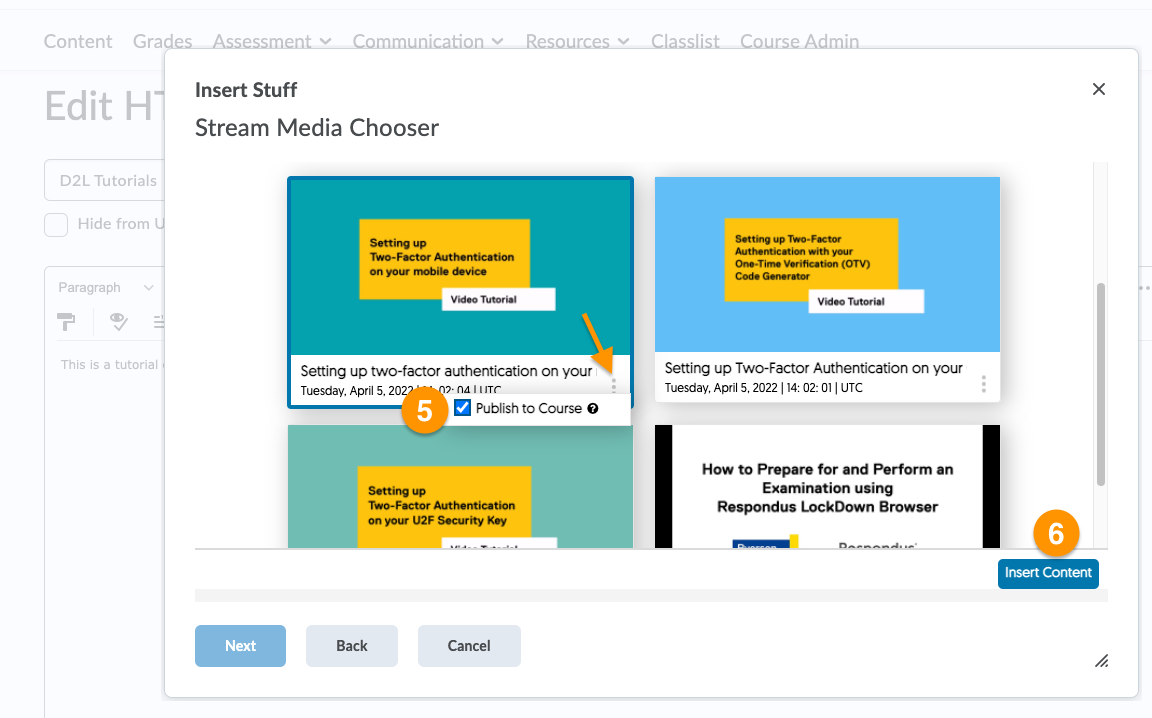
4. Select the video from your Media Library to embed.
5. Click on the three dots in the corner of the video thumbnail and check Publish to Course.
6. Click Insert Content. Verify that the content is embedded properly in the preview.
7. Click Insert.
If the Insert Content button is not visible because you are on a smaller screen, drag the bottom-right corner of the dialogue box to make it bigger.
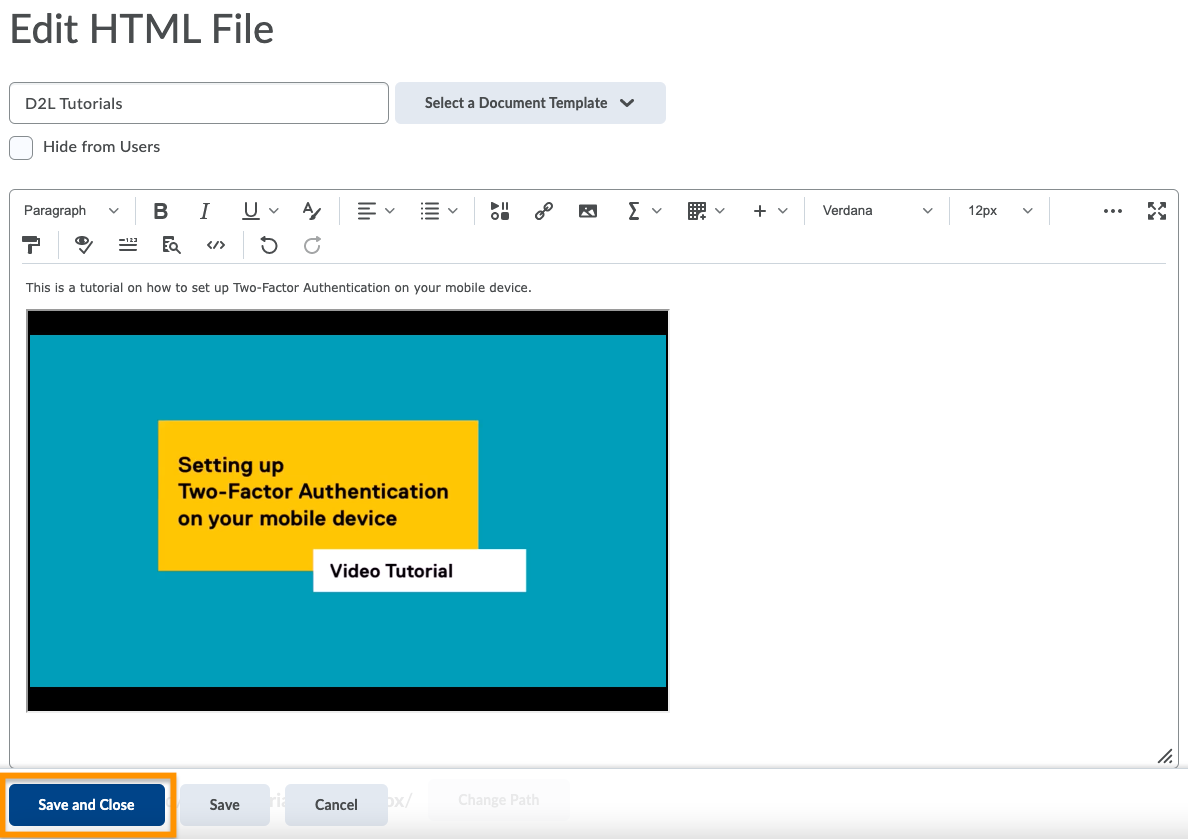
8. Click Save and Close.
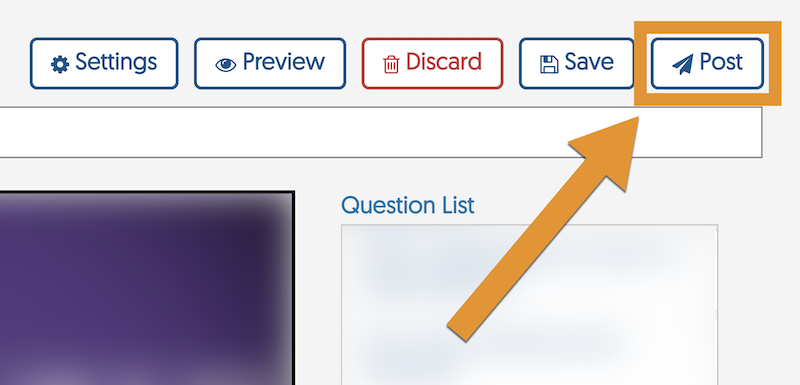
1. In Stream, create the video quiz. Follow the instructions outlined below in the Creating Video Quizzes section.
2. In the video quiz editor, click the Post button in the top right corner of the screen.
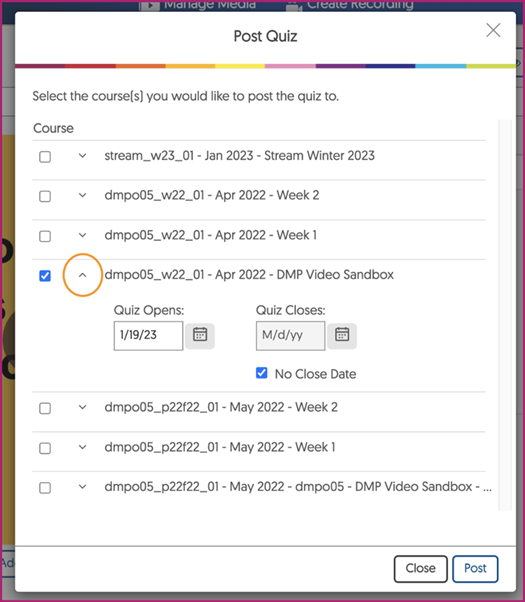
3. A pop-up window with a list of available course shells will appear.
Click the down arrow next to the course shell you would like to use in order to access additional settings like the quiz open and close date.
4. Navigate back to the module in your D2L Brightspace shell.
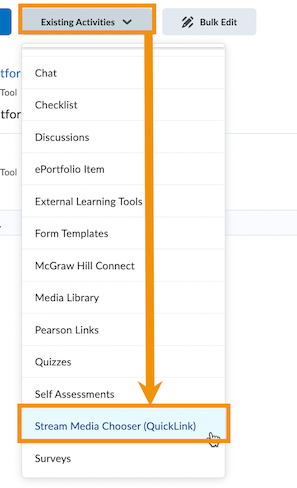
5. Click Existing Activities.
6. From the dropdown menu, click Stream Media Chooser (Quicklink). A pop-up window will appear.
7. Click the Quizzes tab. Select the video quiz you want to insert.
8. Click Insert Content.
9. Your video quiz will now appear in the module.
You can verify if your quiz was uploaded successfully by checking if a corresponding Grade Item (with the same name) has automatically been added under the Grades menu.
To unpublish a Folder/ Channel, click on it, then click More Actions > Unpublish Sub-Channel/ Folder.
Having a quiz within a video is an effective way to engage students. In this guide, you will learn the steps to create a video quiz on the Stream Video Platform, and then make the quiz available in your D2L Brightspace shell.

1. In the Media Library, hover the mouse over the thumbnail of your video in My Media and click More. A pop-up window will appear.

2. Click Quizzes to open the video quiz settings panel.
3. Click Create Video Quiz.
4. Click Add Question. A menu will appear with question type options. Click on a type of question to add one at this timestamp.
If you do not plan to add questions to the quiz, and instead are using it for participation credit, select Create Playback Quiz.
There are 7 types of questions that can be incorporated into a video quiz. These include:
- Multiple Choice
- Select Multiple
- Short Answer
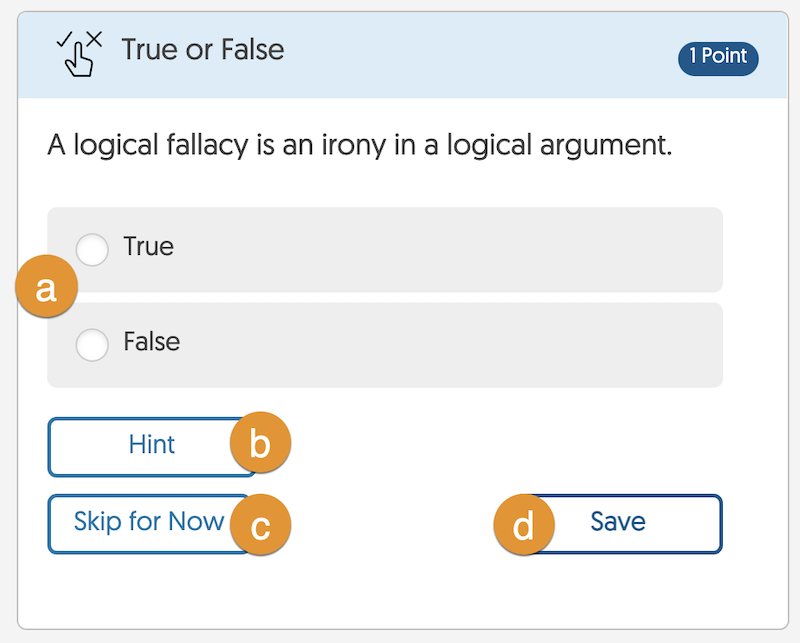
- True or False
- Reflective Pause
- Decision Point
- Fill-in-the-Blank
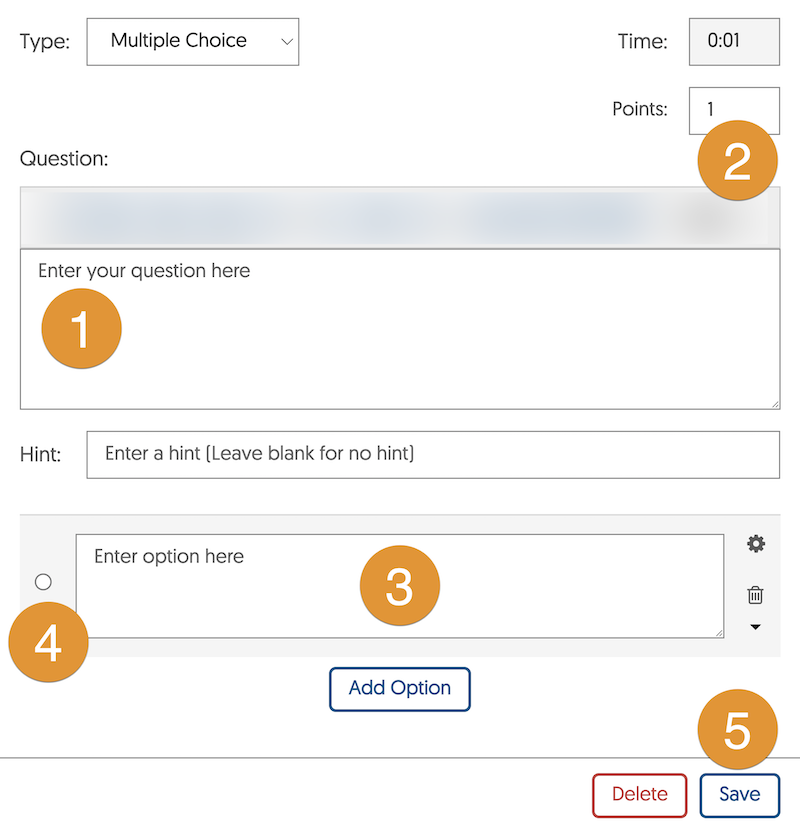
Below are the main features of creating a question in a video quiz.
- Enter your question into the Question Box. Optionally, you can add a hint in the Hint Box.
- You can set a different Points value for the question.
- Enter the Answer Options in the boxes below.
- Choose the Correct Answer by checking the square or circle next to the correct option(s).
- Save the question.
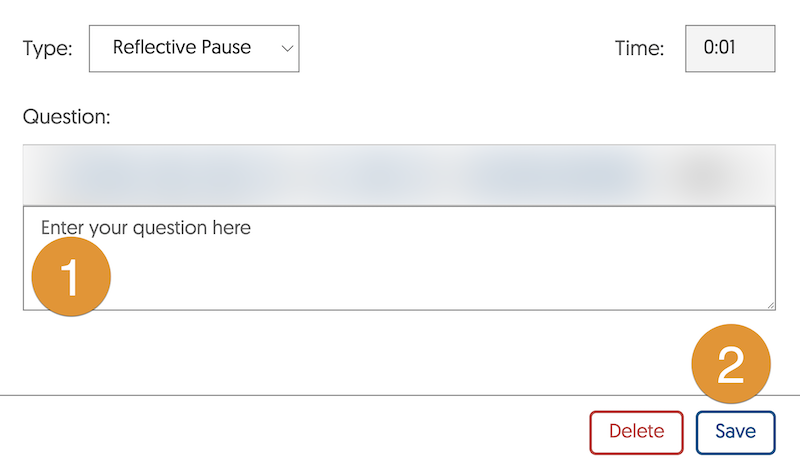
Reflective Pause
A Reflective Pause is not a graded question. It is a prompt that is used to keep viewers engaged.
1. Enter the question into the Question Box.
2. Save the item.

Decision Point
A Decision Point can be used as a Choose-Your-Own-Adventure type question. It is an interactive user experience where the video sequence is non-linear based on the decision point response selected.
1. Enter the possible options for that particular Decision Point.
2. Expand the context menu to choose a Video Jump Point for each option. A video jump point is a timestamp within the video where the viewer will be redirected to after making their selection.
3. Check Use as ending decision to allow the viewer to complete that question and submit the quiz.
4. Click on Save to add the question.
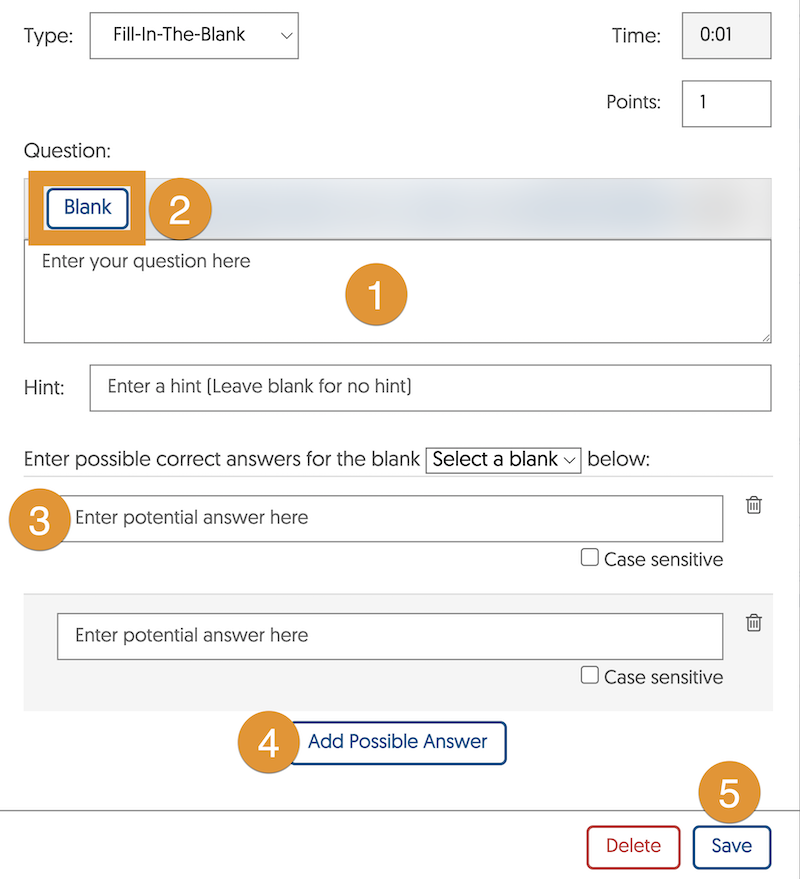
Fill-in-the-Blank
1. Start typing your question into the Question Box. Optionally, you can add a hint in the Hint Box.
2. Press the Blank Button to add a blank.
3. Enter Possible Answers into their respective boxes. These will be the possible correct answers that viewers can put in. They will not appear like a multiple-choice question.
4. Click Add Possible Answer to create more answer options.
5. Save the question.
Before posting the quiz, it is a good idea to preview the quiz to ensure that the viewer is prompted at the correct times with the appropriate questions.
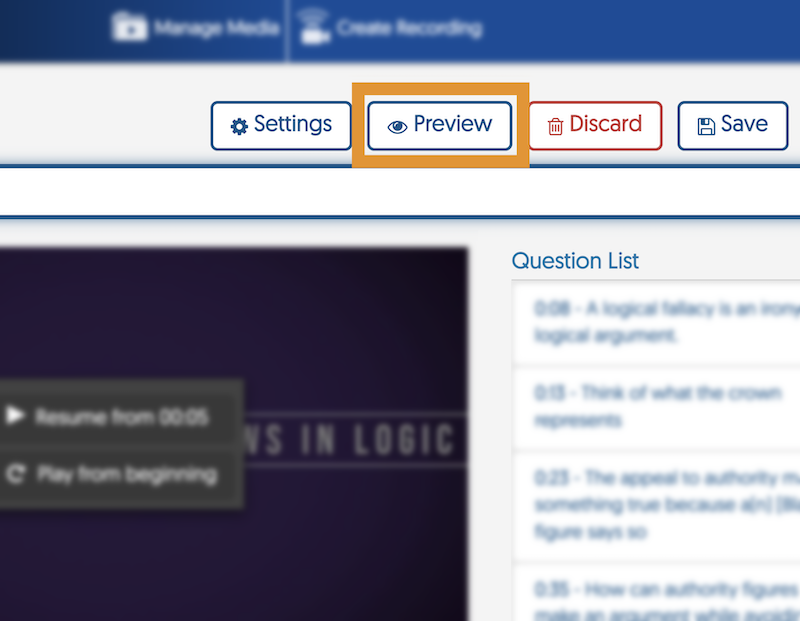
1. Click the Preview button in the quiz editor.
2. There will be a video preview and a timeline highlighting where questions will be in the video.
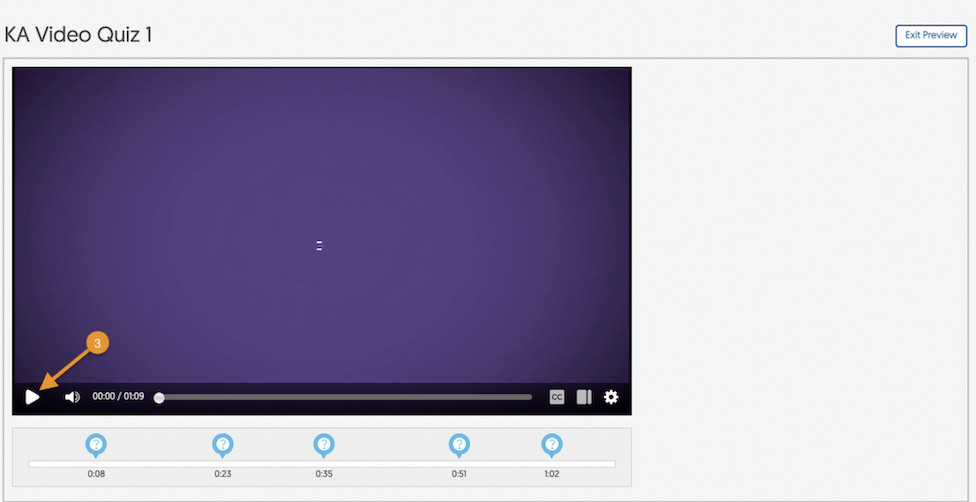
3. Press Play and answer the questions when they appear.
4. When a question appears, you can:
a. Input your answer.
b. See a hint, if one is available.
c. Skip to the next question.
d. Save your answer.
5. Once you answer a question and save it, the video will resume playing until the next question.
6. After answering each question, its icon will turn blue.
7. Once the video playback is complete and all the questions are answered, a Submit button will appear.
Info note: In Preview mode, this will not record as a real attempt into the grade book.
8. Click Exit Preview to return to the video quiz editor.

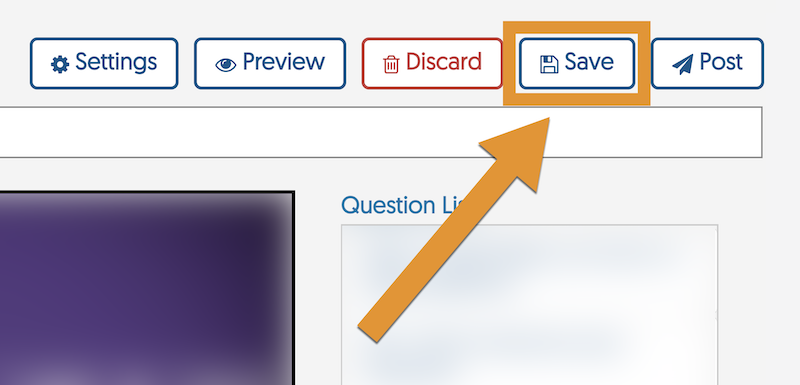
9. Once the quiz is complete, click Save.
You can change and customize the video quiz experience and Gradebook options in the Video Quiz Settings.
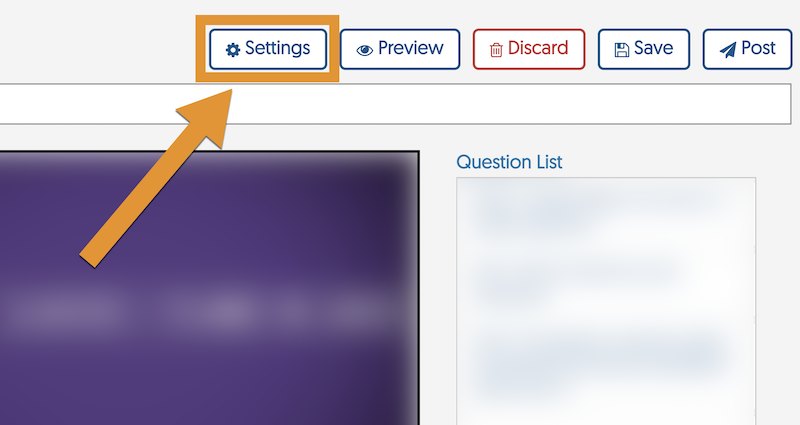
1. Click Settings in the video quiz editor.
2. A pop-up window will appear where you can customize the viewer experience and edit some Gradebook options.
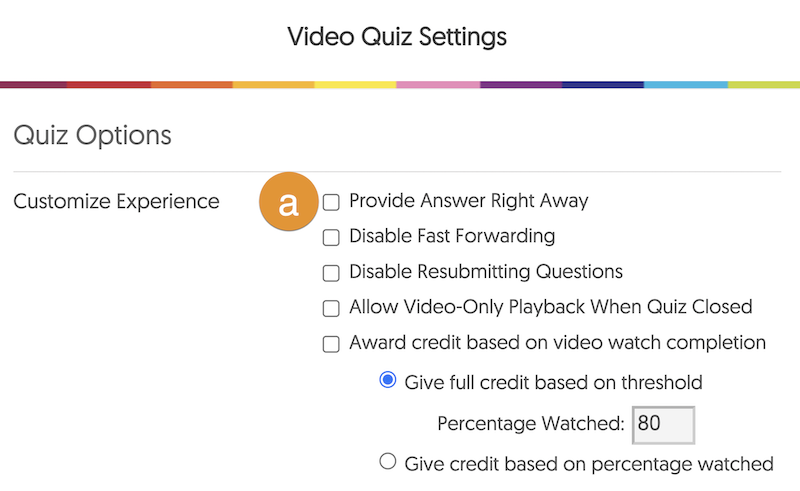
a) Customize Experience
- Provide Answer Right Way: Lets the users know whether their answer was correct or incorrect.
- Disable Fast Forwarding: Prevents users from skipping ahead of the video.
- Disable Resubmitting Questions: Prevents users from changing their answers after making a selection.
- Allow Video-Only Playback When Quiz Closed: Allows users to access a video after the quizzing period has closed.
- Award Credit Based on Video Watch Completion: Awards a bonus point based on whether the user reaches the set percentage watched threshold or based on the percentage watched.
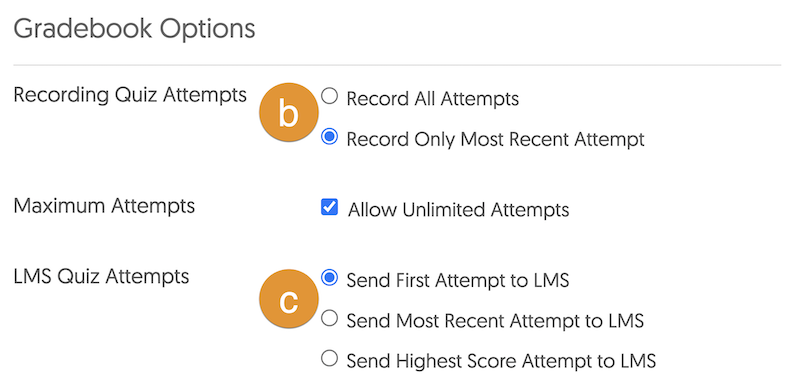
b) Recording Quiz Attempts
- Choose if all attempts are recorded, or only the most recent
- Set the number of attempts allowed
c) LMS Quiz Attempts
Select which attempt would be synced to your course's D2L Brightspace Grades tool.
When you are ready to post the quiz to your course, follow the steps to Publish a Video Quiz to a Brightspace Shell above.