Content
In D2L, Content is an organized collection of links to content files, HTML topics, quizzes, assignments, etc.
Content is organized into three main areas:
- Modules - broader categories, often used to present weekly material (Week 01, Week 02) or modular material (Module 01, Module 02)
- Sub-Modules - sections within a module, used to divide content further - sometimes by type (Powerpoints, Weekly Goals, etc.)
- Topics - can be content files, embedded content, links to quizzes, assignments, etc.
The Table of Contents on the left-hand side provides a way to navigate through the content quickly.
Find Content in the top menu of your shell. If it isn't there, review how to enable course tools.
Point your students to our student guide to course content in Brightspace.
Content files are stored in the Course Admin, under Manage Files.
Most audio/video files are now stored in the Media Library.
Module/sub-module hierarchy
You must create a module before you can add topics. You can create sub-modules (modules within existing modules) to establish a deeper hierarchy.
If you want to keep your course content hidden while you are building it, set the status of your modules and/or topics as Draft.
The course syllabus is likely the first piece of content you will need to add.
Recommendation: upload the course syllabus to a module
Based on our experience with Brightspace, and feedback from students, we recommend you create a module to contain your course syllabus and administrative documents, and upload the course syllabus file there.
Why wouldn't I use the "Course Overview" for my syllabus?
The Course Overview can be found at the top of the Content tool. It is important to note that students do not see this unless you have added content there.
It is ideal for a brief (1-2 line) description of the course - but not for the full syllabus.
In addition, feedback indicates that most students (and instructors) expect to find the course syllabus somewhere in the Table of Contents, organized with the other course materials. Also, once students have clicked on the Table of Contents, or any content below that, the next time they return to the Content tool, by default, they see the last module they viewed in Content, so they are less likely to notice Course Overview.
As such, we recommend creating a module specifically for the course syllabus and administrative documents, and uploading the course syllabus there.
All content in D2L Brightspace is structured around the concept of "modules".
Think of modules as folders that contain different groupings of topics. These can be organized by week, by learning module, or in other ways that work with your course.
You must create a module in order to add any content.
Create a module:
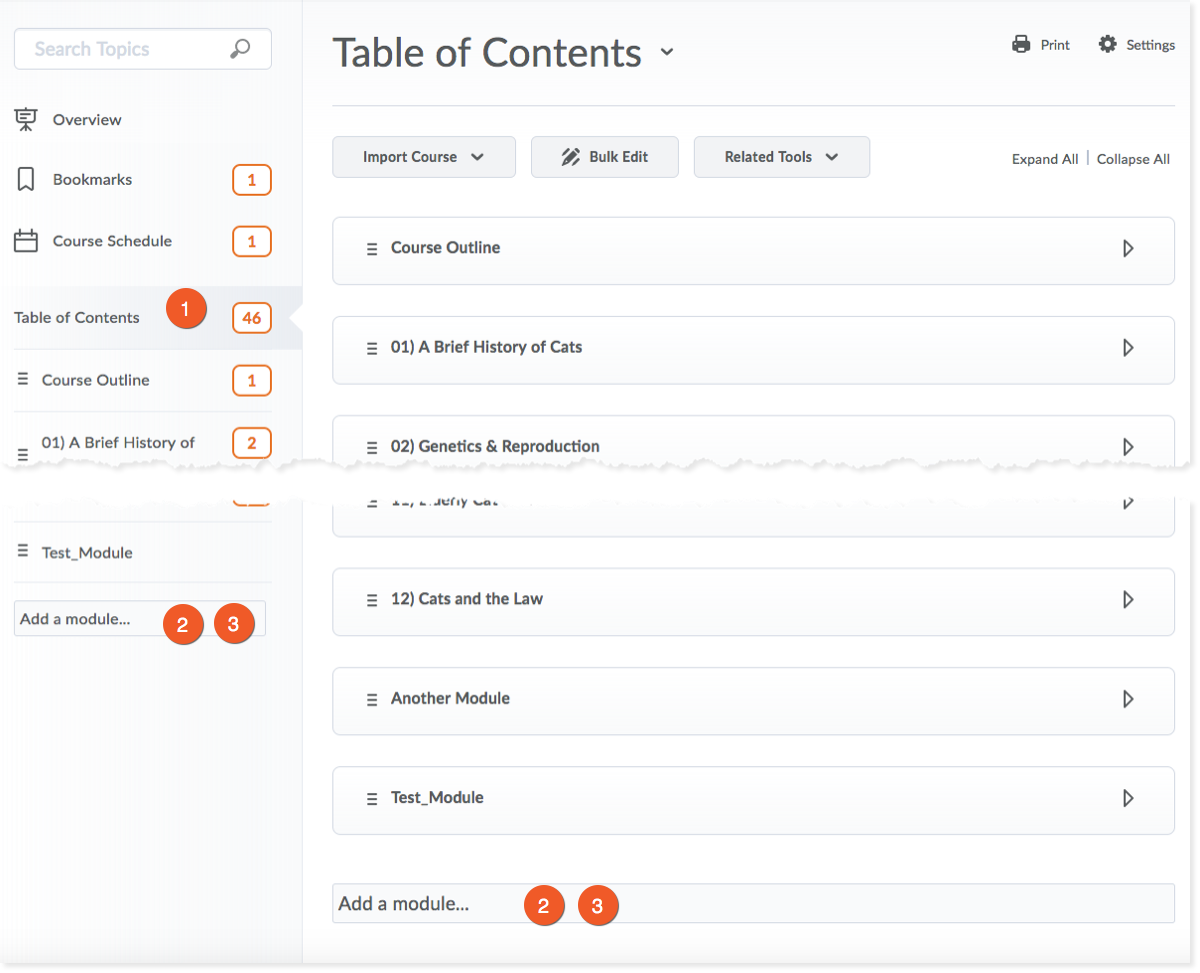
- Look to the left, at the Table of Contents.
- Scroll until you see the bottom of the Table of Contents, and click on Add a module.
- Enter the name of the new module and click on the Enter/Return key on your keyboard.
Reorder the modules
You can change the order of your modules by clicking and dragging the handle to the left of the module title (it looks like 8 dots). Simply click and hold, then move your mouse up or down, to reorder the modules. You will see a solid line when you are between modules, or a module will be highlighted, if you want to move the item to inside that module.
Things you can do once inside a module:
Show/hide the module to students
Look in the upper-right - just below the module's title. Here, you will see an eyeball icon. Click it, and set the option to "Visible" or "Hidden".
Edit the module title
Click on the module title to make it editable, then type a new title.
Add a module description
Look at the top, just below the module's title. Here, you can add a description to help guide the students through the module.
- Click on Add a description.
- Use the editor to enter an introduction to the module.
- Click on Update to save the description
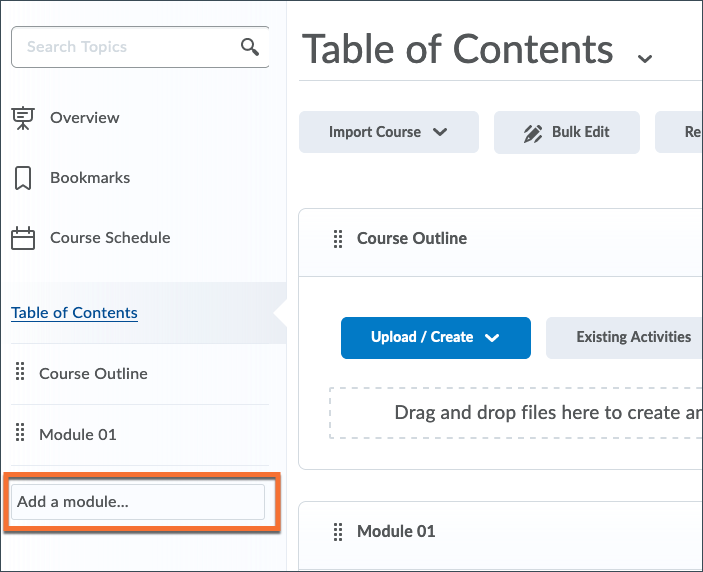
Create a sub-module
You can create a module-within-a-module (a "sub-module"), but please do so sparingly. Think about the number of clicks it will take for a student to get to any piece of content.
- Scroll until you see the bottom of the content in that module, and click on Add a sub-module.
- Enter the name of the new module and click the Enter/Return key on your keyboard.
You can add files and other content within modules and sub-modules within the Content area of your course. Brightspace calls these items "topics".
There are a variety of types of content that can be added. These instructions focus on the generic Upload Files process.
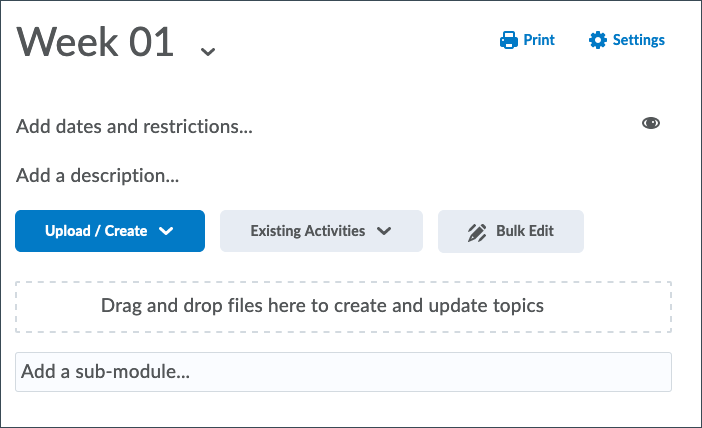
1. Click on the module you want to create a new topic for from the Table of Contents panel.
2. Select the Upload Files option from the Upload/Create menu. This will create a new Topic.
3. There are also options for other types of content that can be added here, such as Video and Audio, Links, and activities found elsewhere in the course.
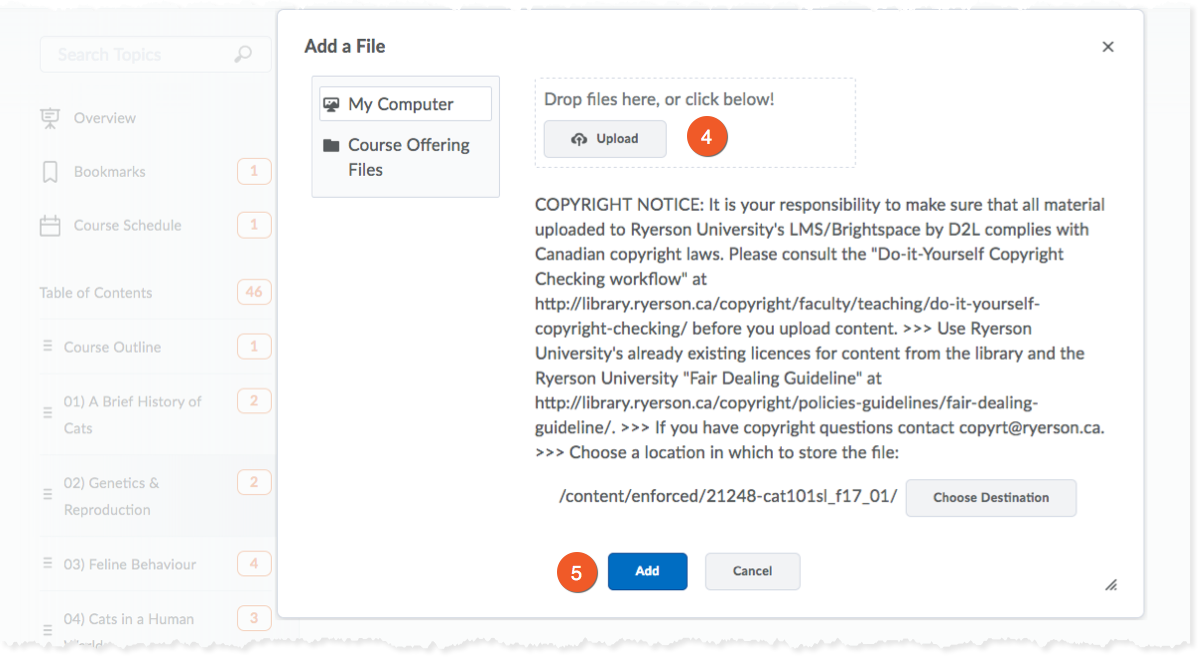
4. Upload a document from your computer or your Course Offering files. Files can also be dragged and dropped to upload. Acceptable file type extensions are listed in the table below.
5. Click on Add.
If a file in your course Manage Files has the same name as the one you are uploading, be careful to NOT select to overwrite the file. ONLY overwrite a file if you are uploading an updated version of the SAME file.
![]()
![]()
When opening a Word Doc within D2L, hyperlinks placed in the document will not open. If the Word Doc is downloaded and viewed offline with word processing software, the hyperlinks will open as intended.
This problem doesn't exist for PDF or PowerPoint files opened in D2L.![]()
| File Type | Files with the following extension are permitted in Brightspace |
|---|---|
| Web Document | HTM, HTML, MHT, MHTML |
| Text Document | RTF, PPT, PPS, PDF, DOC, DOCX, PPTX, XML, XLS, TXT, WPD |
| Image | JPG, JPEG, PNG, GIF, BMP, TIF, TIFF |
| Media | SWF, MPG, MPEG, RM, MP3, MP4*, M4V*, M4A*, AVI, WAV, RAM, ASF, MOV, RA |
You may have content that is hosted outside of D2L Brightspace that you would like to link to from within your course shell.
Some examples of this include:
- Documents you have created in your Google Drive folder.
- Articles from trusted websites that are available to the public.
- Resources from tools outside of Brightspace, like Linkedin Learning or YouTube.
In your course shell, go to the Content tool.
If you already have a module in which you would like to share the audio/video link, click on that module. If you do not already have one, create a new module.
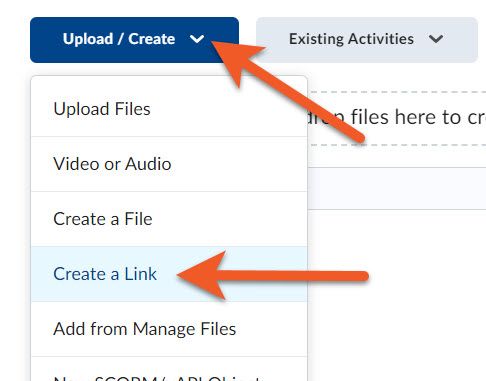
Click on Upload / Create, then Create a link.
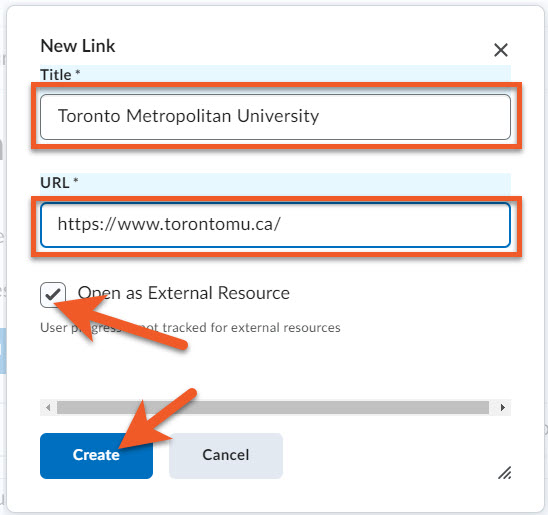
Give the new link a descriptive Title, then paste the address of your resource into the URL field.
Check the box to Open as External Resource, if applicable. Generally, it's considered more accessible to avoid opening links in a new window or tab.
Click on the Create button.
Show/hide the module to students
Look at the top of the page - in the upper-right, just below the module's title, you will see an eyeball icon. Click it, and set the option to "Visible" or "Hidden".
Set the module to release at a later date
- Click on Add dates and restrictions.
- Edit the Start and/or End dates to control when the module will be visible.
Note that the content within a module will not be accessible by the students unless the module is visible to them.
Set release conditions
Release conditions provide a dynamic way to release content to students based on criteria.
For example, you can release content based on:
- which section of the course the student is enrolled in
- how well they scored on a particular test
- whether they have completed an assignment
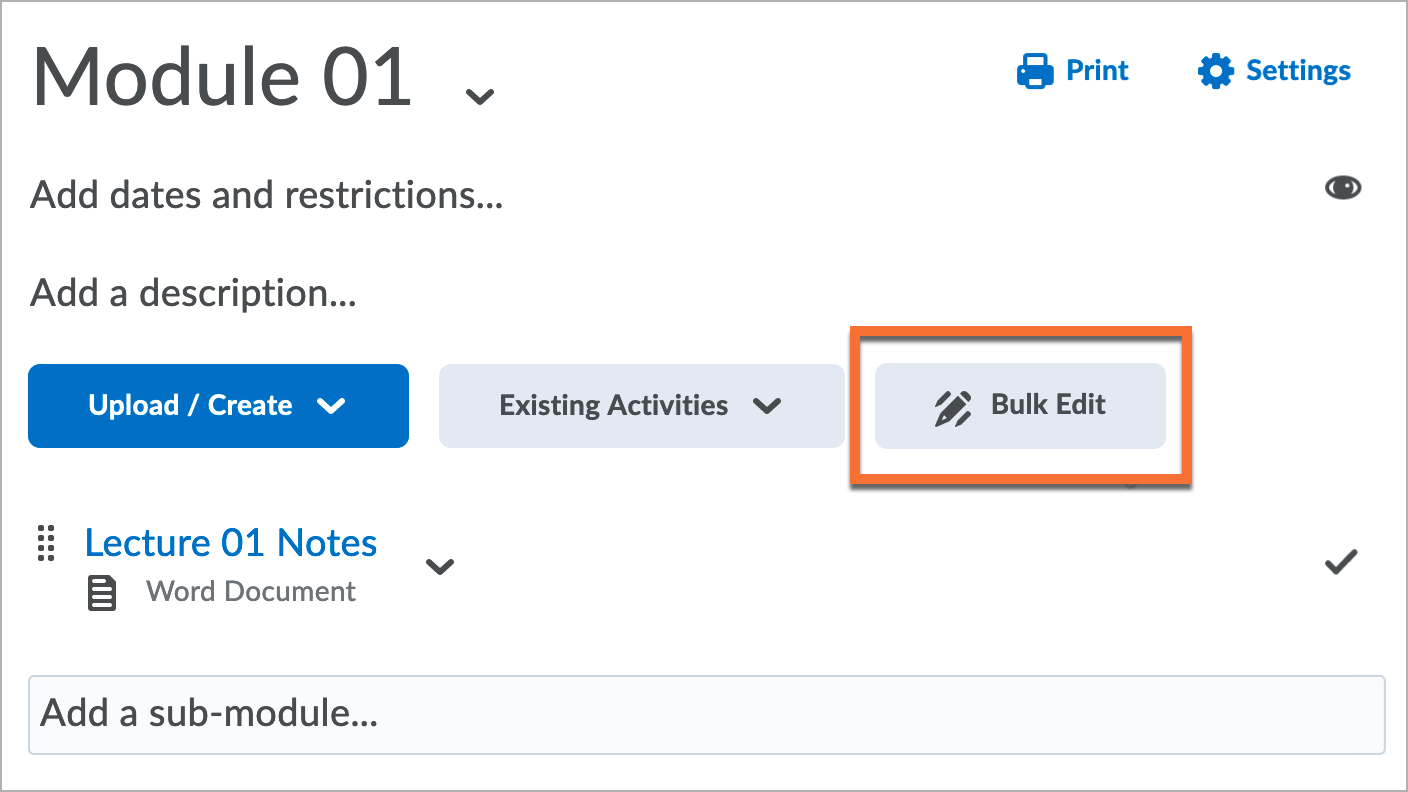
Click on "Bulk Edit"
The "bulk edit" feature is useful here, because it will allow you to open up the edit features for all of the items in the content module.
Even if you only need to edit one item, it saves you a step.
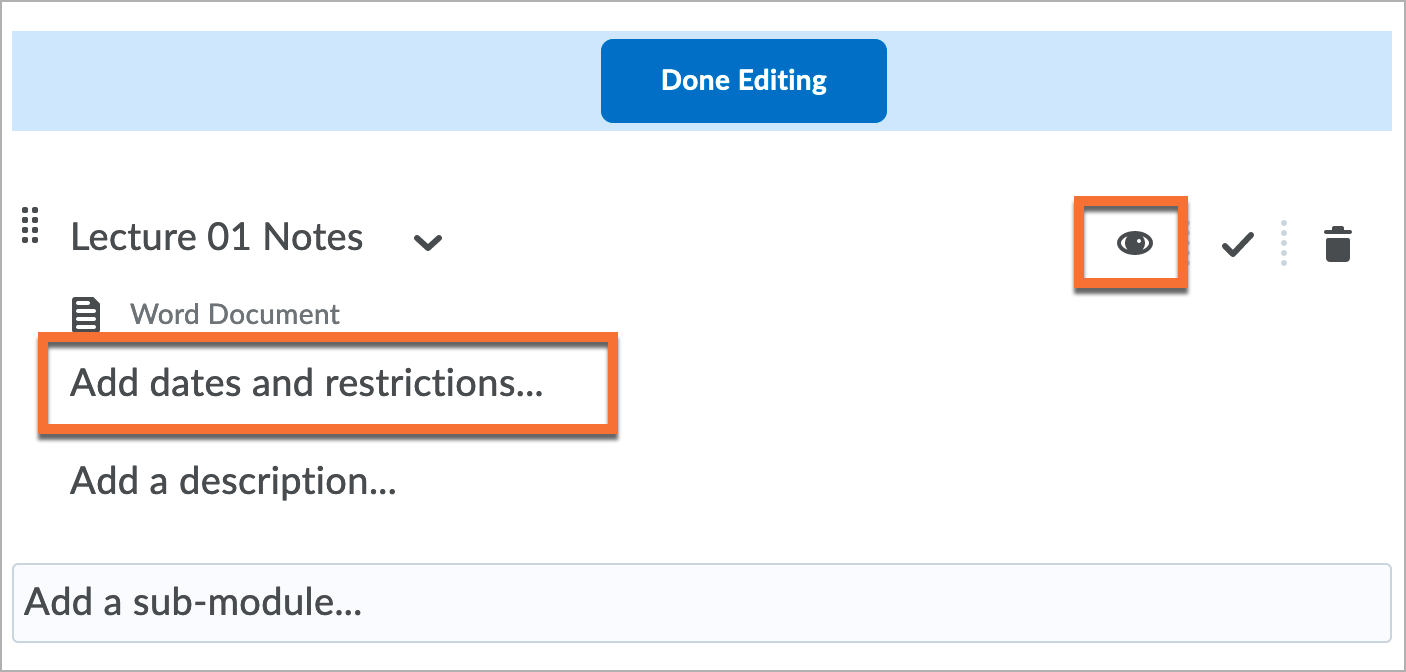
Show/hide the content item (topic) to students
- Look for the eyeball icon to the right of your content item.
- Click it, and set the option to "Visible" or "Hidden".
- Click on Done editing when you are done.
Set the module to release at a later date
- Click on Add dates and restrictions.
- Edit the Start and/or End dates to control when the module will be visible.
- Click on Done editing when you are done.
Note that the content within a module will not be accessible by the students unless the module is visible to them.
Set release conditions
Release conditions provide a dynamic way to release content to students based on criteria.
For example, you can release content based on:
- which section of the course the student is enrolled in
- how well they scored on a particular test
- whether they have completed an assignment
Click on "Bulk Edit"
The "bulk edit" feature is useful here, because it will allow you to open up the edit features for all of the items in the content module.
Even if you only need to edit one item, it saves you a step.
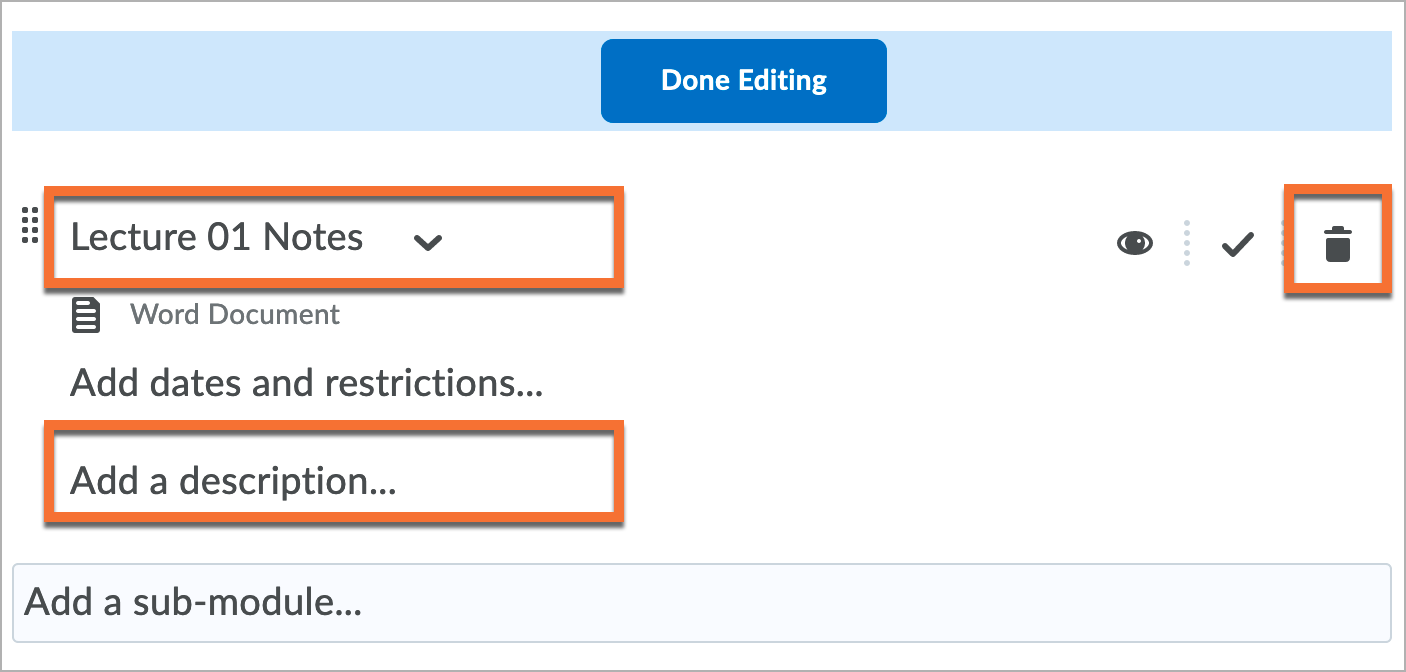
Edit the title of the item
- Click on the current title of the item to make it editable, then make the necessary changes and click outside of the field.
- Click on Done Editing when you're done making all changes.
Add a description
This description appears when inside the module where the item resides.
- Click on Add a description, and enter the description into the text editor.
- Click on Done Editing when you're finished making all changes.
Delete the item
- Click on the trash can icon to the right of the name of the item.
- You will be prompted to indicate whether you are only deleting the link, or are also deleting the attached file - it is advisable to delete the attached file, unless you need to link to it elsewhere.

Replace a content file
If you have an updated version of a content file, you can easily replace the one that is currently in the content module.
- Click the arrow icon next to the item whose file you need to replace.
- Click on Change File.
- Follow the on-screen instructions to upload the new file from your computer.
- Notify the students? If you want the students to know that you have updated a content item that they have already been accessing, check this box. Note that only students who have enabled this kind of notification will receive a message.
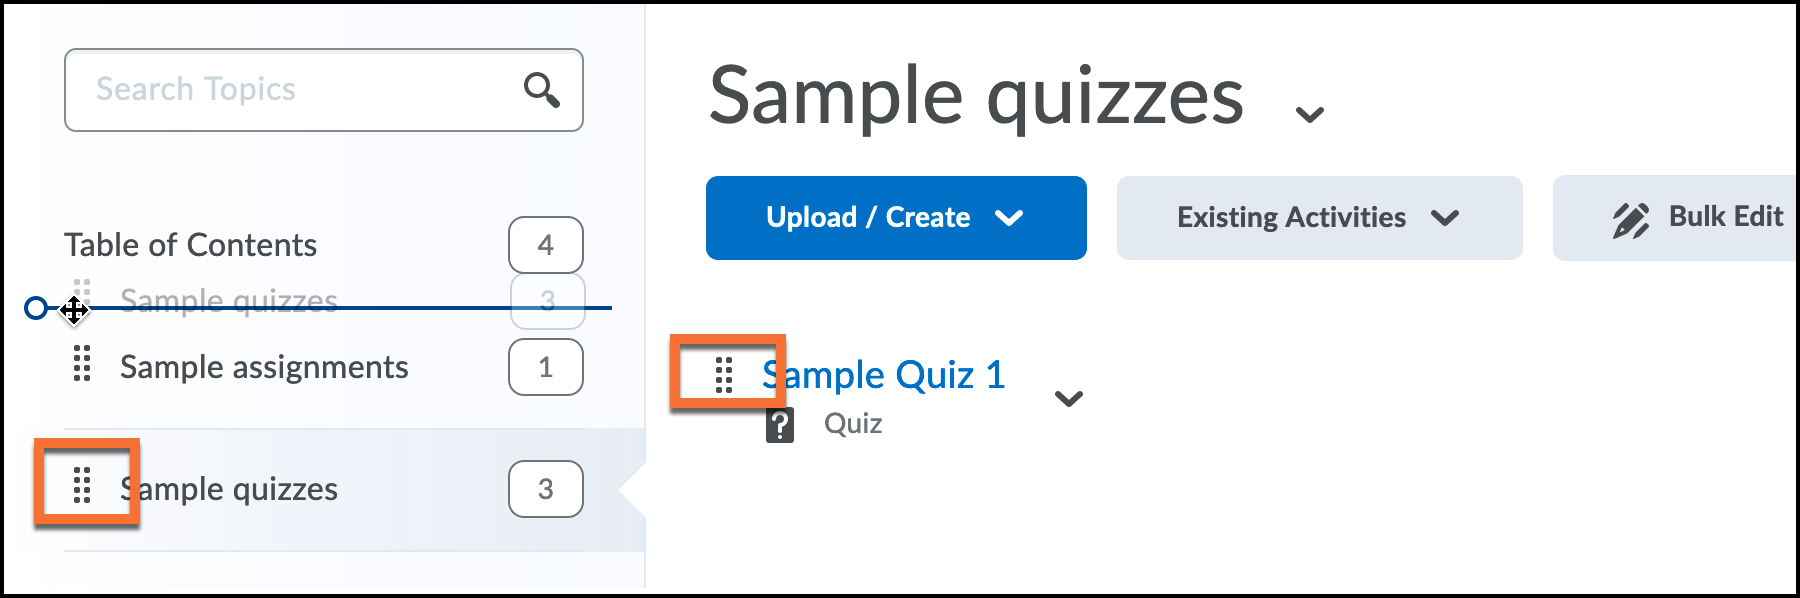
Reorder via drag & drop
- Select the topic or module's drag handle (this looks like 2 columns of 4 dots) to drag and drop.
- If you drag a module or topic above or below other modules and topics, a solid line appears to indicate you can drop the module or topic there.
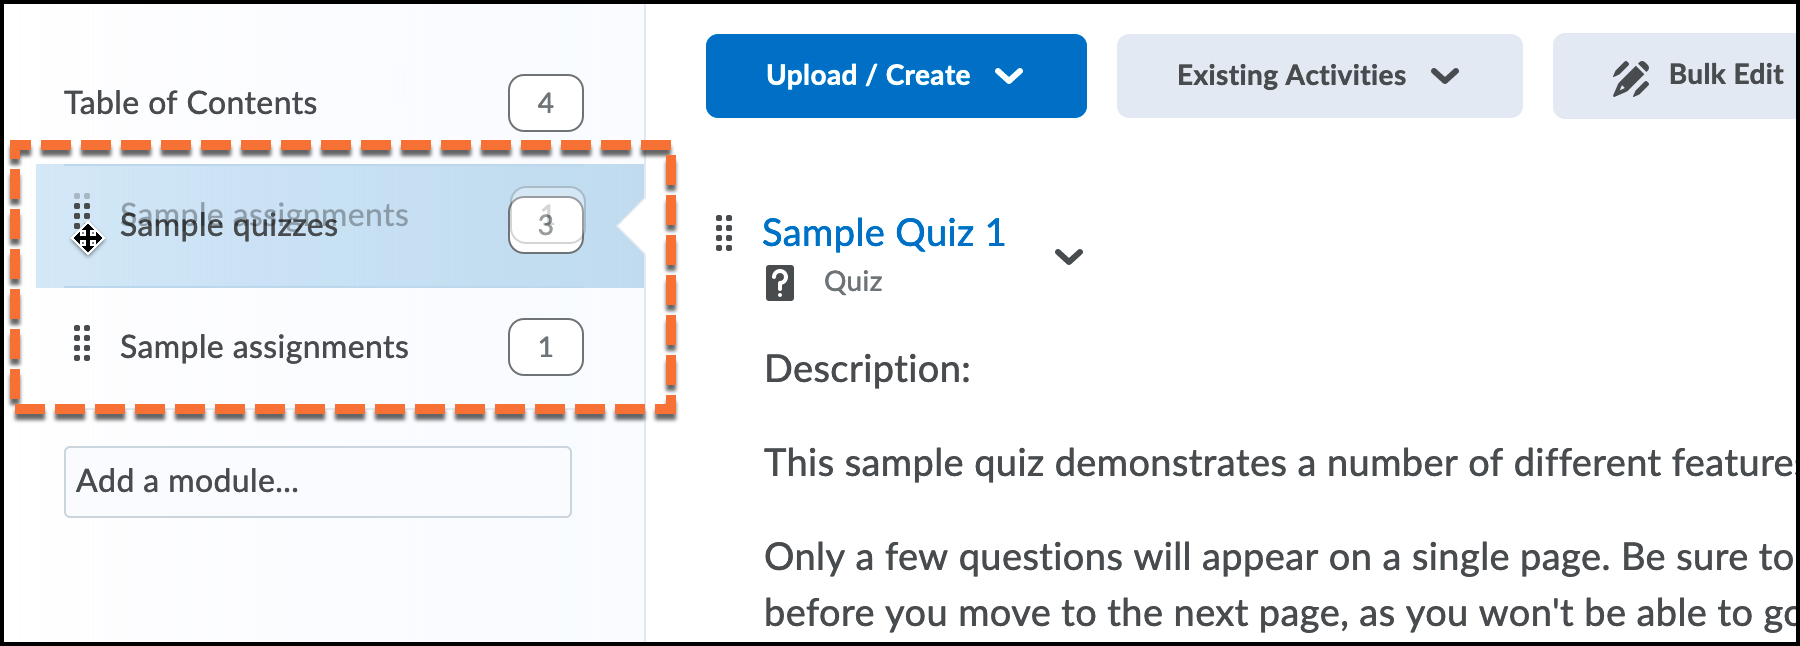
- If you drag a module or topic over another module, the module's appearance changes, to indicate you can drop it there.
- Dropping a module into another module will make it a sub-module. This is how to nest modules within each other.
If you cannot remember where you moved a module or topic, use the search function above the Table of Contents.
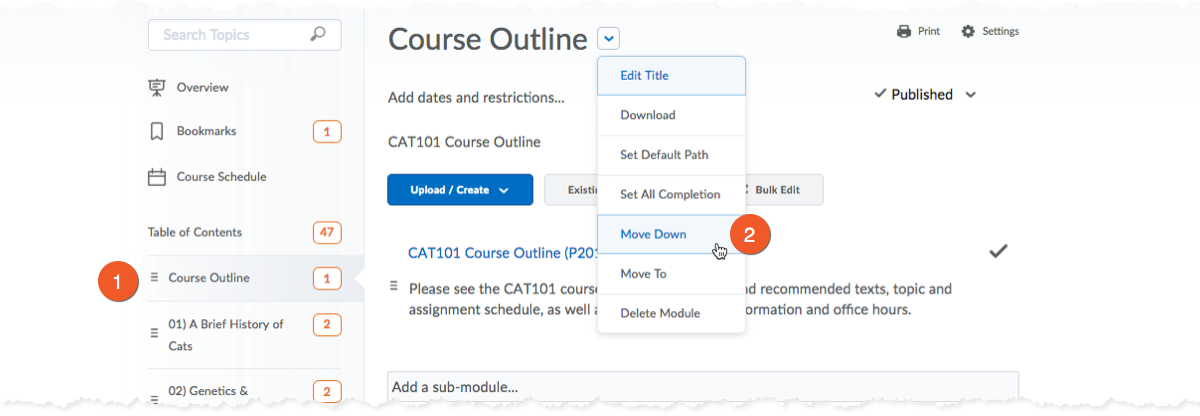
Reorder via menu: Modules
- Click the name of the module from the Table of Contents, to enter it.
- At the top of the module, click the arrow next to the title - then select one of the following options: Move Up, Move Down, or Move To.
The Move To option will allow you to move the module inside another module (making it a sub-module).
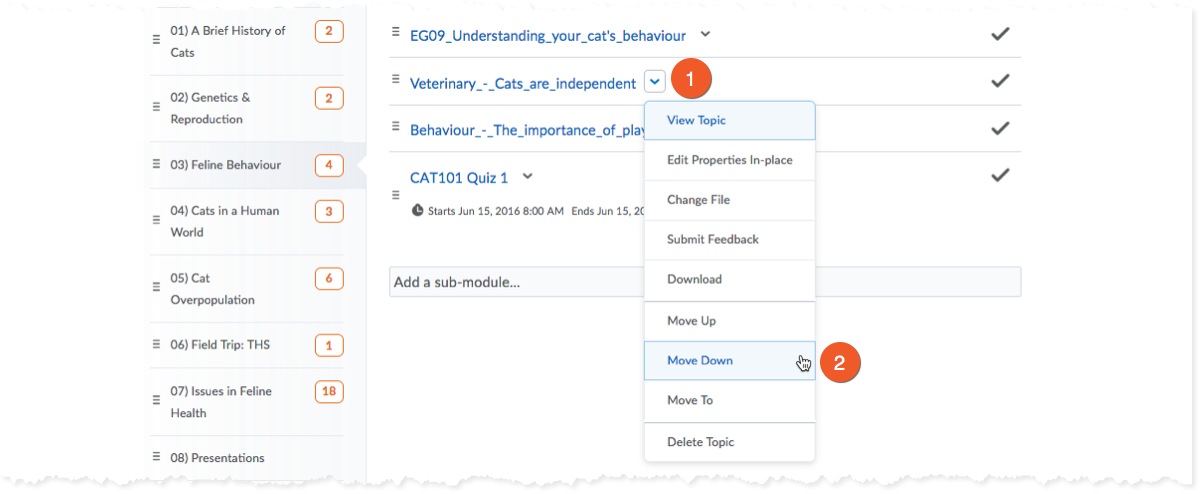
Reorder via menu: Topics
- Locate the topic you want to move, then click the arrow next to the title.
- Select one of the following options: Move Up, Move Down, or Move To.
The Move To option will allow you to relocate the Topic to a different module.
Please be careful when deleting entire modules, as you will also be deleting the contents of those modules.
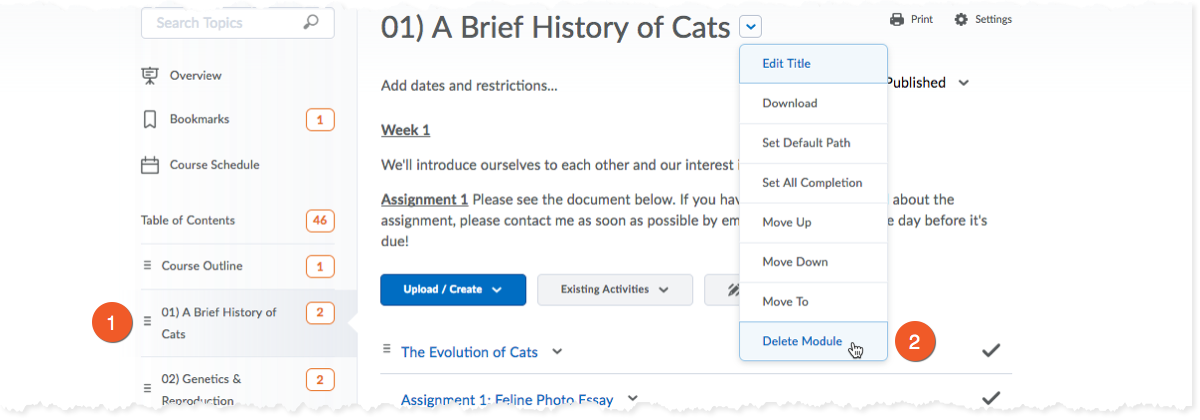
Delete an individual module
- Click the name of the Module you want to delete from the Table of Contents.
- Select Delete Module from the module's contextual menu.
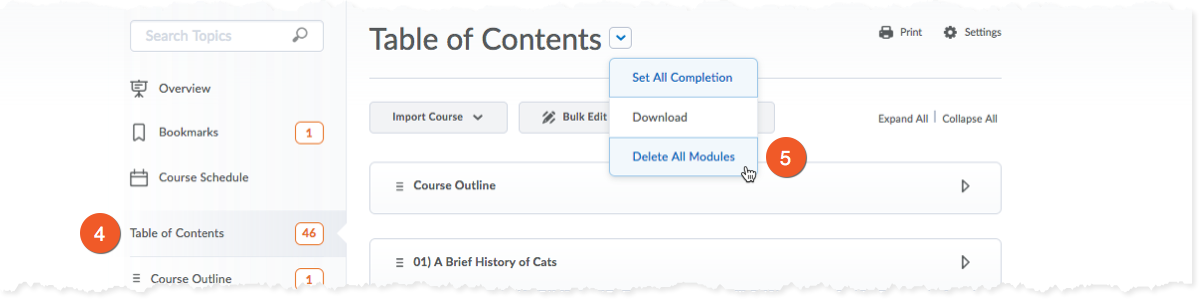
Delete all content modules
This can only be done from the top-level of the Table of Contents. Please use this feature with caution! If you make a mistake, you cannot "undo" it.
- In Content, on the left, click on Table of Contents.
- In the main window, look for the "Table of Contents" title, and click on the arrow icon (contextual menu) to the right.
- Select Delete All Modules from the contextual menu.
Download course content packs
While most instructors prefer to create their own modules and content, organized in their own way, we have created some downloadable "course content packs" that use some standard approaches to content. You are welcome to use these, if you would like an easy way to quickly set up this structure in your course shell.
These course packs contain Content tool items that can be imported into your course shell and customized to your requirements. The details of each pack will describe what is contained in the pack.
To import a course pack to your course shell:
- Go to the Content tool and click on Table of Contents in the sidebar on the left.
- Look to the right, and click on the Import Course button below the Table of Contents title, then click on Import Course Package.
- Follow the on-screen instructions to upload the downloaded course pack zip file (do not unzip it), and proceed to Import All Components.
- When the import is complete, the contents of the content pack will appear in the Content tool.
12 week content pack
This pack contains the following components to import into the Content tool:
- An empty "Weekly Lessons" content module that is hidden from students, that contains an empty sub-module for each week (Week 01 through Week 12)
- An empty content module for the Course Outline
12 module content pack
This pack contains the following components to import into the Content tool:
- An empty "Modules" content module that is hidden from students, that contains an empty sub-module for 12 modules (Module 01 through Module 12)
- An empty content module for the Course Outline
Instructor info content pack
This pack contains the following components to import into the Content tool:
- An content module for Instructor info, with a fillable module description
Related video tutorials and webinars
Find all of our D2L Brightspace video tutorials and webinars on our Brightspace Stream page.
 Copyright Notice:
It is your responsibility to make sure that all material uploaded to Toronto Metropolitan University's LMS/Brightspace by D2L and other systems complies with Canadian copyright laws. Please consult the "Do-it-Yourself Copyright Checking workflow (opens in new window) " before you upload content.
Use the university's already existing licences for content from the library and the Toronto Metropolitan University "Fair Dealing Guideline (opens in new window) ".
If you have copyright questions contact copyrt@torontomu.ca.![]()