Media Library
The Media Library provides storage, streaming, captioning, and light editing tools for all audio-video materials that you have uploaded to D2L using Content > Upload/Create > Video or Audio, Record Audio, Record Video, or Video Note. Use Media Library to manage all your audio-video content.
Note: Older files which were uploaded prior to Spring 2022 may not appear in the Media Library. If you don’t see them, you will need to upload any older audio/video files again, to take advantage of the Media Library tools.
On this page:
Media Library files are stored in My Courses > Tools > Media Library.
Find Content in the top menu of your shell. If it isn't there, review how to enable course tools.
Point your students to our student guide to course content in Brightspace.
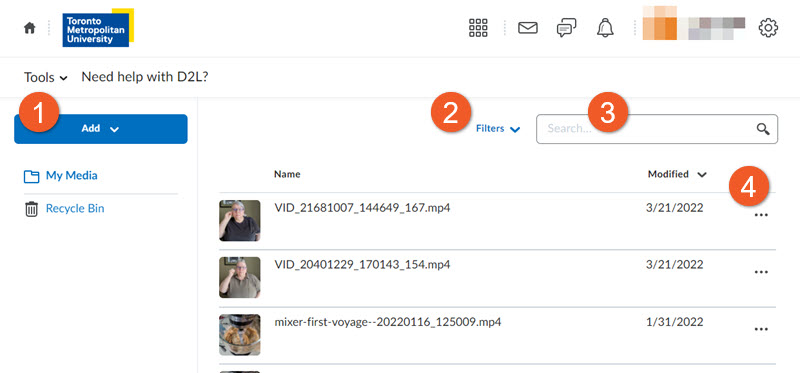
Media Library provides the following options:
- Click Add to upload a media file or record using your webcam.
Note: Create Presentation is not currently available.
- When searching, filter content based on audio/video type. More than one filter can be used. Filters include:
- Content Type: Audio, video, or both.
- Source: Where content was added from. Multiple filters can be selected.
- Content: Uploaded from the Content tool.
- Media Library: Uploaded or created in the Media Library.
- Audio or Video Note: Content created in Audio and Video Note.
- Capture App (not available).
- Imported: Added from course imports.
- Other: Content added prior to the addition of source tracking.
- Date Modified: This changes to Date Deleted on the Recycle Bin screen.
- Date Created
- Search for all content in your Media Library repository.
- Click options (...) to:
- Preview content.
- Download audio-video content to a device.
- Edit video timelines, add chapters, and create manual or automated captions using the editor.
- Rename content
- Edit Description.
- Delete content.
The Delete and Recycle bin options allow creators to not only delete content but also to restore files for up to 90 days.
Does all audio and video content end up in the Media Library?
Most, but not all.
What content goes into Media Library?
The following audio-video content paths lead to Media Library:
- Content added using the Content tool
- Record / Upload Audio or Video Notes
- Audio-Video Attachments using Record Audio or Record Video (excluding files uploaded directly to Assignments, those files go to Manage Files)
- Upload option in Media Library
The following audio-video content is not included in Media Library:
- Portfolio Evidence of Learning files and links.
- Files uploaded directly to an Assignment using the attach file feature. These files will be saved in Manage Files.
Do audio files also use the Media Library Editor?
Audio files support captioning and chapters, but do not support timeline editing currently. Audio editing support will be added in a future release.
Can editing be done on mobile devices?
D2L recommends editing on a computer. Editing can be done in mobile browsers, but the Editor is optimized for a mouse at this time.
Editing a video will change it in all the places it exists in Brightspace, is there a way to determine where it is used?
Not currently, but D2L is investigating the best way to solve this. Please take extra care when making updates.
Do the Chapters added appear as text and cause a break during playback?
No, the chapters only appear as points on the timeline.
Is it possible to upload a caption track instead of automatically generating one?
Yes, a .vtt file can be uploaded.
Is there a maximum file size?
D2L recommends that new audio-video files are 1GB or less, with a max of 2GB. The larger the file, the longer the time it will take to upload and transcode. Also, keep in mind that it is easier for students to consume shorter videos, focused on a specific topic.
What file types are supported in the Media Library?
The following file types are supported in Brightspace:
Video Files: .mp4, .avi, .f4v, .flv, .m4v, .mov, .webm, .wmv, and the ability to optimize for streaming (2GB max and up to 720p output)
Audio Files: .mp3, .m4a, .ogg, .wav, .wma (1GB max)
Notes:
- Brightspace supports these file types but prefers .mp4 and .mp3.
- If problems are discovered while playing a video after upload, try using the <Optimize for Streaming> option in the Media Library’s edit suite. This option optimizes the file for Brightspace and resolves most playback issues.
When I’m uploading a file, the upload seems to get stuck at 70%. Why?
When a media file upload reaches 70%, D2L begins to process the file, so that it can be streamed. Depending on the file size, this may take a while. Please leave the window open, and give it time to finish uploading and processing. If you wish, you can open D2L Brightspace in a second tab, and continue to work in other areas of your course shell while you wait.
In addition to uploading directly to your Media Library, you can also continue to upload your media files in the usual ways, and your content will also appear in the Media Library:
- Content > Upload/Create > Video or Audio
- Anywhere you see the “Record Video” or “Record Audio” button
- Anywhere you see the “Video Note” button
All of these files will appear in your Media Library, so you can watch, edit or reuse them again.
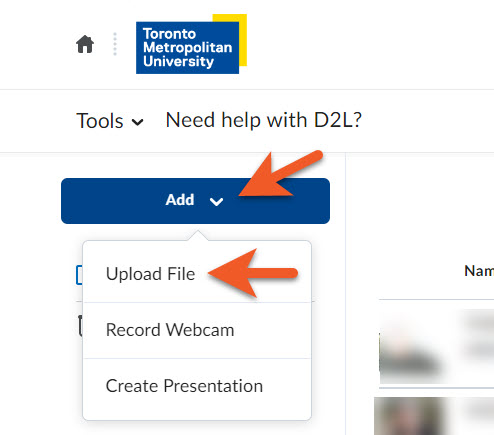
Upload directly to the Media Library
- To upload audio/video files directly to the Media Library, go to My Courses > Tools > Media Library.
- Click on Add > Upload File.
- Navigate to, and select the file on your computer, then click on Open. You will see the upload progress in the lower-right of the page. Keep the page open until the upload is finished. When the upload is complete, you will see the file in your list.
Note: Create Presentation is not currently available.
If you’ve previously uploaded content to another course shell, and wish to use the same video, for example, it’s now quite easy to do so.
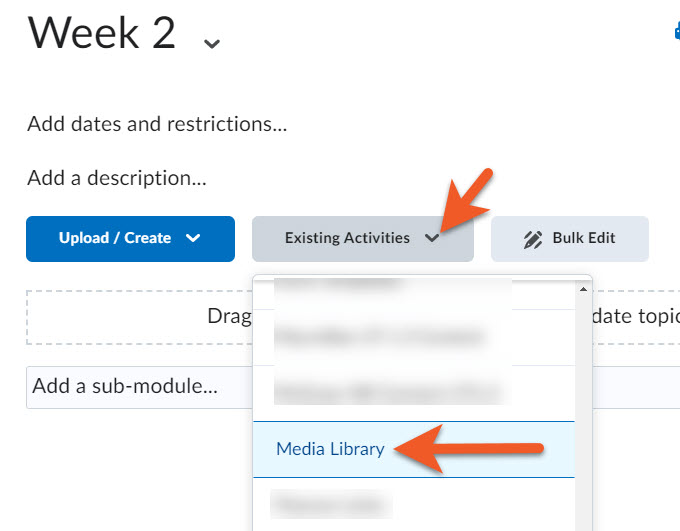
In Content
- In the course shell where you wish to insert the video, go to Content, then the module where you wish to add it.
- Click on Existing Activities > Media Library.
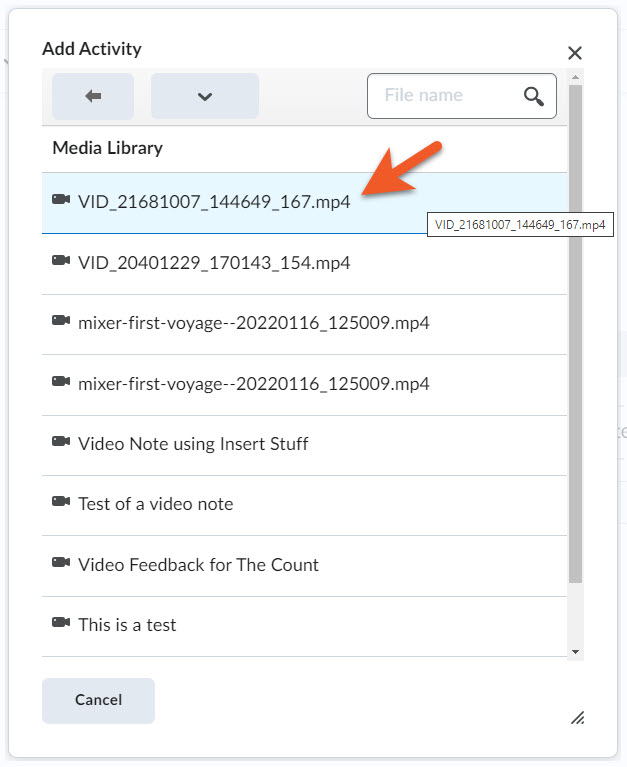
3. Click on the file you wish to add. It will appear in the module.
If you have a lot of files in your Media Library, you can type part or all of the file name into the search box at the top of the popup box to help you find it.
Reuse a video for feedback on an assignment
If you have previously uploaded or recorded a video containing general feedback, which you want to reuse with multiple students, this is possible.
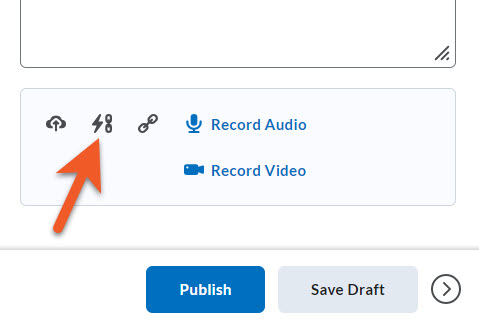
- Evaluate the student as usual. On the evaluation screen, at the bottom of the evaluation panel, click on the “Link to Existing Activity” icon.
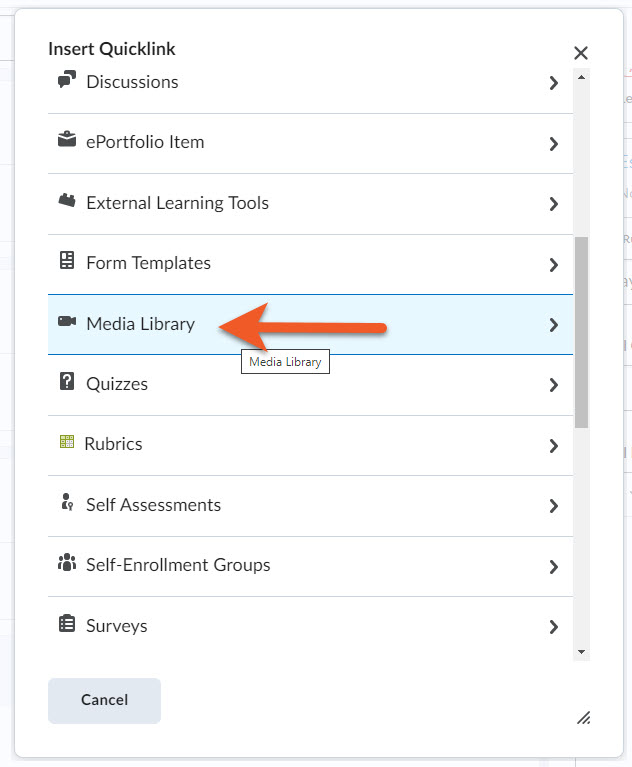
2. Scroll down the list of tools, and click on Media Library.
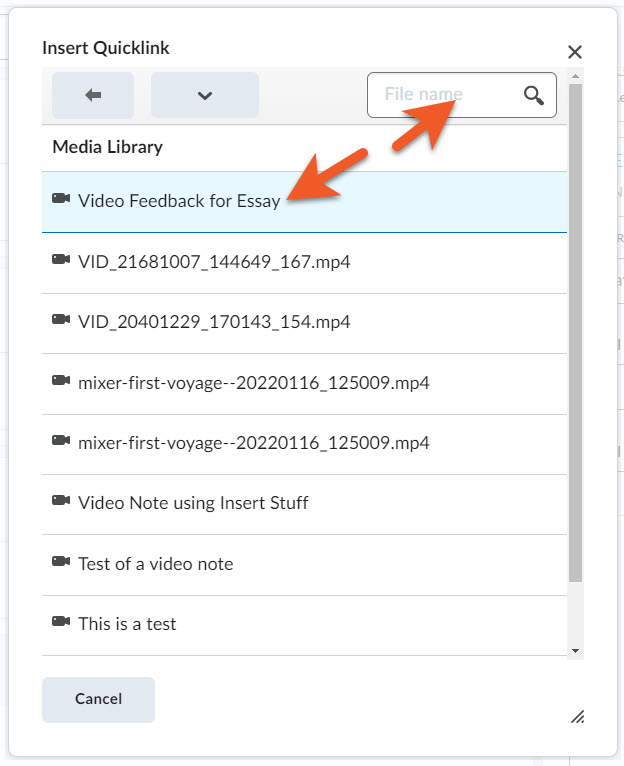
3. If you see the item you wish to use in the list, click on it. If you don’t, use the search box to type part or all of the name, to narrow your search, then click on the name.
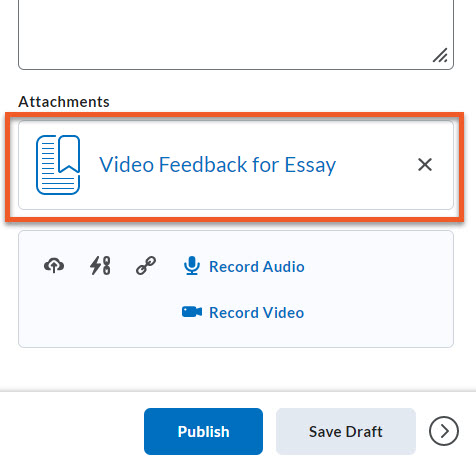
4. You will now see the file in the Attachments section, near the bottom of the evaluation panel.
5. Remember to either Save Draft (if you’re still grading) or Publish (to push the grade to the gradebook), to save your changes.
Note: you can also use this process to attach a previously-uploaded video in other locations in D2L Brightspace, such as as an attachment to an Assignment (perhaps as a resource for the project) or an Announcement.

You may have previously uploaded a file that was automatically named by your device, such as a video recorded on your smartphone, but the filename is not descriptive. It’s a better experience for your students if your files have relevant names. It’s quite easy to rename a file in the Media Library.
1. Go to My Courses > Tools > Media Library.
2. Locate the file, either by scrolling, using filters or the search box. To the far right of the file name, click on options [...], and select Rename.
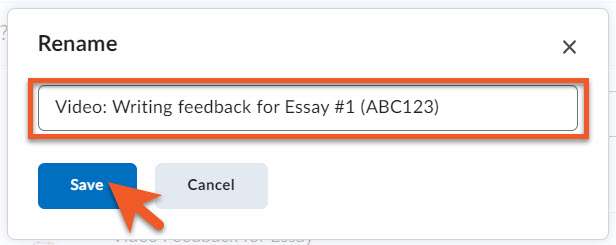
3. Type in the new name and click on Save.
Keep in mind that the Media Library contains audio/video files for all of your courses, so avoid using the same name for multiple files, and if content is course-specific, you may wish to include the course code in the name, so it’s easier to find the correct file later.
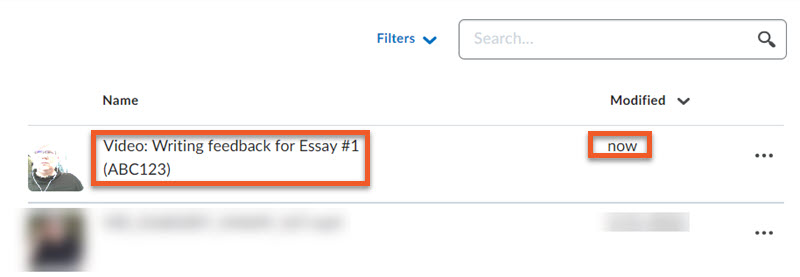
4. You will now see the new name and the time/date it was modified.
Editing the description works in a very similar way, but select Edit Description from the options [...] menu.
Please note: A piece of content that is updated, changes everywhere the content appears in Brightspace. For example, if you want the content to have a different name in one course, upload the file again, and rename that copy. (There is currently no “copy” or “duplicate” functionality, though that may change in the future.)
If you upload a lot of files, updated content, or multiple versions of media files, you may wish to do a little housekeeping, to prevent your Media Library from quickly becoming unwieldy.
Warning: Before you delete anything from the Media Library, keep in mind that this will also remove access to that file from any course shells that link to it. The item will still appear in your course shell, but the link will not work. At this time, it’s not possible to see which shells a media file is being used in, but D2L is working on a solution.
Also, keep in mind that if you delete the only instance of a media file from a course shell, it will still exist in the Media Library.
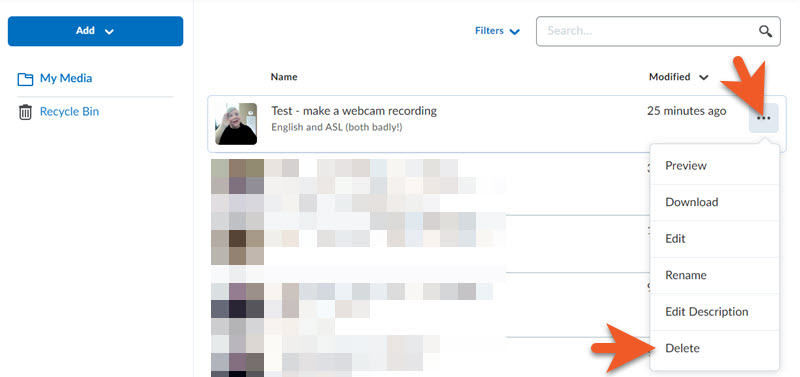
Delete a file from Media Library
1. Go to My Courses > Tools > Media Library.
2. To the right of the file you wish to delete, click on options [...], then Delete.

3. In the popup, click on Delete. The file disappears from your list.
Note: All deleted files remain in the Recycle Bin for 90 days, in case you need to restore them. After the 90 days, they are permanently deleted.
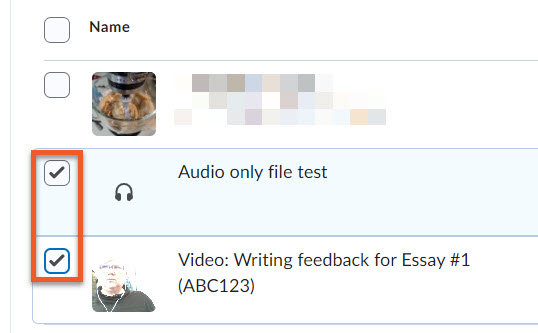
Delete multiple files from Media Library
1. Go to My Courses > Tools > Media Library.
2. Click the checkboxes to the left of the files you wish to delete.
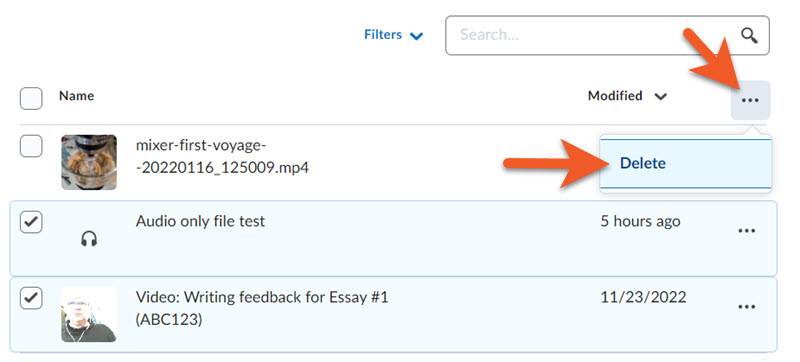
3. In the upper-right area of the page, click on options [...], then Delete.
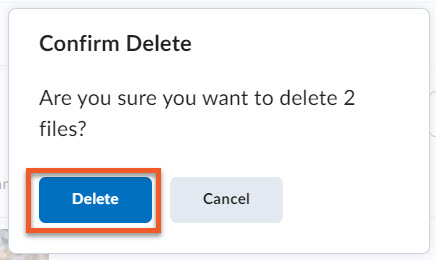
4. In the popup, click on Delete. The files disappear from your list.
Note: All deleted files remain in the Recycle Bin for 90 days, in case you need to restore them. After 90 days, they are permanently deleted.
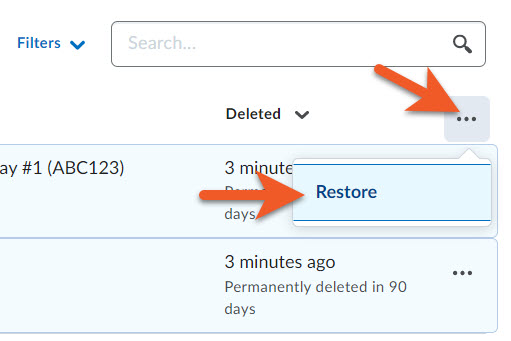
Restore a file that has been deleted from Media Library
It is possible to restore a deleted file from the Recycle Bin, if it was deleted within the past 90 days.
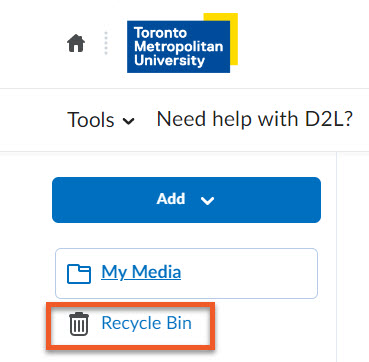
1. Go to My Courses > Tools > Media Library.
2. On the left, click on Recycle Bin.
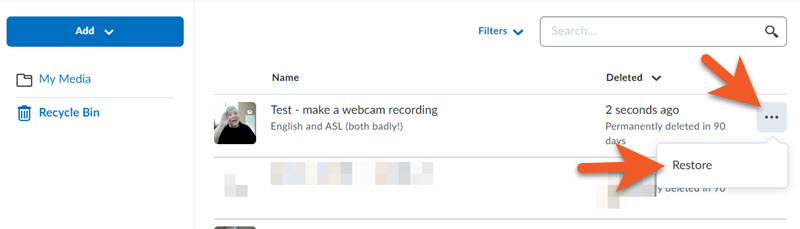
3. In the Recycle Bin, you will see a list of files that have been deleted within the past 90 days.
To the right of the file you wish to restore, click on options [...], then Restore.
The file disappears from the file list in Recycle Bin. Click on My Media on the left, and you’ll see the file has appeared at the top of your file list.
Restore multiple files that have been deleted from Media Library
It is possible to restore a deleted file from the Recycle Bin, if it was deleted within the past 90 days.
1. Go to My Courses > Tools > Media Library.
2. On the left, click on Recycle Bin.

3. In the Recycle Bin, you will see a list of files that have been deleted within the past 90 days.
Click the checkboxes to the left of the files you wish to restore.
4. In the upper-right area of the page, click on options [...], then Restore.
The files disappear from the file list in Recycle Bin. Click on My Media on the left, and you’ll see the files have appeared at the top of your file list.

Often, the thumbnail image is not enough for you to identify a file. You can use Preview, to open the media player, so you can watch or listen to your file.
1. Go to My Courses > Tools > Media Library.
2. To the right of the file you wish to preview, click on options [...], then Preview.
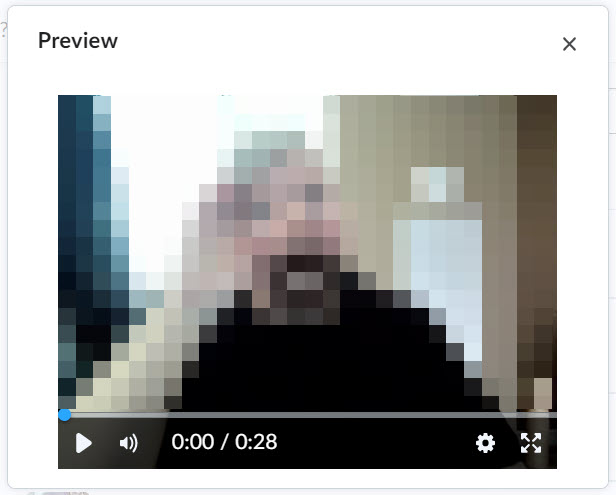
3. A popup window will open the embedded media player, and you review your media file. Simply close the popup window when you are done.
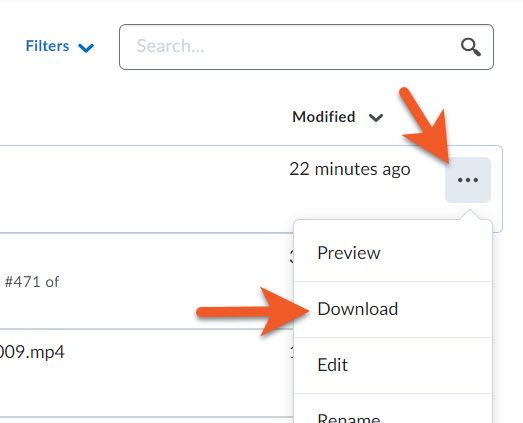
If you want to use your media files outside of D2L Brightspace, or save a backup copy, you can use Download to do this.
1. Go to My Courses > Tools > Media Library.
2. To the right of the file you wish to download, click on options [...], then Download.
The file download will automatically start. You can find the file in the default location on your hard drive where your browser saves all downloads. The file name may be somewhat cryptic-looking, so we recommend immediately opening your download folder, and rename the file to something more meaningful.
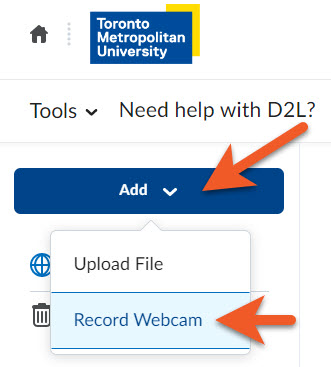
You have more control if you create videos on your device, edit, save, and then upload to your Media Library in D2L. However, if you wish to record and save directly into your Media Library, using your webcam, it is possible.
1. To upload audio/video files directly to the Media Library, go to My Courses > Tools > Media Library.
2. Click on Add > Record Webcam.
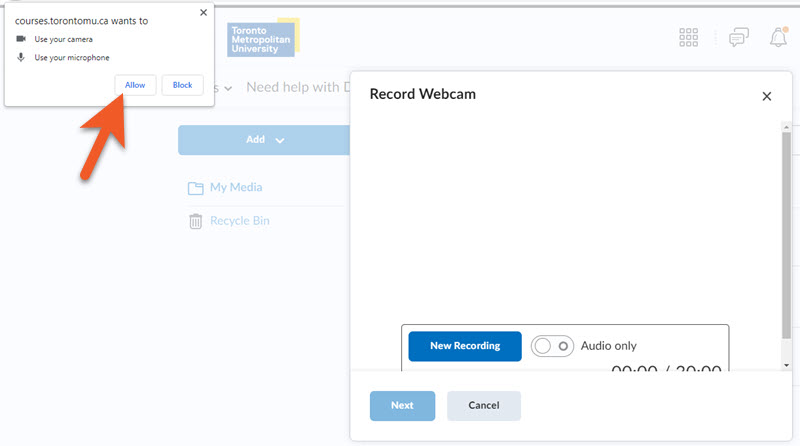
3. You will notice a “Record Webcam” popup window open.
You may not notice a 2nd popup window appear, requesting your permission to use your camera and your microphone. You must click on Allow in the 2nd window, or you will not be able to proceed.
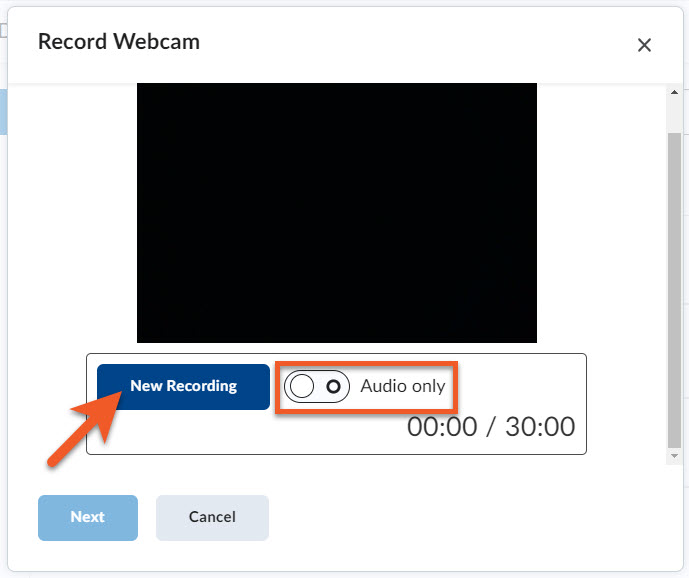
4. Make sure your webcam is on, aimed correctly, and you are ready to go.
If you wish to record sound only, with no video, toggle the Audio only button.
Click on New Recording to start recording.
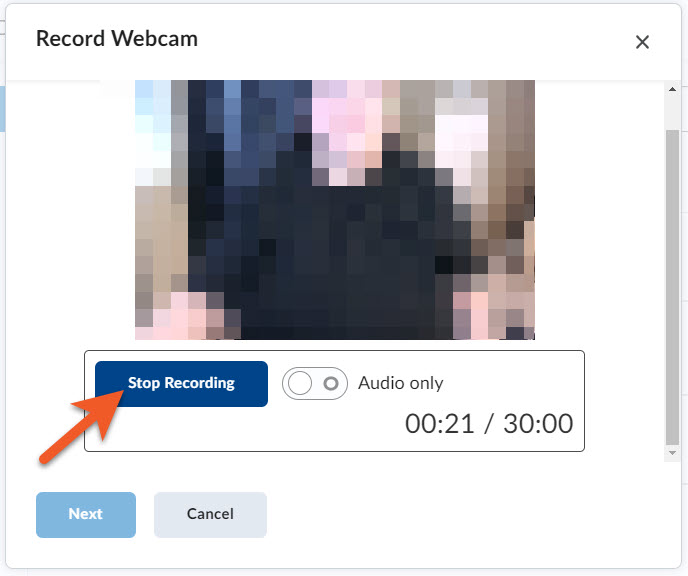
5. Click on Stop Recording to end your recording.
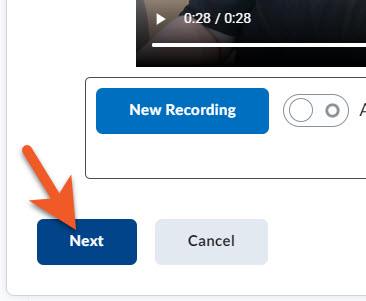
6. Click on Next to proceed.
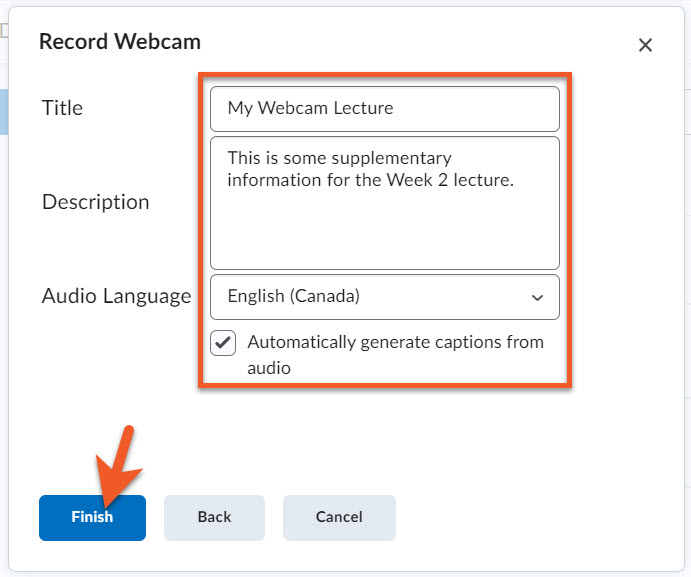
7. Fill in all fields, including Title, Description and Audio Language. If you want D2L to automatically generate captions, select the Automatically generate captions from audio checkbox.
Click on Finish to save your work.
Depending on the length of your video, it may take a while to process. When the video is finished processing, you will see it at the top of your list of files.
Once you’ve uploaded or recorded audio or video, the edit tools in the Media Library allow you to add chapters, create auto-captions (which we very strongly recommend editing!), upload a caption file, and make very basic edits to the timeline.
NOTE: When you update a file, it changes everywhere the content appears in Brightspace. For example, changed captions or timeline edits.
Open the Edit screen
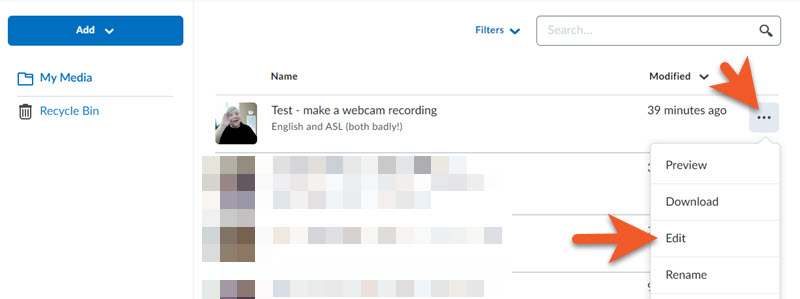
1. Go to My Courses > Tools > Media Library.
2. To the right of the file you wish to edit, click on options [...], then Edit.
About the Edit screen
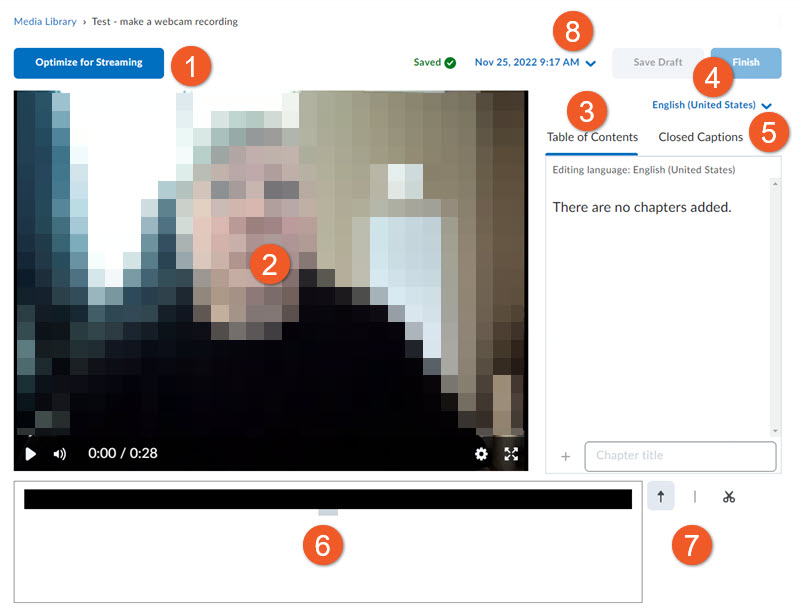
- If you experience problems playing a video after upload, try clicking on the Optimize for Streaming button. This converts the file to a format that is more compatible with Brightspace and resolves most playback issues. Keep in mind that it may take a while for the file conversion to occur.
- Review your media file in the embedded media player.
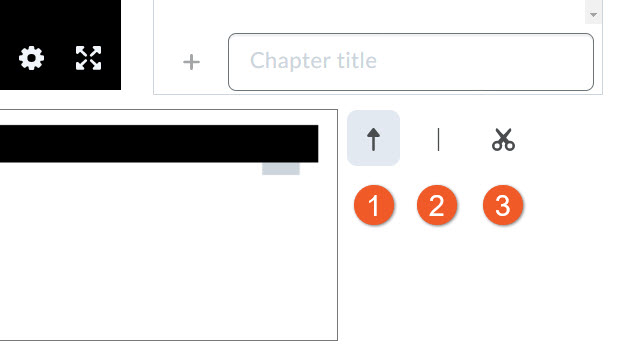
- The Table of Contents tab is where you can add chapters to your media to indicate meaningful segments or changes of topic. Chapters appear above the timecode when a user hovers over the timeline. Keep in mind that chapters are not clickable and do not impact playback.
- Click on the language dropdown to set the language.
- The Closed Captions tab is where you can create auto-captions, edit captions, or upload a caption file.
- The timeline allows you to see where you are in the media, and is used when editing the timeline.
- The editing tools are used for seeking, marking and cutting when editing the timeline.
- By default, the timestamp of the most recent version of your media file is shown. This is the version that appears in your course shells. However, if you need to roll back to an older version, click on the down arrow beside the date, and select the version you wish to review and restore. Save draft to revert to that version of your media file.
It’s very important to make all of your content as accessible as possible, so you’ll likely use the tools to generate and edit closed captions more often than the other editing tools.
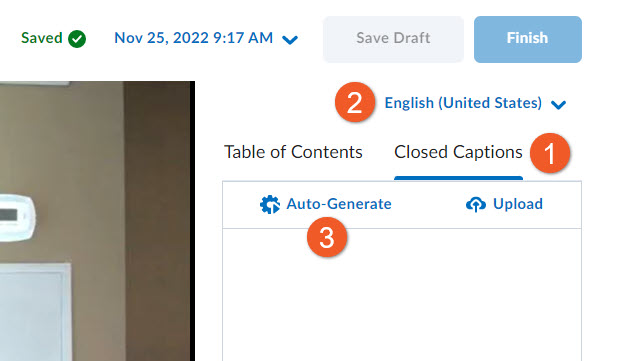
1. To auto-generate captions, make your way to the edit screen, then click on the Closed Captions tab.
2. Select your language from the dropdown.
3. Click on Auto-Generate.
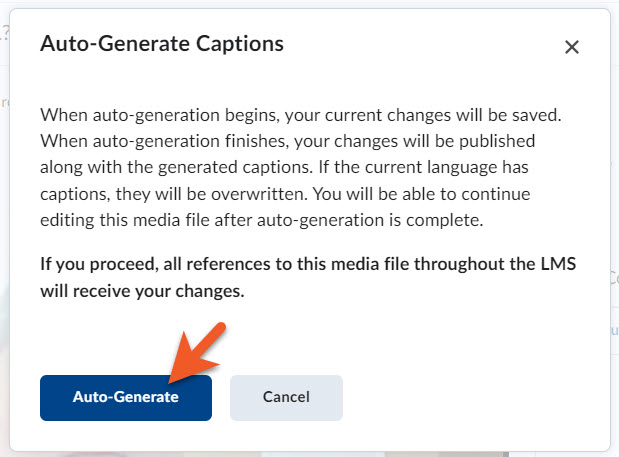
4. Read the warning in the popup window. This explains that any past captions for this language will be overwritten by the auto-generated captions, as soon as you click on the button. There is no way to undo this. If you want to proceed, click on Auto-Generate.
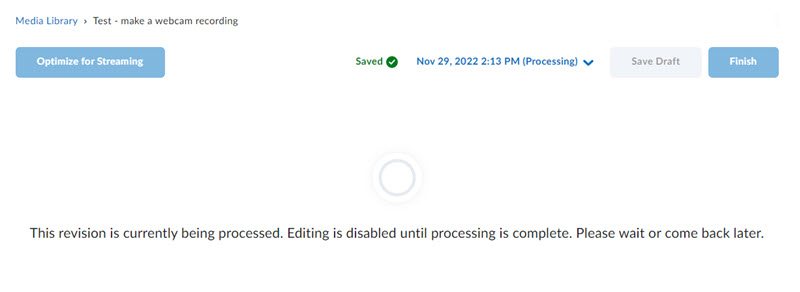
5. While the captions are being generated, you will see a status message that indicates that you need to wait until the process is complete before you can proceed with any editing. If you want to, it is safe to go to another page in Brightspace and do something else, then return later.
If you wait, when editing is complete, the main edit screen will reload. Click on the Closed Captions tab to view and edit (if desired) your captions.
Note that the Save Draft and Publish buttons are greyed out because auto-generated captions are automatically saved (and overwrite any previous captions in that language).
It’s very important to make all of your content as accessible as possible. If you have created a caption file (format: .vtt), you can upload to the Closed Captions tool, and connect your captions to your media file.
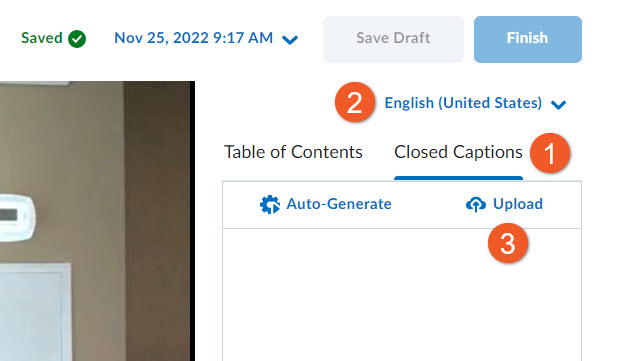
1. To upload captions, make your way to the edit screen, then click on the Closed Captions tab.
2. Select your language from the dropdown.
3. Click on Upload.
4. Navigate to the .vtt file on your hard drive, and click on Open.
5. It may take a while for your captions to be processed, depending on the length of your media file. When the processing is done, you will see your captions appear, with timestamps, in the main area of the Closed Captions tab.
6. Click on Save Draft if you will be making additional changes, or click on Finish to save all of your changes. You will see a warning that if you proceed, all instances of this media file will be updated.
At this point, it’s a good idea to review your media with the captions on, to make sure everything appears as expected. You may need to make some edits, to finetune the timing, fix typos, or fix line lengths that don’t fit on the screen.
If you have created caption files in multiple languages, repeat the process for each language, selecting the correct language each time.
If you have used the Auto-Generate tool to create captions for your media, we very strongly recommend taking some time to edit the captions, as they will not be perfect. Or, if you’ve uploaded a caption file (.vtt), and discover some minor errors, it’s easy to edit, instead of uploading again.

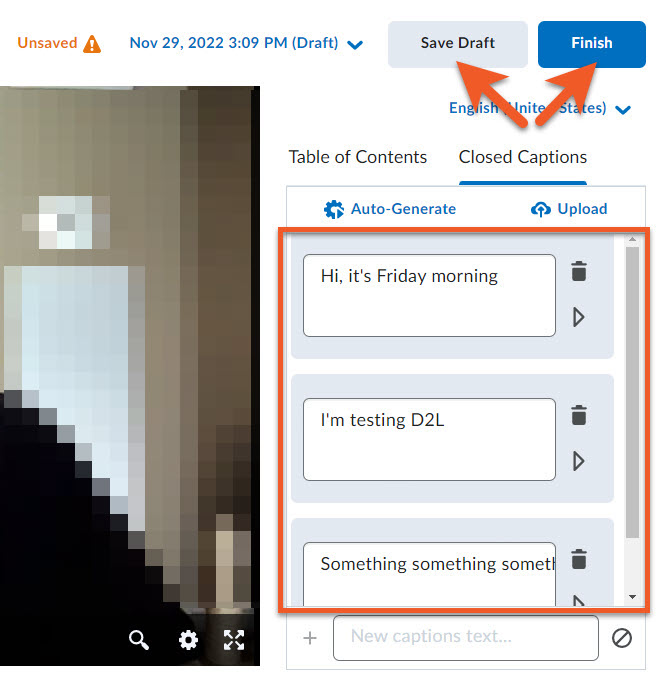
1. To edit captions, make your way to the edit screen, then click on the Closed Captions tab.
2. Select your language from the dropdown.
3. Click on the desired caption and edit as needed.
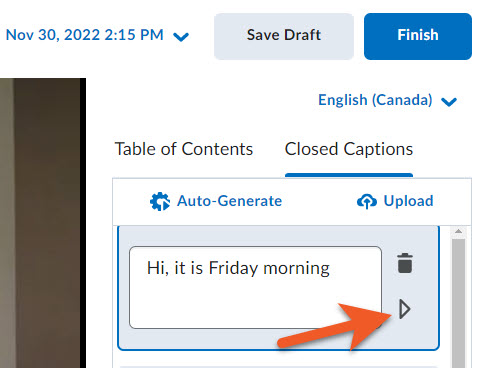
4. To adjust the timing of a caption, open the timing panel by clicking on the right arrow, located to the right of the caption.

5. Click and type to change the time (format: HH:MM:SS.SSS), or click on the clock icon to synchronize the time to the position indicated in the media player and on the timeline.
You can use the media player to repeatedly review and finetune your captions and timing
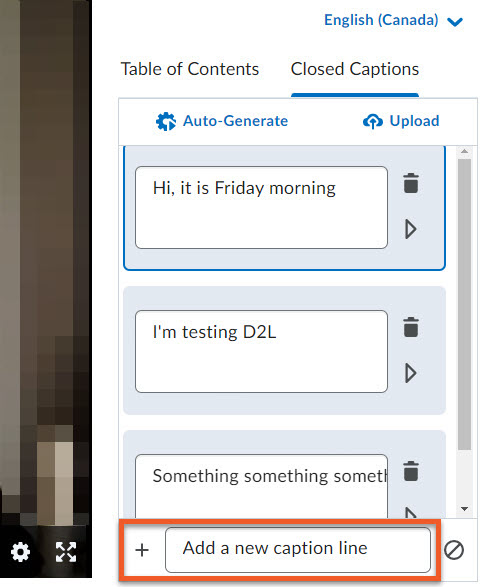
6. If you need to add a new caption line, click on the caption above where you want to insert the new line. Then, at the bottom of the caption panel, type the new caption into the text box, and click on the + symbol to add the caption.
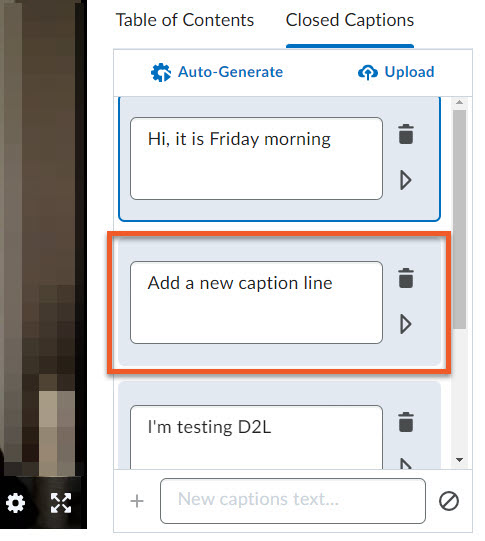
You will see your new caption inserted into the timeline.
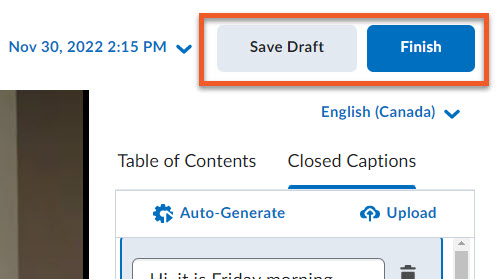
7. Remember to periodically click on Save Draft to save your work-in-progress, and click on Publish when you are done making changes. Keep in mind that when you click on Publish, your changes are updated in all locations in your course shells where this media file appears.
For a number of reasons, we don’t recommend uploading long videos (over 10 minutes or so, or 1Gb) to D2L Brightspace. D2L does not manage larger/longer files very well. Also, there are other streaming services, such as Stream and Google Drive, which provide a better experience. Also, most students will struggle to focus on a longer video.
However, if you upload a video that covers a number of topics, chapters are a great way to indicate where each new topic begins. This can be useful for students who want to find and review a particular topic within a longer video.
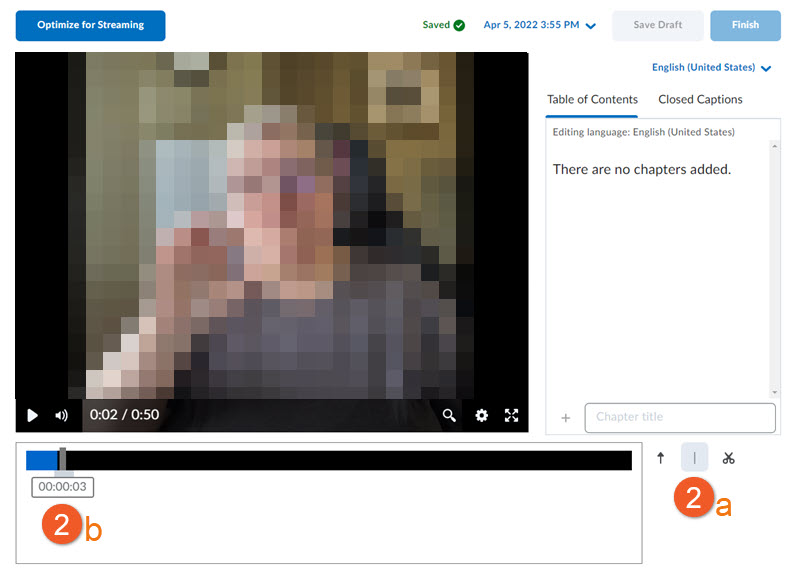
1. To add chapters, make your way to the edit screen, then click on the Table of Contents tab.
2. Select your language from the dropdown.
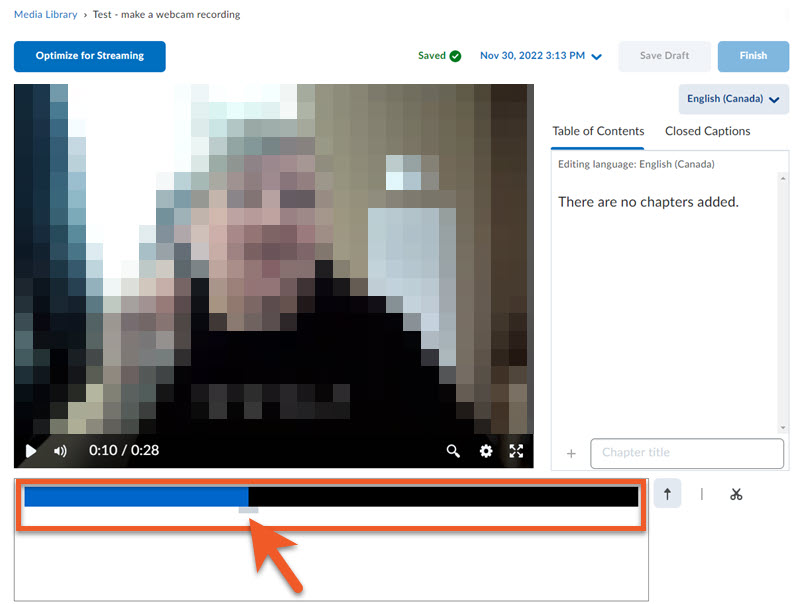
3. Locate the black timeline bar below the media player. Slide/click your cursor to locate the place on the timeline where you want your chapter to start.
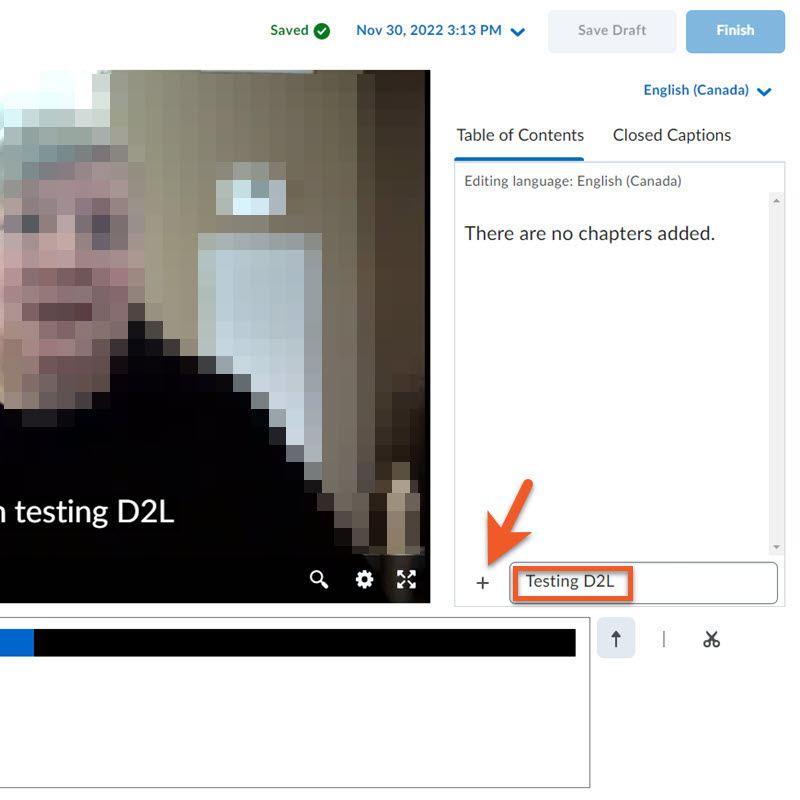
4. In the Table of Contents tab, near the bottom, type the chapter title into the text box, and click the Plus (+) icon, to add your chapter marker.
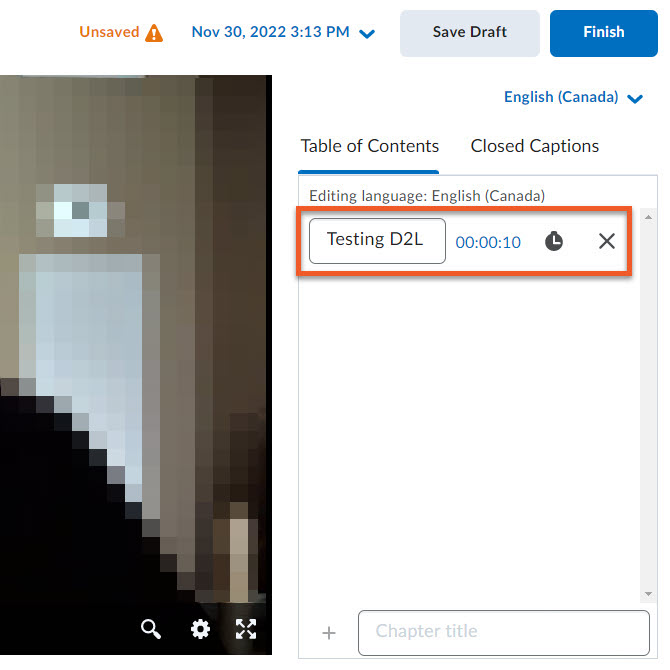
5. You can now see the new chapter listed in the Table of Contents.
6. Repeat to add additional chapters.
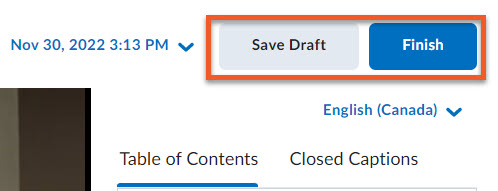
7. Remember to click on Save Draft often, to ensure your work is saved. Click on Publish when you are finished, to save all of your changes, which will appear anywhere the media file exists in your course shells.
If you need to make major edits to the timeline of your video, we strongly recommend using proper video editing software. The video editor in the Media Library is very basic. We only recommend using it for light edits that do not require a lot of precision, such as trimming the beginning or end of your video. For example, you can only edit to the nearest second on the timeline, so you may not be able to trim exactly where you want.
Note: Timeline editing is only available for video content. D2L may add audio editing functionality in the future.
1. Go to My Courses > Tools > Media Library.
2. To the right of the file you wish to edit, click on options [...], then Edit.
Editing tools
There are 3 tools that you will use when editing the timeline:
- Seek (arrow)
- Mark (line)
- Cut (scissor)

Trim the beginning of your video
If there is some extra content at the beginning of your video that is not needed, here’s how to remove it:
1. Either use the media player to play the video, pausing at the exact spot where you wish to start the video, OR click on the Seek icon, then on the black timeline bar below the media player, drag your mouse along the timeline, to the exact spot where you wish to mark the video.
2. Click on the Mark icon, then click on the location on the timeline, to mark the end point of the segment you wish to remove.
If you wish to remove a section in the middle of the video, you need to mark the start and end locations of that segment.
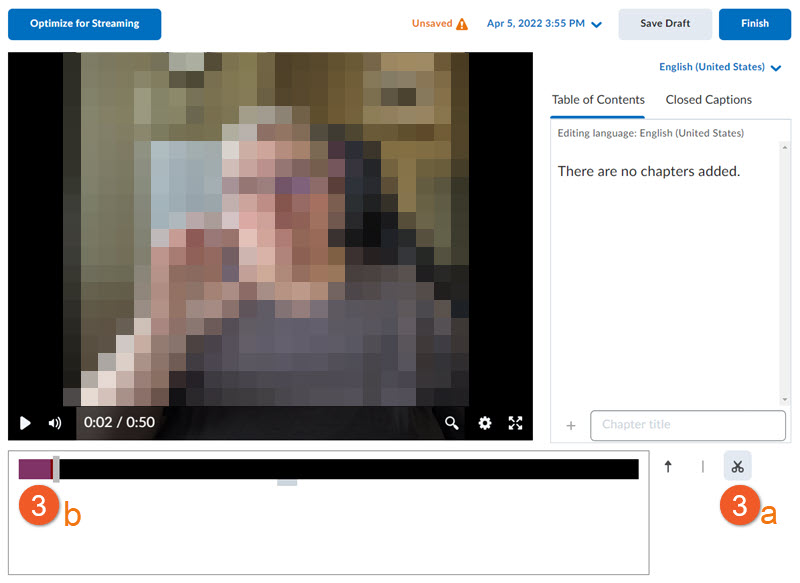
3. Now, you need to select which portion of the video you want “removed”. Click on the Cut icon. Then on the timeline, click on the portion you wish to remove. It should then be indicated in red.
Note that the video will be edited to the nearest full second. This editing tool is not capable of more precision.
4. If you wish to edit additional portions of the video, repeat the above steps for each portion. Keep in mind that this tool is not suitable for significant or fine editing.
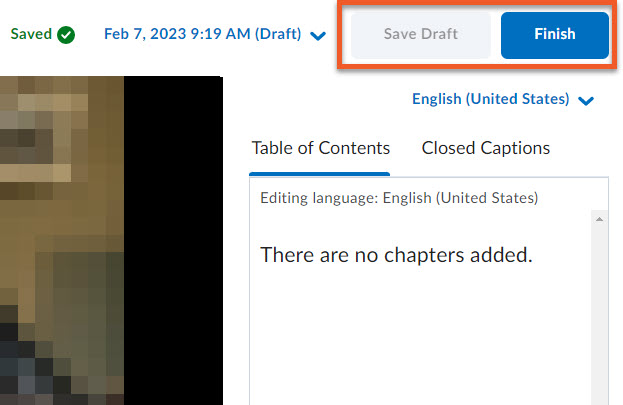
5. D2L does not automatically save your work. Remember to regularly click on Save Draft to save your work-in-progress, and when you are ready to leave the page, or are completely finished editing the video, click on Finish.
You will notice that you continue to see the entire video in the editor, but the removed portions appear in red on the timeline. When your students view the video, they will only see the portions that are indicated in black on the timeline.
If, after saving, the playback of your video is not smooth, click on the Optimize for Streaming button in the upper left, and wait for the video to process. This should improve the quality.
After editing captions, chapters, or the timeline, you may discover that you made a mistake, and want to go back to an older version of your video, and try again. As long as you have saved your changes regularly, this is fairly easy.
1. If you are not already on the edit page for your video, go to My Courses > Tools > Media Library.
2. To the right of the file you wish to edit, click on options [...], then Edit.
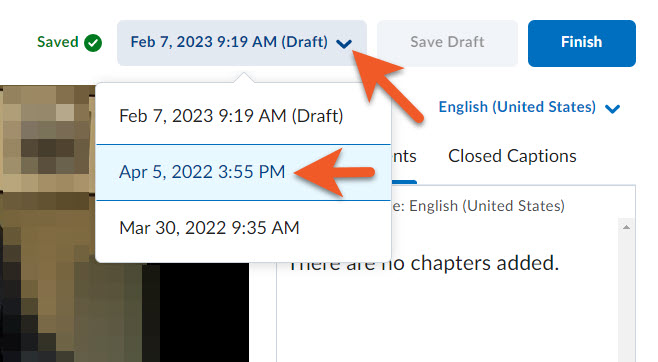
3. In the upper-right area of the page, click on the date dropdown, and then select the version you wish to revert to.
4. Proceed with making edits to captions, chapters or the timeline, and remember to click on either Save Draft or Finish to save your work-in-progress (and create a new version).
Related video tutorials and webinars
Find all of our D2L Brightspace video tutorials and webinars on our Brightspace Stream page.
 Copyright Notice:
It is your responsibility to make sure that all material uploaded to Toronto Metropolitan University's LMS/Brightspace by D2L and other systems complies with Canadian copyright laws. Please consult the "Do-it-Yourself Copyright Checking workflow (opens in new window) " before you upload content.
Use the university's already existing licences for content from the library and the Toronto Metropolitan University "Fair Dealing Guideline (opens in new window) ".
If you have copyright questions contact copyrt@torontomu.ca.![]()