Zoom Breakout Rooms
Breakout Rooms allow you to split your Zoom meeting into small groups automatically or manually. Breakout rooms mimic in-person small group discussions, separate from the main meeting.
Support
- Zoom's video tutorials (external link)
- Zoom's help center (external link)
- Email the main Help Desk at: help@torontomu.ca using your TMU email address.
About
Participants have full audio, video and screen sharing capabilities when using breakout rooms.
- If you already know how you want to split up your participants, you can pre-assign breakout rooms.
- Breakout rooms can be populated with members of your D2L Brightspace course groups.
Limitations
- By default, only the host or co-host can assign participants to breakout rooms.
- Hosts and co-hosts can choose to allow participants to choose their own room, but this must be done in the meeting when launching the breakout rooms.
- If the meeting is being cloud recorded, it will only record the main meeting and none of the breakouts will be captured.
- It is currently only possible to record in breakout rooms with local recording. The host must allow specific participants to record locally and it will only record the room the participant who is recording is in.
- You can create up to 100 breakout rooms.
Instructions

In a Zoom meeting, select the Breakout room button within the Zoom toolbar. If you do not see it, select the More () button.
Specify the number of breakout rooms you would like to create.
Then determine how you would like to assign participants into breakout rooms:
- Assign automatically (Recommended): Zoom will automatically assign participants into random rooms.
- Assign manually: The host manually assigns participants into rooms.
- Let participants choose room
Select the Create button when done.
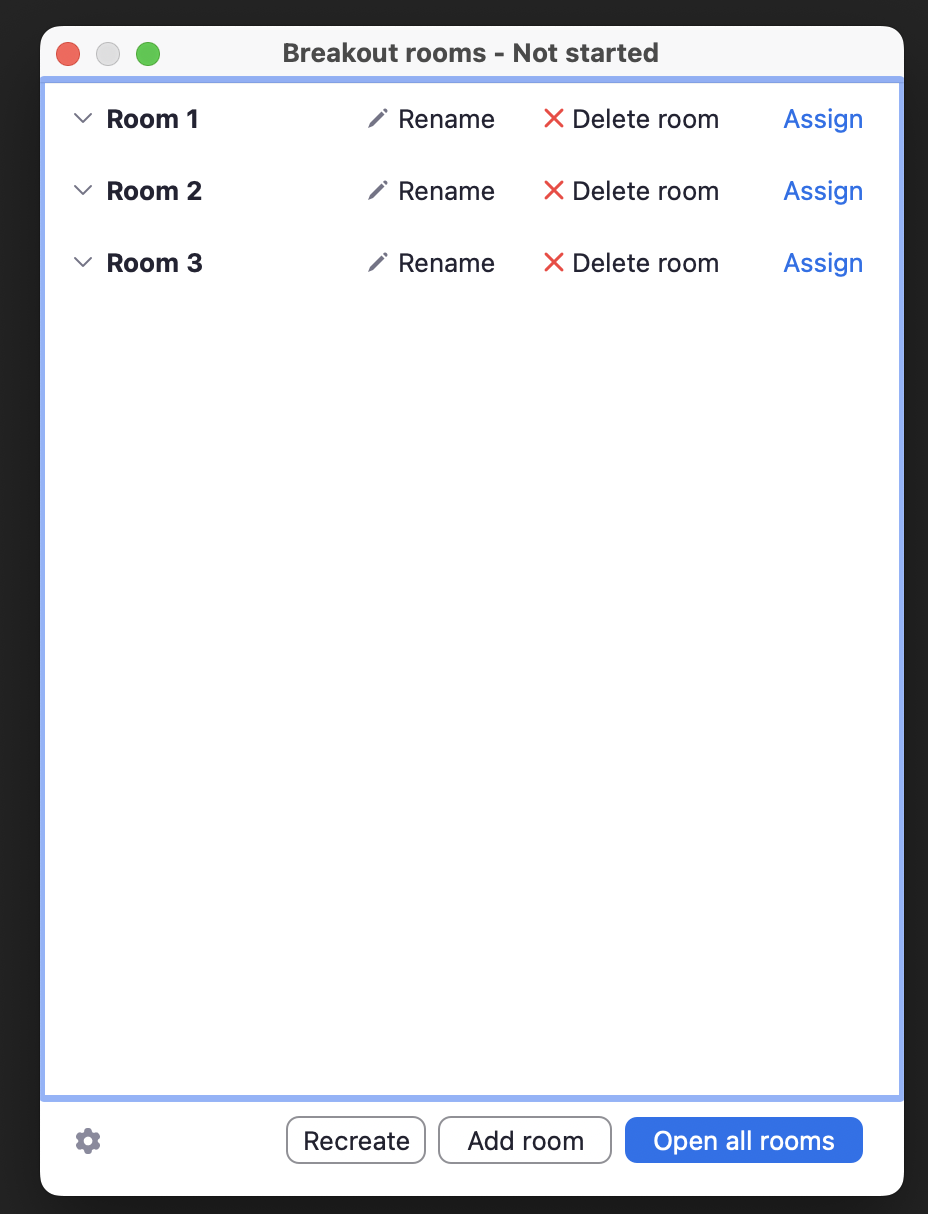
Upon selecting the Create, participants will be assigned to a room. In this pop-up window, you can manually reassign participants to different rooms by selecting the Assign button next to the desired room number.
You can start the breakout rooms by selecting the Open all rooms button.
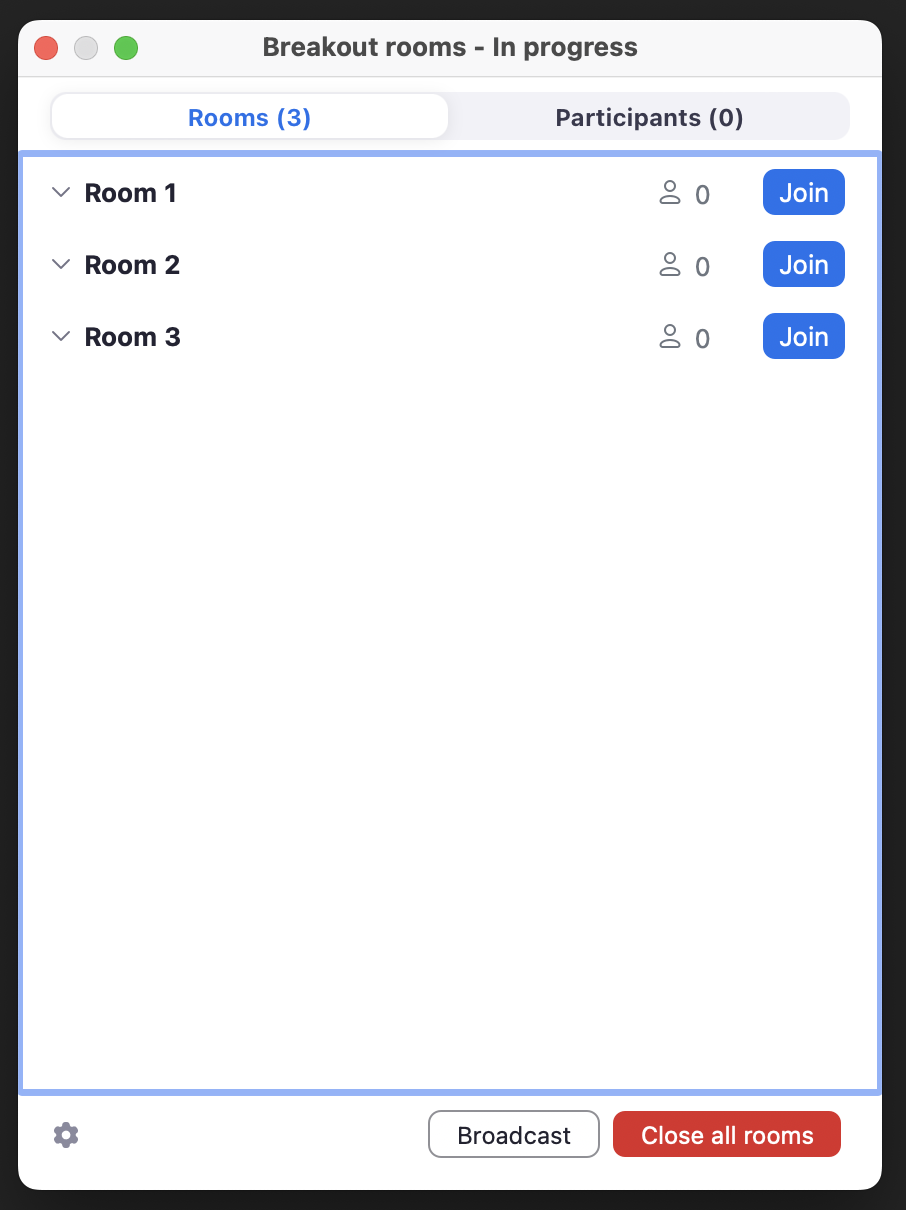
When breakout rooms are in progress, you have the option to:
- Manually re-assign participants to other breakout rooms.
- Join any of the breakout rooms.
- Broadcast a message to all breakout rooms.
- Close all rooms, and participants will return to the main meeting room.
Additional options
If necessary, you can also modify additional options by selecting the Options () button in the bottom left corner.
- Allow participants to choose rooms.
- Specify how long breakout rooms will be opened for.
- Adjust the countdown timer after closing a breakout room.
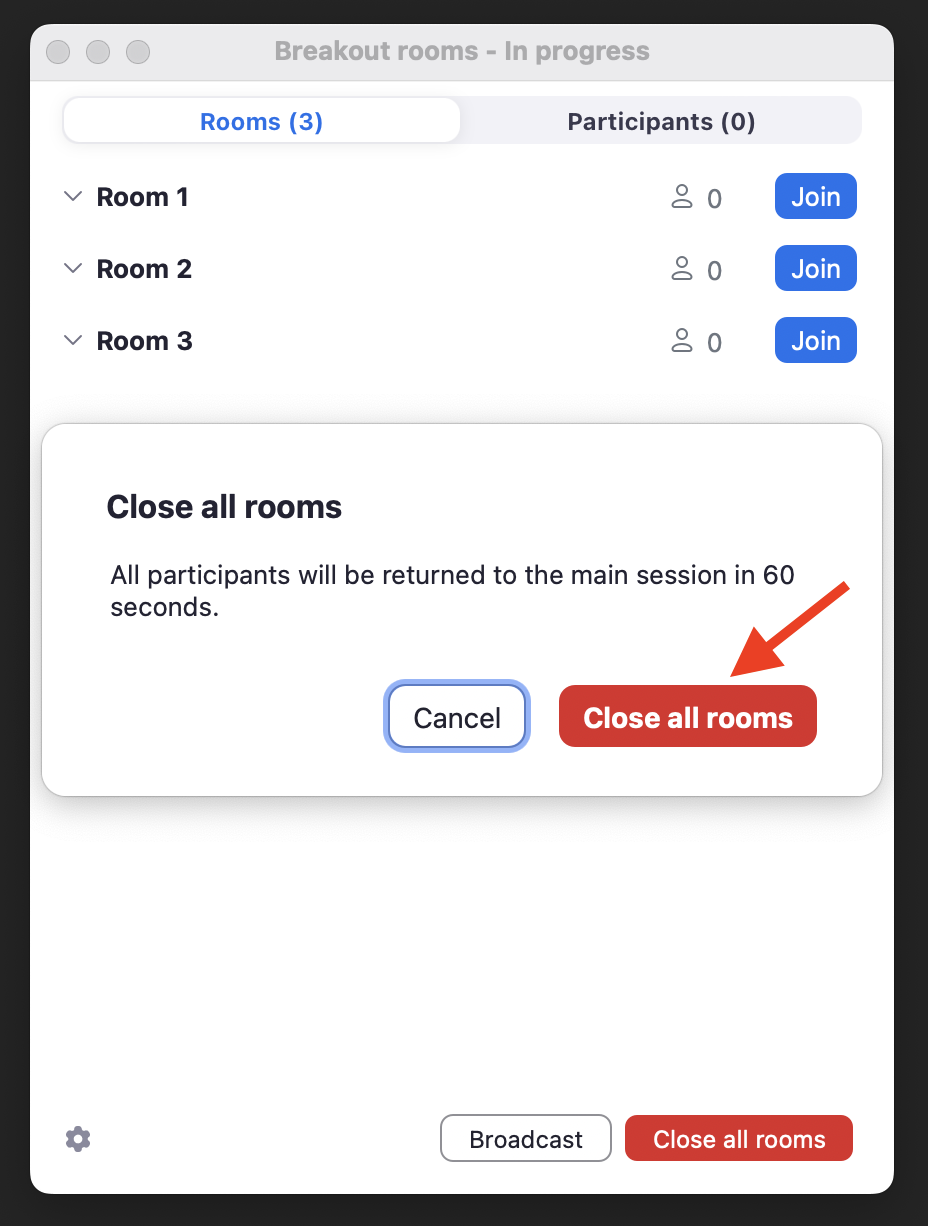
Closing breakout rooms
Select Close all rooms to end breakout rooms. All participants will return to the main room after 60 seconds by default.
If you know how you want the students to be grouped in advance, you can pre-assign the students to their respective breakout rooms in Zoom. If you are using the Groups feature in D2L Brightspace, you can even export the group membership to use for Zoom breakout rooms.
Important: Please ensure students login to the Zoom desktop app using SSO.
Step 1: Schedule a meeting
Sign in to the Zoom web portal, and then under Meetings, select Schedule a meeting. (external link)

To pre-assign participants into breakout rooms, go to "Options" and select Show. Then select the Breakout Room pre-assign checkbox.
You may:
- Create Rooms: Create your own breakout rooms and invite participants manually.
- Import from CSV: Create breakout rooms through a CSV file.
Step 2: Assign participants

Method 1: Manually assign participants by email
Create breakout rooms by selecting Create Rooms, and then add participants by entering their email.
Select the Save button when you are done.
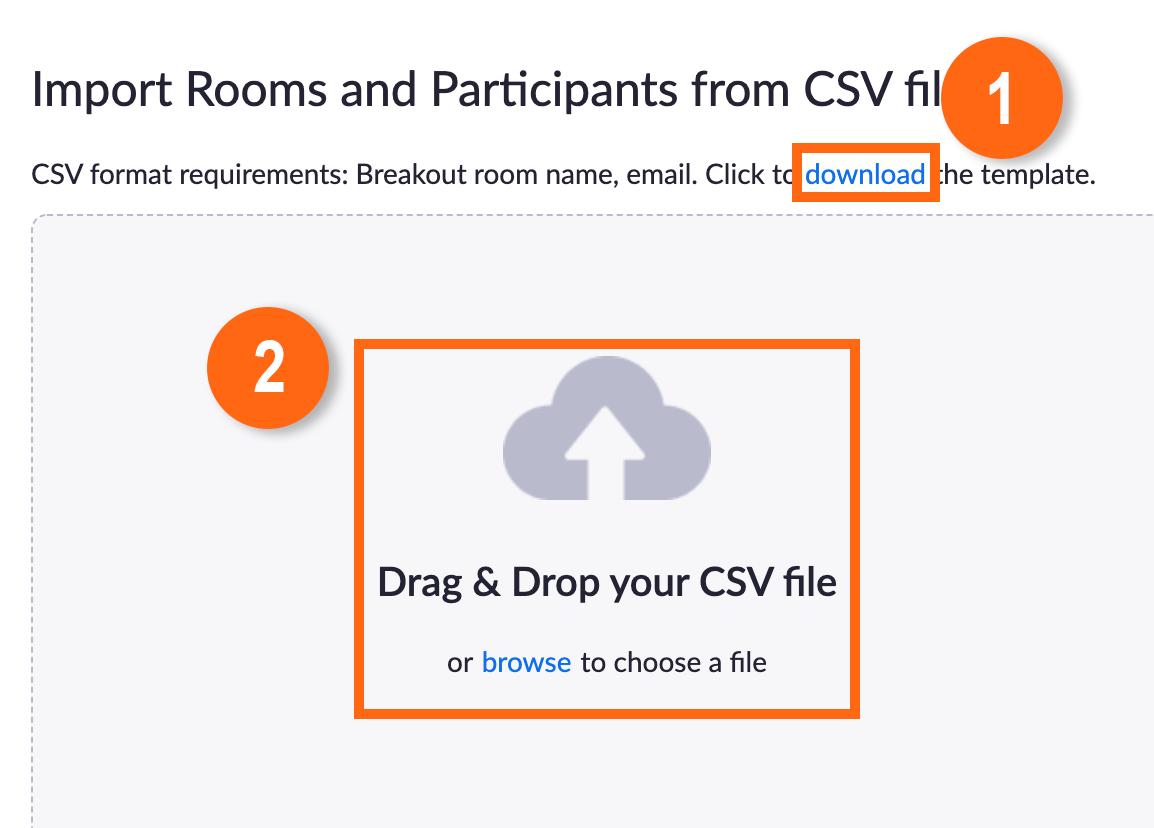
Method 2: Import CSV
First Download the template provided by Zoom in the window and follow the template. You must assign participants into rooms according to the template. See the steps below if you need to know how to export groups from D2L and update the template correctly.
Once you have updated the CSV template, upload the file by drag and drop or select browse.
The CSV should populate into the window and you are able to see the rooms you have created and the emails assigned to them. Select Save.
Step 3: Export D2L Brightspace group membership for Zoom breakout rooms
If you are using the D2L Brightspace Groups tool, you can export the group membership for use in your Zoom breakout rooms.
The instructions below cover the following steps:
- Exporting the D2L Brightspace group membership using the Groups tool.
- Preparing the data for use in the Zoom breakout rooms template.
From there, proceed to the instructions on this page for pre-assigning breakout rooms using a CSV.
Download the group membership from D2L grades

In your D2L Brightspace course shell, click on Communication > Groups in the top navigation.
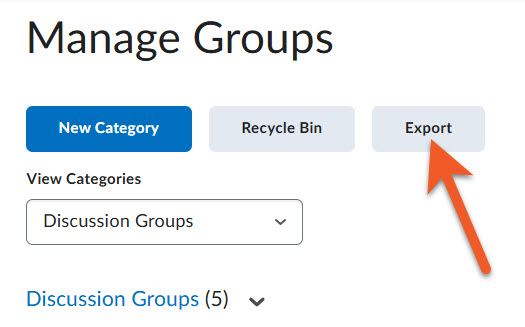
On the Manage Groups page, click on Export.
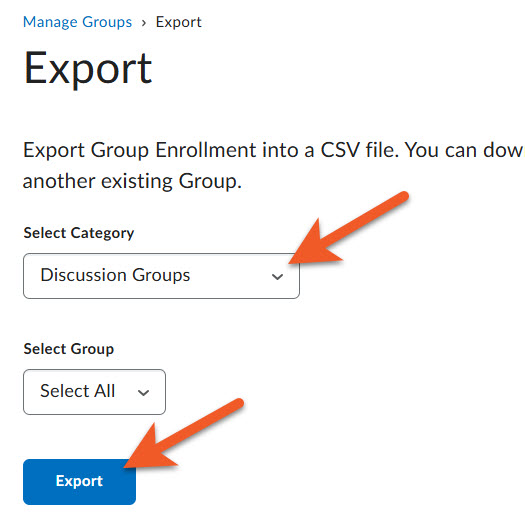
Select the Group Category that you wish to export the list of students for from the Select Category dropdown. Keep in mind that a Group Category is a set of groups, such as all the groups used for class discussions or a group project.
If you only wish to export the list of students from one group within a category, you can then select that group from the Select Group dropdown, but in most instances, you will want to see members of all groups in a given category, so leave this set as "Select All".
Click on the Export button.

Wait for D2L to generate the file. For most courses, this will only take a few seconds, but if you have a large number of groups in the category, it may take a minute or longer.
When you see the "Complete" message, click on Download, to download the CSV file to your computer. If you are not prompted for the location, you will be able to find the file where you find all of your downloaded files.
You can open the CSV file with Microsoft Excel, Google Sheets (after uploading to your Google Drive), or most spreadsheet software.
Sort and transfer the D2L groups data into the Zoom CSV template

Step 1: Open the Excel Sheet or CSV obtained from D2L into Excel and select all data columns and rows by clicking and dragging your cursor from one corner of the data to the other corner.
Step 2: Click the 'Data' tab at the top.
Step 3: Click 'Sort.'

Step 1: Sort by the column that correlates to the group number, in this case it is called ‘Group Name.’
Step 2: Checkmark the box that says 'My list has headers.'
Step 3: Click 'OK.' You should see that the data has sorted in order of group number.

Step 4:
- In the D2L Excel Sheet/CSV file, select the column with the header 'Group Name' by clicking and dragging your cursor along the cells.
- Copy the column by right clicking and selecting 'copy.'
The column will appear to have dashed lines to indicate it has been copied.

- Open the Zoom Template in Excel and select the column with the header 'Pre-assign Room Name' by clicking on the A2 cell.
- Paste the information by right clicking and selecting paste.
The column will have the information populated from the D2L file into the column.

Step 6: In the D2L Excel Sheet/CSV file, select the column with the header 'Email Address' by clicking and dragging your cursor along the cells. Then copy the column by right clicking and selecting 'copy.'
The column will appear to have dashed lines to indicate it has been copied.

Step 7: Open the Zoom Template in Excel, select the column with the header 'Email' by clicking on the B2 cell. Then, paste the information by right clicking and selecting paste.
The column will have the information populated from the D2L file into the column.

Step 8: Once both columns in the Zoom Template have been populated with the data from the D2L CSV file, on the top menu, click 'file' and then 'save as.' Select 'CSV' as your file format.
Step 9: Then click 'Save.' You can now upload the CSV file into Zoom and it will automatically import the data.
Sometimes, a student will join the Zoom meeting but won't be added into their pre-assigned breakout room.
First, be sure the students are all logged in to their TMU Zoom account using SSO. Once you are sure the students have done this, try the following.
- Start the meeting with participants pre-assigned to breakout rooms.
- Select Close All Rooms to end all breakout rooms.
- Select Recreate then Recover to pre-assigned rooms. Participants will be reorganized into the breakout rooms you specified when scheduling the meeting.
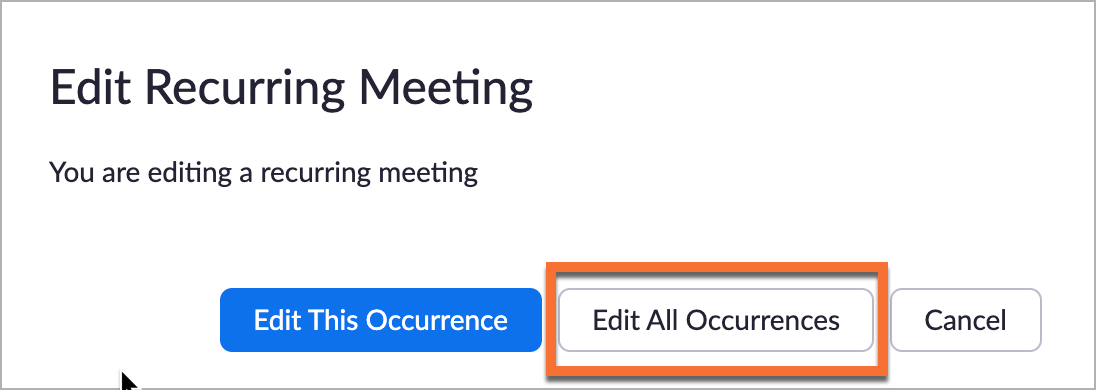
If you are using a recurring meeting, and plan to use breakout rooms, there are a few things to keep in mind.
- If you Edit All Occurrences and make a change, your existing breakout rooms may be lost and you will need to recreate them.
- You will not be able to create or modify pre-assigned breakout rooms for the individual meetings ("This Occurrence") — only "All Occurrences".
Zoom general information
Zoom is a live streaming and web conferencing tool for online meetings & seminars in real-time.

