Create a Quiz With Google Forms

You can use Google Forms to create a quiz for your students. Instructors can indicate correct and incorrect answers for multiple choice, checkboxes, or drop-down question options.
Note that D2L Brightspace already has the ability to create quizzes, with the added benefit of having quizzes link directly to assessments in D2L. But, you might want to create quizzes using Google Forms for pre-assessment quizzes and distribute these to anyone via a URL or email, not just to students in your course.
Other examples where you might want to use Google Forms might be for quick polling or surveying (similar to using iClickers).
- Create a Quiz Using Google Forms
- Create Questions and Assign Points to Questions
- Add Explanations to Answers
- Add an Image or Video to a Question or Answer
- Add an Image or Video on Its Own
- See Quiz Responses
- See a Summary of Responses
- Choose What People Can See After They Submit
- Send Results via Email
- Distribute the Quiz to Your Class
Getting Started
- Create a new Google form, or open an existing Google Form.
- At the top right corner, click Settings
 .
. - Click QUIZZES.
- Next to "Make this a quiz" click the switch
 .
.

- Click SAVE.
- To add a new question to your quiz, click Add
 .
.
(Remember, you can only indicate points values, and correct and incorrect answers for multiple choice, checkboxes, or drop-down question types)
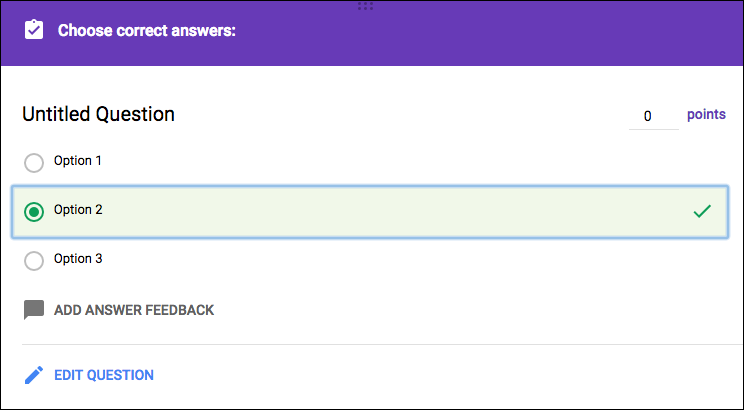
- Fill out your question and answers.
- In the bottom left, click ANSWER KEY.
- In the top right of the question, choose how many points the question is worth.
Note: To go back and edit the question or options, in the bottom left, click EDIT QUESTION.
Note about multiple choice questions:
- Users only have the option to select one response if the question type is either “Multiple Choice” or “Dropdown”, but the ANSWER KEY allows the instructor to select multiple answers as being correct. If you have indicated there is more than one correct answer, the student will get full points for selecting ONE of the correct answers.
- “Checkboxes” allow students to select multiple answers. They must select all correct answers to get points for the question for this question type.
- There is no option to grant partial points awarded to students.
You can add links, videos, or websites to answers to explain them further. Respondents will see your feedback only after they finish the quiz.
- Click a question.
- Click ANSWER KEY.
- Click ADD ANSWER FEEDBACK.
- Type feedback for "INCORRECT ANSWERS" and "CORRECT ANSWERS," then click SAVE.
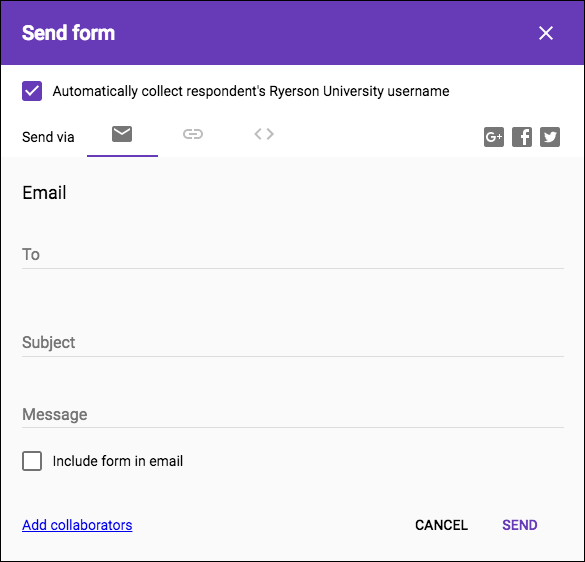
- Click the Send button in the upper right hand corner.
- Next, you have three options to distribute the quiz to your class.
A. The first option is to send via email, where you can add email addresses of your students in the “To” field (you could also use your course Google Group address)
B. Secondly, you can use the “Send via” link. Click on the link icon as shown below:
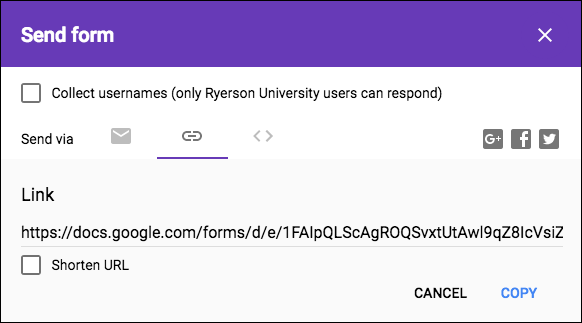
Click Copy to copy the full URL to your clipboard. You can then paste this URL into an email, for example.
Note: You may first want us the check box to “Shorten URL” to display a shortened version the link. Both the long and shortened URLs will work to link back to your quiz. If you are presenting the link in class, it will be easier for students to retype a shortened URL.
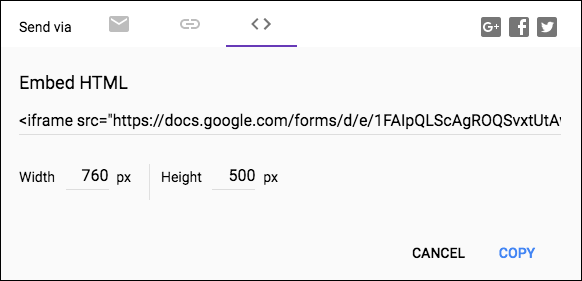
C. Lastly, you can use the embed code from the quiz to embed in a website, such as D2L. Click the < > option beside the “Send via” to COPY the embed code.
For more information on how to view and manage form responses visit Google’s support site (external link) .
Add Images or Videos
To add an image to a question:
- Click a question.
- To the right, click Add image
 .
. - Upload or choose an image.
- Click Select.
To add an image to an answer:
- Click a multiple choice or checkbox question.
- To the right of the answer, click Add image .
- Upload or choose an image.
- Click Select.
You can add an image or YouTube video to your quiz.
- In your Google Form quiz, click Add Image . To add a video, click Add Video
 . You can’t add videos to questions, but you can place them before or after a question.
 - Choose your image or video and click Select.
View Responses
An instructor can see automatic summaries of all the responses to a quiz, including:
- Frequently missed questions
- Graphs marked with correct answers
- Average, median, and range of scores
Note: The actual point scores of the quiz are visible in the form summary. The total points are not included in an underlying spreadsheet and currently cannot be exported.
- Open a quiz in Google Forms (external link) .
- At the top, click RESPONSES.
- Click SUMMARY.
Note: To look at individual student’s responses, click INDIVIDUAL to scroll through each response.
Quiz Results
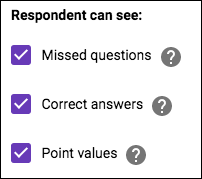
You can choose what people can see during and after they submit their answers:
- Missed questions
- Correct answers
- Point values
To change options:
- Open a quiz in Google Forms.
- At the top right, click Settings
 .
. - Click QUIZZES.
- Under "Respondent can see," check the boxes next to the options you want.
You can collect usernames for those submitting a quiz response and hold onto results until you’re ready to share them. This requires your students to log into their TMU Google Apps account. If they are logged into a personal Gmail account, this may conflict, giving them the warning that they do not have permission to access this quiz. They simply need to log out of any personal Gmail accounts. Below are instructions on how to send quiz results to students via email.
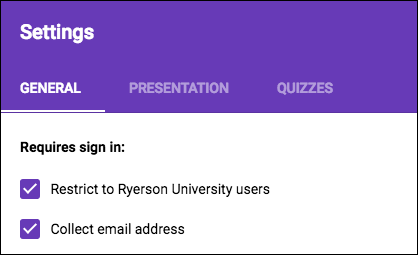
Collect Email Addresses
- Open a quiz in Google Form.
- At the top right, click Settings .
- Under "GENERAL," check the box next to "Collect email address."
Choose When to Release Grades
- At the top right, click Settings .
- Click QUIZZES.
- Choose an option:
- Immediately after each submission: Choose this option if you want people to get their results right away.
- Later, after manual review: Choose this option if you want to email results later.
Email Results
- Click RESPONSES.
- Next to "Scores," click RELEASE SCORES.
- Check the boxes next to who you want to email.
- Click SEND EMAILS AND RELEASE.