Managing Global Google Room Resources in Google Calendar
- Open Google Calendar.
- Select the "+" sign next to Other Calendars.
- Select Browse resources.
- Select the building or location for the resource you would like to add.
- To add the resource to your My Calendar list, select the checkbox next to each resource you wish to add.
Hover over the room calendar in the list under “My Calendars”. You’ll see a drop down arrow to the right of the Calendar’s name, select that arrow and select Settings and sharing as shown below. If you do not see the option to Settings and sharing then you do not have the permissions to do this operation for this room.

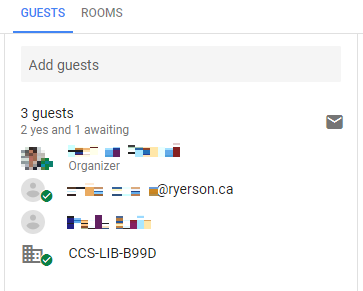
The Settings and sharing screen, displays a list of all the people or groups who have permission to book a meeting in this room.

If you need to add or remove someone, you can manage this yourself from this screen.
Add someone new by adding their email address in the box indicated Add People and selecting Permissions Settings for them to the right (drop-down menu). Everyone listed here except you as the owner should have the minimum Permission Setting: “See all event details”
- In order for all users to be able to successfully schedule a resource, it must be shared as See all event details with the users who need access to book the room. If you share with lesser settings, your users may be able to schedule the resource, but the resource will always decline the event.
This “See all event details” allows them to reserve this room for their meeting when creating a new event in the “Rooms, etc.” option. If you wish to give some or all of your users higher permissions to the calendar, such as the ability to also manage the sharing, and to directly make changes to any events on the calendar “Make changes AND manage sharing” permission, this is equivalent to what the owner has permissions to do. Please review the other calendar sharing permission setting options and select the appropriate setting for each user or group:
- Make changes AND manage sharing: This person will have owner rights to your calendar. You cannot grant someone outside your domain this level of access
- Make changes to events: This person can see and change events directly on the calendar, including private events. You cannot grant someone outside your domain (TMU) this level of access
- (minimum setting) See all event details: This person can view the details of your events, except those marked as private. This person will also be able to reserve this resource.
Sharing the calendar with the public, will allow anyone with access to the calendar to see all event details (except private events) and will allow anyone to book the resource.
Delete Users
If you need to delete someone who no longer needs access to reserve this room, you can select the trash bin located to the right hand side of their name to remove their access to this calendar.
- Open your Google Calendar either through logging into my.torontomu and clicking on the Apps tab, or if you’re already logged into your TMU Gmail, simply select on the Apps grid at the top right of your screen to open other Google Workspace apps:

- Create a new event. If you are inviting other guests to your meeting, locate the Guests to the right of your event. Start typing their email addresses to bring up the Global Address List (type their name and/or email address) and select Add.

Booking a room for your meeting: Separately, you can now book a resource such as a room, lab, etc. By clicking Rooms, etc. A list of Rooms becomes visible. The rooms can be ‘busy’ searched for available time, but availability for your requested meeting time is indicated by the green square and by default, only those rooms that are available, display. A user will only be able to book a room if the owner has granted them permissions. In this below example, CCS meeting rooms are available for this user to book a meeting in.

If you deselect the Show only available checkbox, you can also see other rooms that are unavailable during your selected time, rooms that are busy are denoted by the red box and x. Trying to book a room that is busy will result in the request being rejected, but you can change your date & time if you need that specific room, etc. or see step # 5 on how to busy search.
Example of the view showing all rooms free or busy for your selected meeting time:

- Click Add beside a resource that is free to reserve this room. By default, you can only view rooms and resources you have permission to book. The room will automatically accept meeting requests for this room if no conflict exists if that’s how the administrator set-up the resource. Adding a resource automaticallypopulates it’s name in the “Where” field of your meeting so your guests will know where to go:

- Busy Searching:
Before you send the invitation to guests, or if you’d like to compare the availability of multiple rooms and resources, add any resource you’d like to busy search, (multiple selections are fine), and select the Find a time tab to see a list of guest, resources, etc. to check all availability, scrolling to other days if need be.
Back in the Event details, simply remove any of the rooms, etc. you aren’t going to book. - Click Save and send the invitations to your guests to notify them about the event.
- If you have tried to reserve a room etc. that someone else had already booked, OR, if the room was set up with an admin that approves or rejects all event requests for the room, you will get an email notification notifying you the room has rejected the booking. You can edit the event and add a different resource if possible. Otherwise, you’ll see that the room was accepted (either automatically or by an admin when the room shows a checkmark beside it in the event):
Note: You, as a room owner, or anyone who has manage this calendar or higher permissions can also book time slots directly on the calendar as you’ll have the ability to select resources you manage in the Calendar drop down box as shown below. By default, it’s always your own calendar meetings get created on, unless you change this. Be careful how many people have access to do this as double bookings may occur when too many people have permissions to make changes to events and don’t have to go through the typical booking process!

Keeping Your Meetings Private in Google Calendar
In order to make automated booking of meeting rooms available in your Google Calendar everyone who has permission to book a room can see all the calendar events in the room. They can see the title of the event/meeting, who is attending, and any other information you place in the event or attach to it.
In order to keep your meeting private you must mark the calendar event private when you create it. Here are the selection choices:
We strongly recommend that you check every calendar event you create. If you have included a meeting room in the invitation list, take a moment to mark the meeting private. Information regarding private meetings is still available to all the attendees.
Please note: this also applies to the automated booking of equipment and any other Google Calendar resource.
Viewing resource calendars on your Google Calendar (Subscribing)
Sometimes it’s helpful to get a snapshot of a meeting room, or other Google resource directly on your calendar. You can subscribe to those rooms, etc. you have access too by:
- Clicking on Other Calendars.

- Click Browse Interesting Calendars.
- Click the More tab.
- Click Resources for ryerson.ca.
- Find your rooms and select Subscribe. This will add the calendar to your list of Other Calendars. You can not subscribe to a calendar you do not have permission to book.
Then to view or hide any calendar view, simply select the calendar to turn the view on and off. You can change the display colour, which will not change it for everyone.
Using Google Groups to control access to your room(s) (Optional):
While you can add individual people one at a time, if you have several rooms for your departments, we recommend requesting a “Google Group” that you can use not only to centrally manage all of your members that need access to similar resources, but to also use as a mailing list. Please see more information on Google Groups.
How your colleagues can view resource calendars right on on their Google Calendar (Subscribing)
Sometimes it’s helpful to get a snapshot of a meeting room, or other Google resource directly on your calendar. As an owner, your room calendars appear in your “My Calendar” list. But your users will not have these calendars listed. They can subscribe to those rooms by doing the following:
- Clicking on Other Calendars.
- Click Browse Interesting Calendars.
- Click the More tab
- Click Resources for ryerson.ca.
Find your rooms and select Subscribe. This will add the calendar to your list of Other Calendars. You can not subscribe to a calendar you do not have permission to book.
Then to view or hide any calendar view, simply select the calendar to turn the view on and off. You can change the display colour, which will not change it for everyone.
While not the default setting, a common use for resource notifications is if you want to have a "resource manager" who approves or rejects the scheduling of a given resource. Perhaps you have a resource that you want to restrict to certain users at particular times of day. You can set it up so the resource manager gets resource booking request notifications and can then accept or decline events on behalf of the resource.
To set up a resource manager (you must have permission to share the resource calendar with others)
- Go to My calendars, select the down-arrow by the desired resource, and select Share this Calendar.
- Share the resource (external link) with specific people who are allowed to book the resource.
- Give the resource manager (either you or someone else) permission to Make changes AND manage sharing.
- On the Calendar Details tab, set Auto-accept invitations to be Automatically add all invitations to this calendar.
- As the resource manager, arrange to get notifications for the resource using the steps at the top of this article.
Now when a user creates an event and schedules the resource, the resource is invited but does not automatically accept. The resource manager gets notified about each new or changed event, and can then accept or decline the event on behalf of the resource.
To accept or decline events for a resource:
- If you haven't already done so, set up a resource manager as described above.
- As the resource manager, when you get notification about a new or changed event, select more details in the notification email. The notification will be titled "New Event" (versus "Invitation"). This takes you directly to the event.
- In the event, indicate whether or not the resource is attending and select Save.
Note: **If you're personally invited to the event, you'll receive an "Invitation" message for yourself, plus a "New Event" message for the resource to accept or reject for the resource. To respond for yourself and separately on behalf of the resource, you may need to navigate to the appropriate instance of the event from your calendar. To see all the events for the resource, highlight the resource calendar in your Other calendars list (or My calendars list if you're a Google Workspace administrator).
For additional questions or support issues regarding Google Resources (rooms), please contact the CCS HelpDesk at x 556806 or help@torontomu.ca.