Facilitate a class collaborative activity using Google Workspace
The various tools in Google Workspace offer a flexible way of engaging students in activities in real-time. Facilitate group and class-wide activities by having participants all contribute ideas to the same interface (Google Doc, Sheets, Slides, Jamboard, Drawing, etc.).
Features such as version history, commenting and real-time updating make these a great fit for interacting with students that are participating both in-person and remotely.
This workflow leverages Google Groups and the setup of shared Google Drive folders to organize and share the resources. Once these are created, it's easy to share resources and create collaborative activities!
Google Drive can be found in my.torontomu.ca, under "Apps".
 (external link)
Watch the workshop
"Teaching with Google" (external link)
IMPORTANT: The students will be able to see, modify and delete each others' contributions to the collaborative activity subfolder. Please consider this carefully when planning the activity.
When you request a "Course Shell", both a Brightspace shell and Google Group are created. Anyone you add to the shell using Self Service - including sections of students, TAs and co-Instructors - are added as members to both the Brightspace shell and the Google Group.
If your "Course Shell" has already been requested, you should have received a confirmation email with the "shell code".
If the shell code is abc123_w22_01, the Google Group address is abc123_w22_01@torontomu.ca.
Use this address to email your Google Group members and share resources in Google Drive.
You can also go to Google Groups directly and find your group.
Next, create a class shared folder in Google Drive that you can use to share materials with your students, as well as collaborative Google Drive activities.
Our recommendation is to only give the students "Viewer" access to the shared folder, so you have more control over the sharing of various pieces of content and subfolders within the folder.
Create a new folder in Google Drive
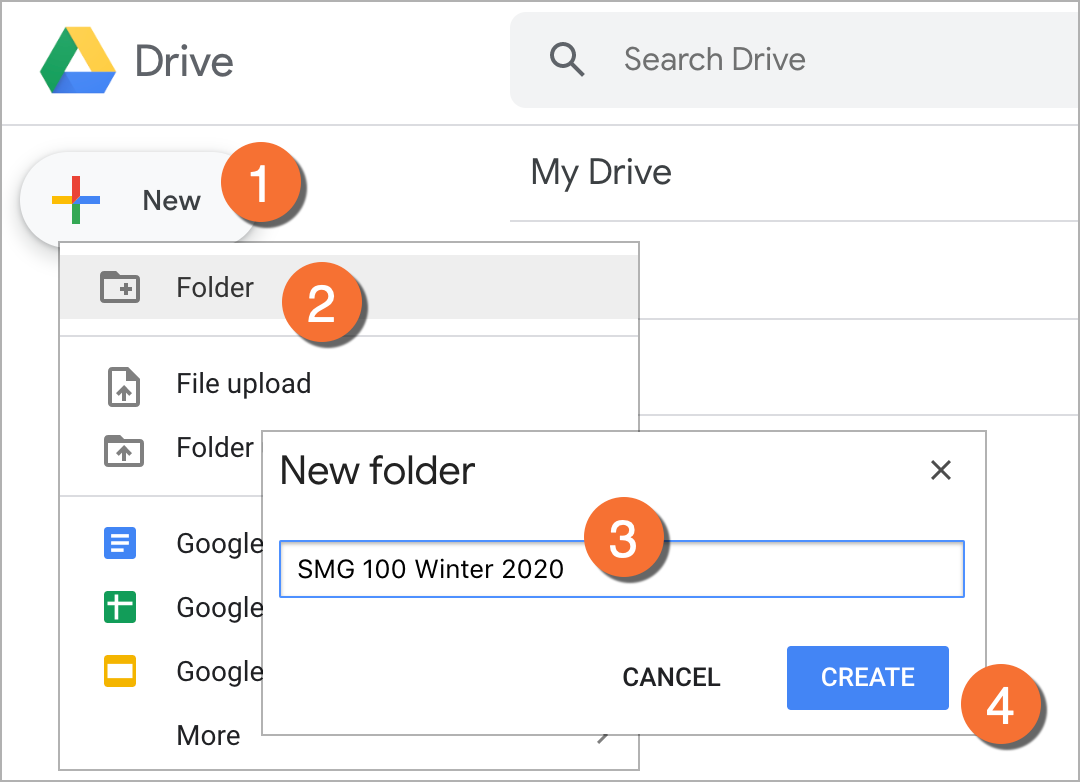
- Click the "New" button in the top-left corner of Google Drive.
- Click "Folder" in the menu.
- Enter a name for the new folder. We recommend using a combination of your course code, term and section number (if appropriate).
- Click the "Create" button at the bottom.
Note: you can create folders within this folder to further organize the content you wish to share with your students.
Share the folder with your class Google Group
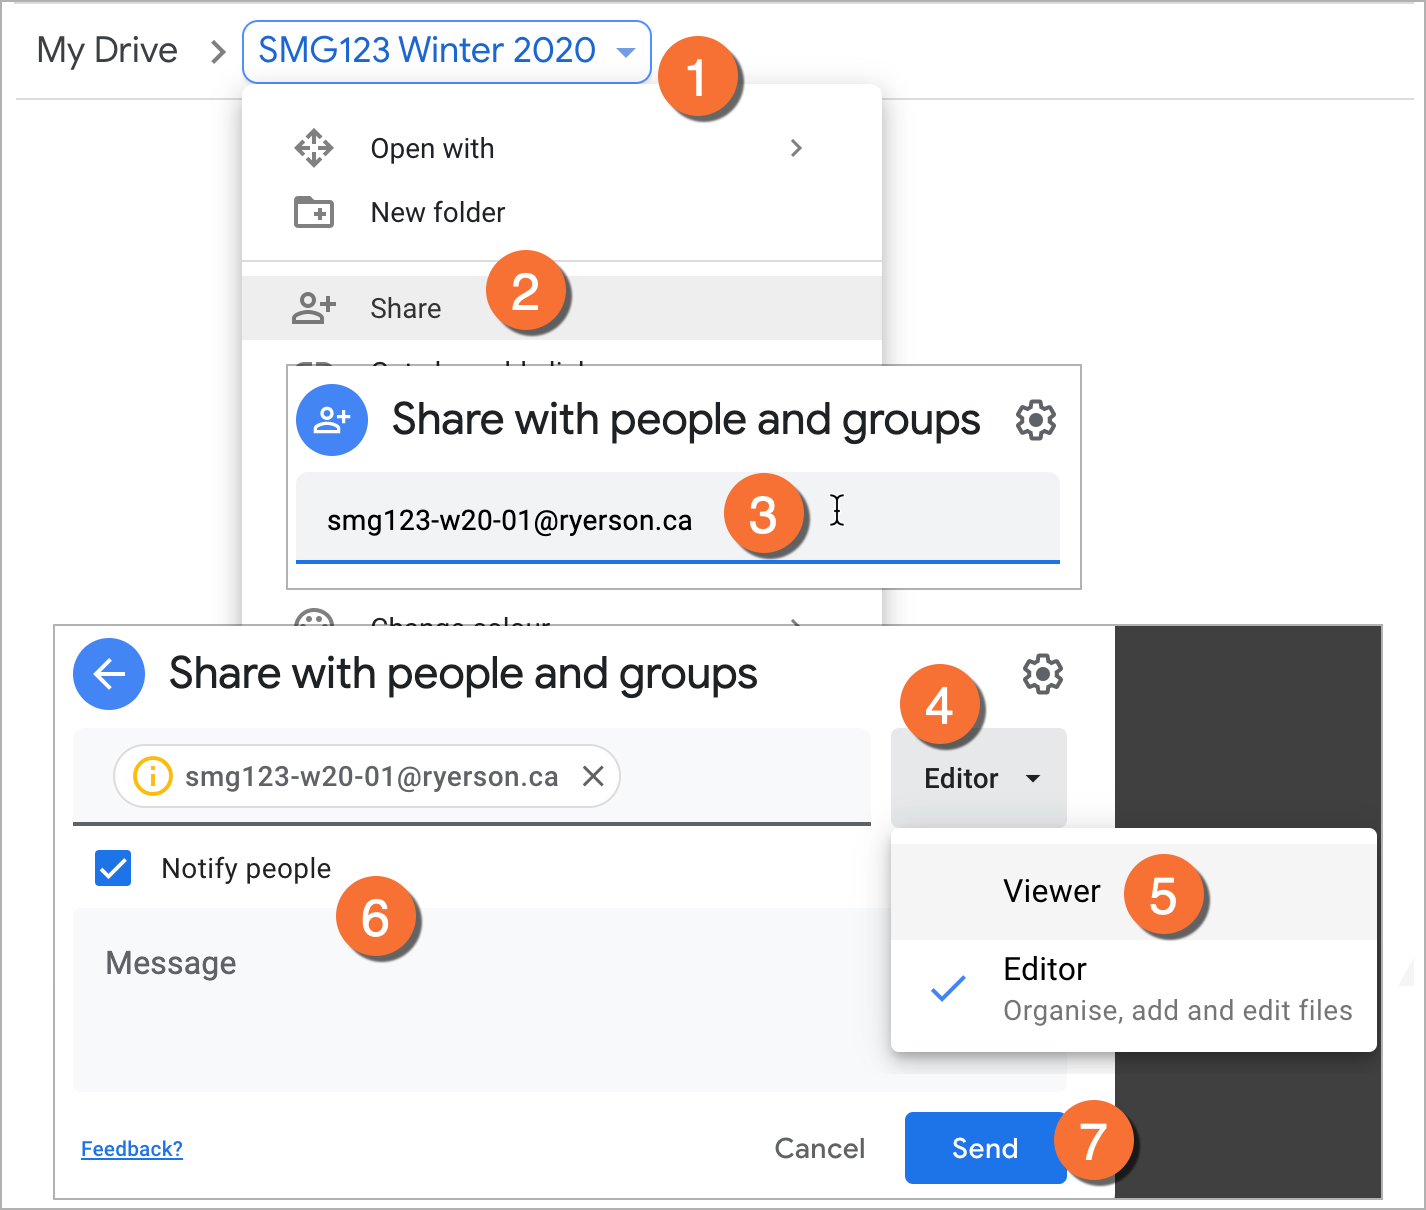
- Go to the top of the main Google Drive window, and click the arrow next to the name of the folder.
- Click "Share" in the menu.
- On the "Share with people and groups" screen, type in the email address of the Google Group you created for your class. Hit the "Enter" or "Return" key on your keyboard.
- The window will update with some additional details. Look to the right of the class email address - you should see a dropdown menu, possibly with the label "Editor". Click this to review the sharing permission options.
- We recommend setting the permission to "Viewer", which will only allow your students to view the contents of the folder and not edit them, nor make changes to the folder itself.
- You may want to write a message to let the students know about the new class folder. An email will be sent to them with a link to the folder. Alternatively, you can uncheck the "Notify people" checkbox if you would prefer not to notify the students about the shared folder.
- Click the "Send" or "Share" button to proceed with the changes.
Note: Users will be required to login with only their Toronto Metropolitan University Google account in order to access this content.
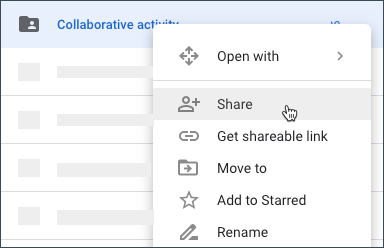
- Make sure you are inside your course shared folder in Google Drive.
- Click New > Folder and create a new subfolder for your activity. Give it a clear and concise name that everyone will understand.
- Right-click on the new folder and click "Share".
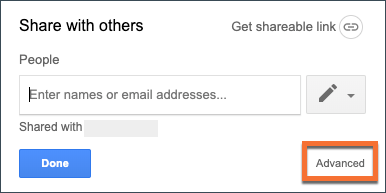
- Since the class Google Group already has read access to this subfolder (inherited from the class folder), you will need to click on "Advanced" to upgrade their access.

- Locate the class Google Group in the list of "Who has access" and click their dropdown menu (it will likely appear as an eyeball icon).
- Select "Can organize, add and edit"
- Check the box to "Prevent editors from changing access and adding new people". This ensures the students cannot add other users to the folder.
- Click the "Save changes" button at the bottom of the page.
- On the subsequent page, click the "Done" button at the bottom of the page.
IMPORTANT: The students will be able to see, modify and delete each others' contributions to the collaborative activity subfolder. Please consider this carefully when planning the activity.
Tips for creating a "collaborative activity"
Time to be creative and plan a collaborative activity using Google tools!
Simply create a new item in the collaborative activity folder, using one of the available options: Google Doc, Google Spreadsheet, Google Jamboard, Google Drawing, Google Form.
Since the entire class has edit access to the contents of this folder, you won't have to worry about setting the permissions -- just be aware of them (see the note at the top of this page).
To add a new document to the folder in Google Drive:
- Make sure you are inside the folder where you want the activity to be created.
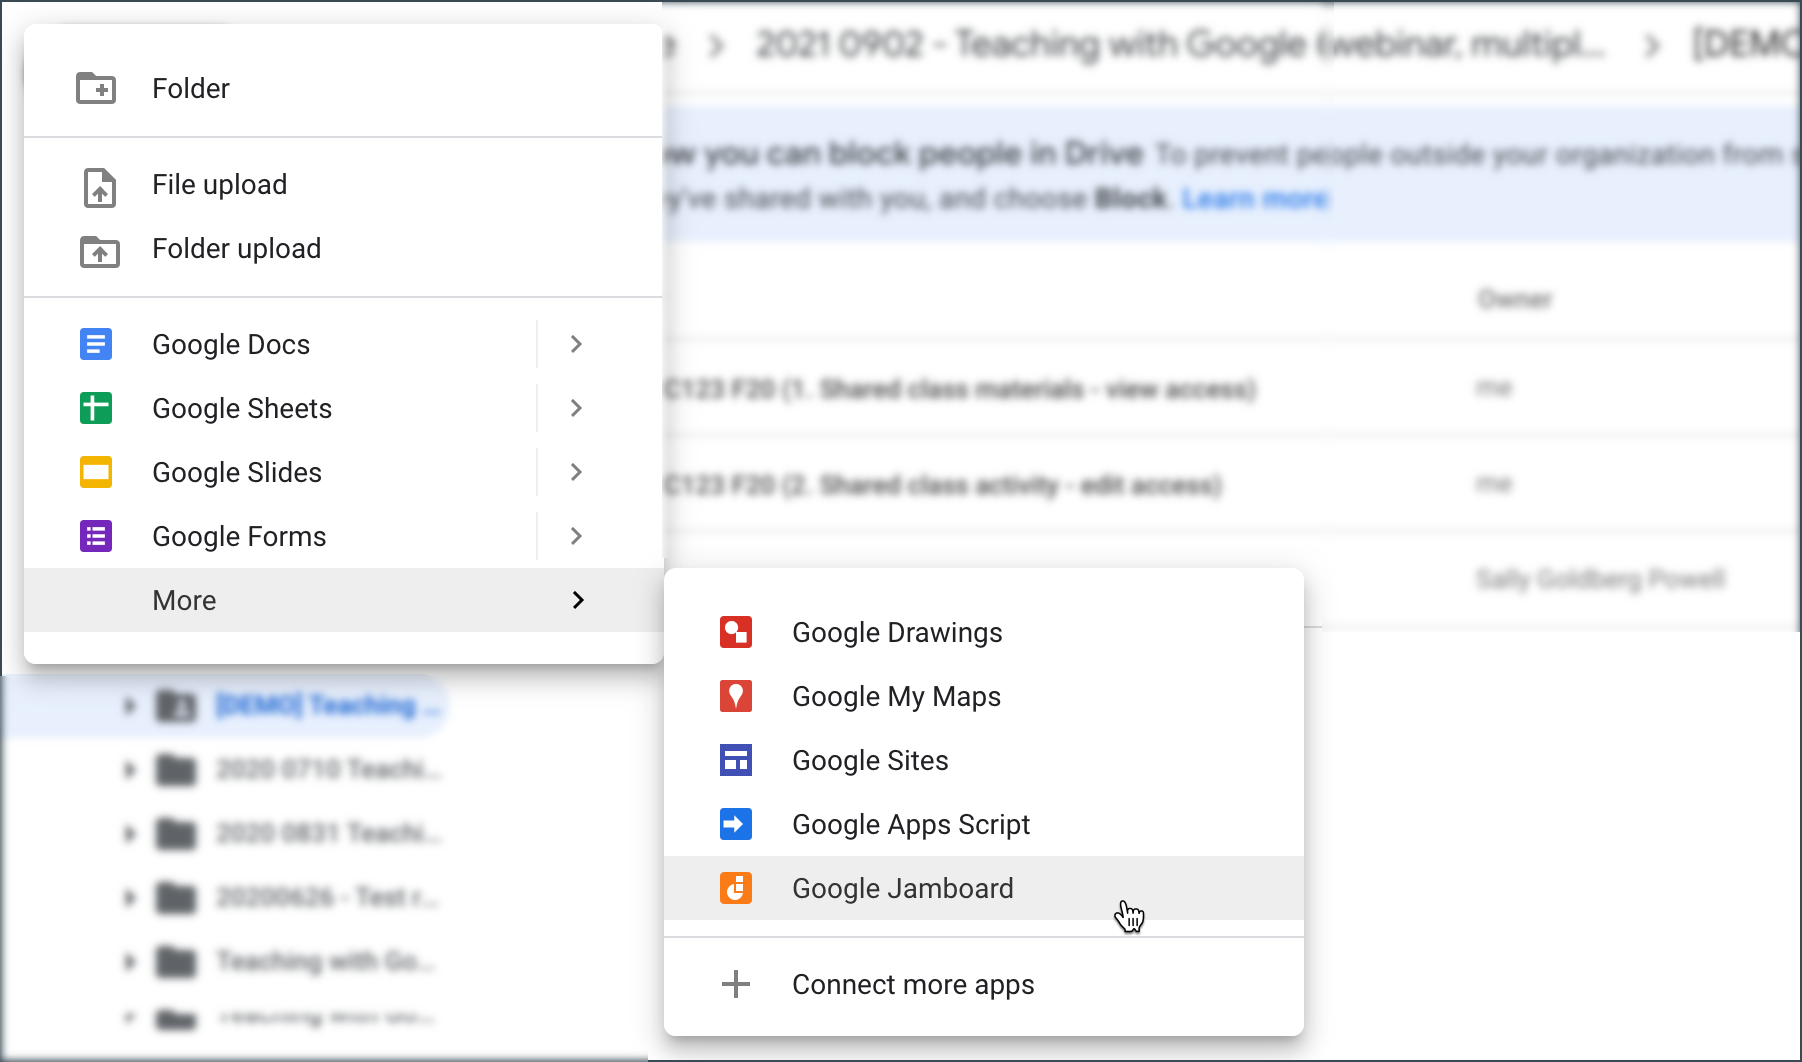
- Click the "New" button in the top-left corner.
- From the resulting menu, click the name of the type of document you want to create (such as Google Docs, Google Sheets, etc.). If you do not see the type listed, click the "More" link at the bottom to see the extended list of tools.
The various tools in Google Workspace offer a flexible way of not only delivering content, but engaging students in activities in real-time. Here are some examples of how you can use Google Workspace for developing collaborative activities:
| Google tool | What can this be used for? | Resources |
|---|---|---|
| Google Docs (Documents) |
|
|
| Google Sheets (Spreadsheets) |
|
|
| Google Jamboard (Whiteboard) |
|
|
| Google Drawings (Diagrams and charts) |
|
|
| Google Slides (Presentation slides) |
|
|
| Google Forms (Data collection) |
|
|
We've heard from many instructors who would like to share content, but prevent it from being downloaded by the students.
This isn't something that can be set on an entire folder - you need to enable it on each item.
This will not prevent students from recording their screens, taking photos/screenshots or copying and pasting sections of text.
This setting does not disable downloading for those with edit access to the item.
- Create or upload an item into your shared Google drive folder.
- Right-click the item, then select "Share".
- In the "Share with people and groups" pop-up, look to the top-right and click the settings icon.
- Some new options will appear - un-check the box "Viewers and commenters can see the option to download, print and copy".
- Click the arrow to go back to the sharing settings.
- Click "Done".
Once you have created content and folders in Google Drive and set the sharing settings so that your students can access them, how do you provide them with the links?
We recommend posting the links to your class Google resources and activities to the Content tool in D2L Brightspace. This is an ideal place to collect all class resources so students can easily find them.
You may also choose to provide links via email or other tools in Brightspace, like Announcements... but we recommend also having the links available in the Content.
Copy the link from Google
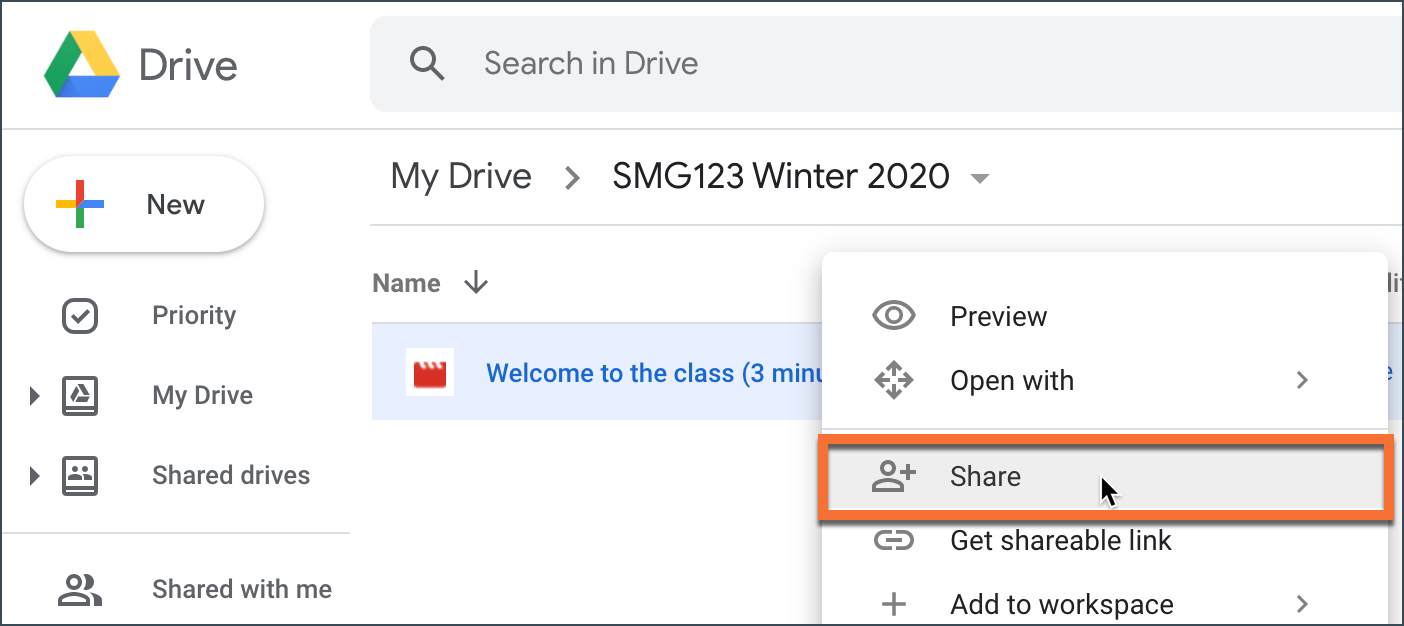
For Google folders and documents (like Google Docs, Google Sheets, Google Slides, etc.):
- Right-click the folder or item, and click "Get Link".
- On the pop-up, click the "Copy Link" button to copy the link into your browser's clipboard.
- Paste this into a text editor, so that you have a copy of it for the next steps.
"Create a Link" in the Brightspace Content tool
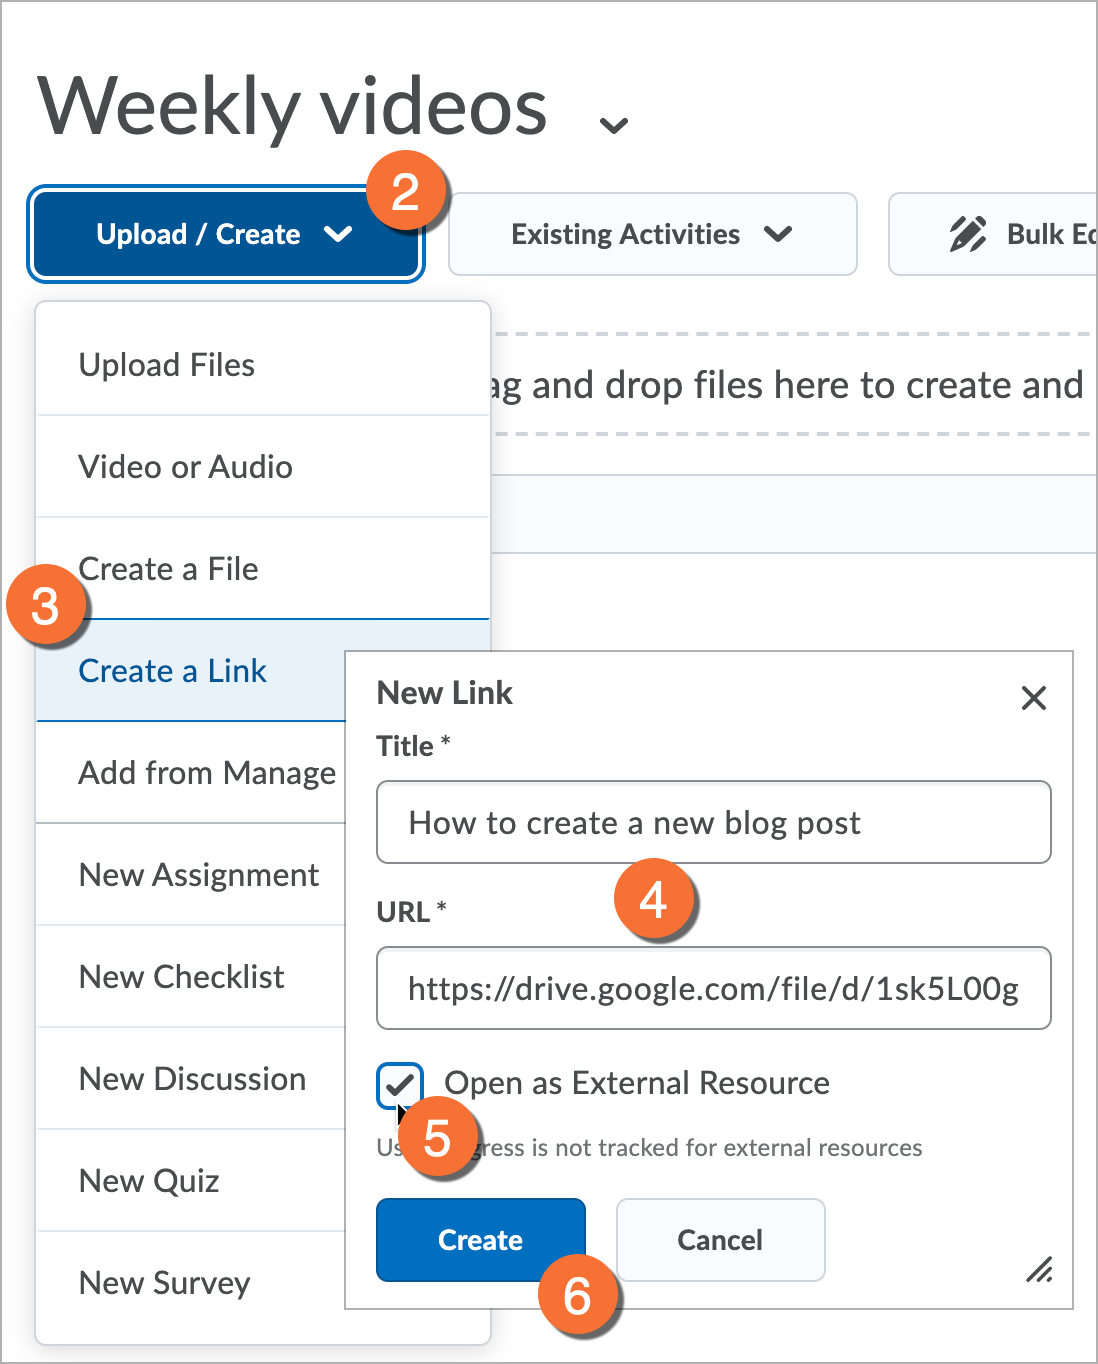
- Login to D2L Brightspace, enter your course shell, and go to the Contents tool.
- If you already have a module in which you would like to share the audio/video link, go into that module. If not, create a new module.
- Click the "Upload / Create" button, then "Create a link".
- Give the new link a title, then paste the address of your Google Drive file into the "URL" field.
- You may need to check the box "Open as External Resource" if your files are located in a Google Shared Drive or if you are linking to a folder. Otherwise, you may choose to leave this unchecked.
- Click the "Create" button.
As long as the Google Drive folder has been properly shared and the students are only logged in with their Toronto Metropolitan University Google account, the audio/video should play directly in D2L Brightspace.
Are your students emailing you to request access to a Google document that you know you have already shared with the class?
It may be that the student has another Google account that is conflicting with their Toronto Metropolitan University account, and is preventing them from accessing your shared resources.
Here is a workflow that should prevent this problem.
These instructions can also be found on the student guide to accessing content in D2L Brightspace - please feel free to share it with them.
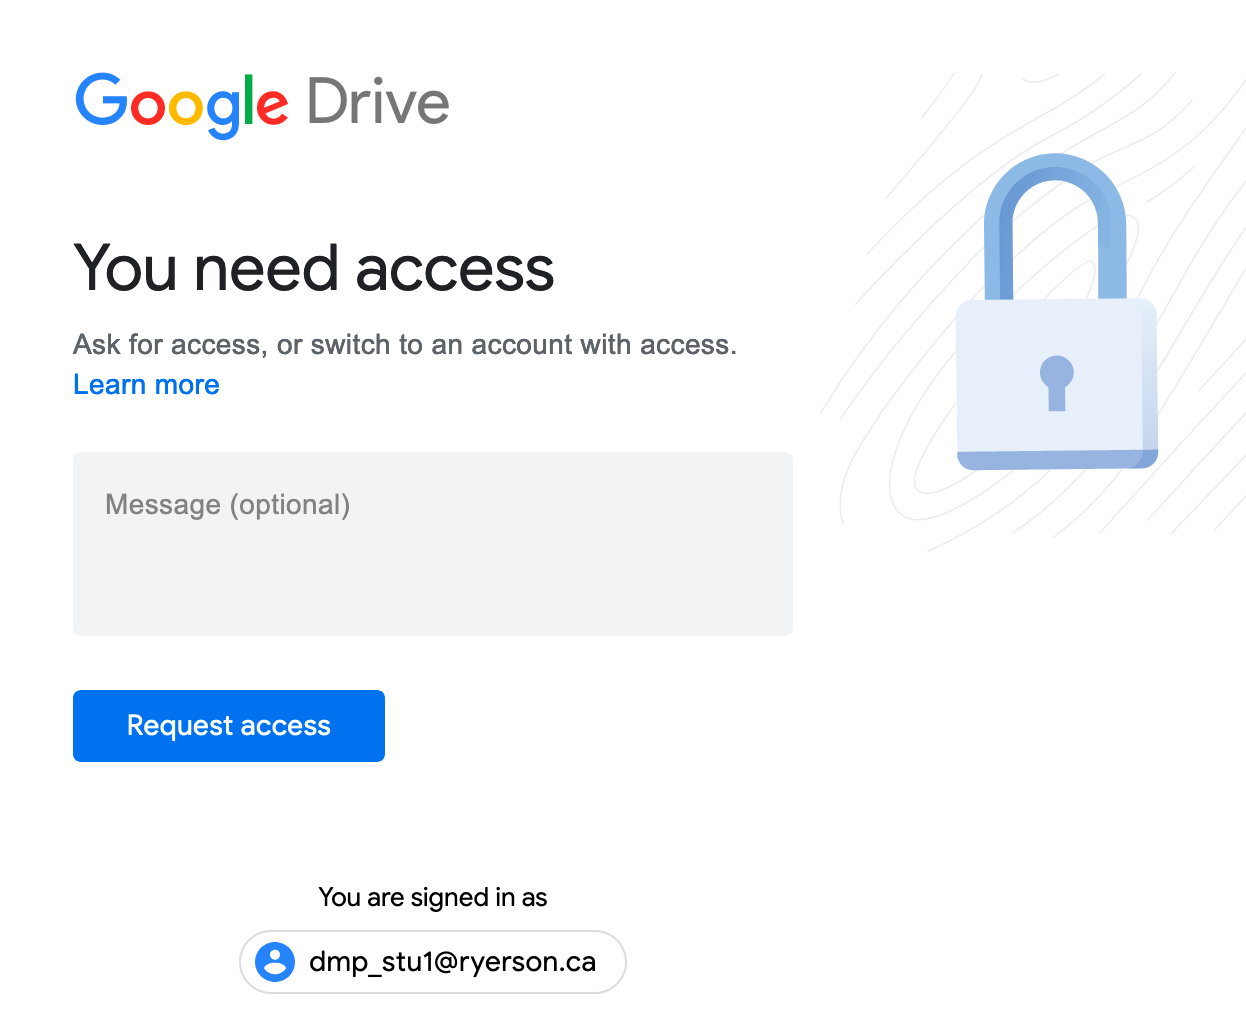
These steps will help to ensure you can access content that is shared with you from Google Drive.
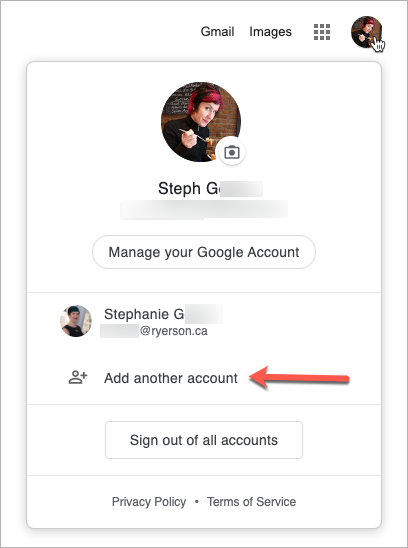
- Go to google.com (external link) and click on the user icon in the top-right corner. Not only will this page tell you which account you are currently logged into, you will be able to logout or add your Toronto Metropolitan University account to this list.
- Once you get to this screen, you can either "sign out of all accounts" (the quick method) or click "add another account" and then proceed to login using your Toronto Metropolitan University email address and password. (In the example here, you will see that I have both my Toronto Metropolitan University account and my personal account listed)
- Go to my.ryerson.ca and log out completely. You're going to start the login process from scratch.
- After logging out, log back in at my.ryerson.ca. Complete the remaining steps within 30 minutes.
- Click on Apps and open Google Drive, just to ensure you have a new session in your Toronto Metropolitan University Google account.
- Proceed to the page or application from which you are trying to access shared Google content (D2L Brightspace, email, or another application used in your course).
The "quick method" (logging out of Google) is useful for a one-time access of materials, but adding your Toronto Metropolitan University account will ensure your access isn't impeded long-term. If your course relies heavily on materials shared from Google Drive, adding your Toronto Metropolitan University account may be the better option.
Another tip: use a different web browser for your Toronto Metropolitan University work than for your personal communications. We recommend using Chrome if you use Google tools at Toronto Metropolitan University frequently, so consider using something like Mozilla Firefox or Safari for your personal accounts.